

[The King of Fighters AFK Tips] Essential Team Composition for 'Attack & Crit DMG' Buff Fighters
[킹오파 AFK 꿀팁] 팀 편성 핵심 '공격력&치피' 버프 파이터

When putting together a squad in 'The King of Fighters AFK' (hereafter KOF AFK), the primary concerns are synergy and elemental attributes. Synergy kicks in once you field two to three fighters sharing the same trait, while matching elements against a raid target or boss's weakness is the effective way to stack up extra damage.
But there's more to squad building than just those two pillars. You need to keep a close eye on the active skills—specifically the buffs and debuffs. From raw attack and crit damage boosts to defensive buffs, getting the right mix is what separates a decent team from a powerhouse. To save you the headache, KookminTree has compiled the essential allies who pack these offensive buffs.
Boosting the main damage dealer's weight class: 'Attack Power Increase'
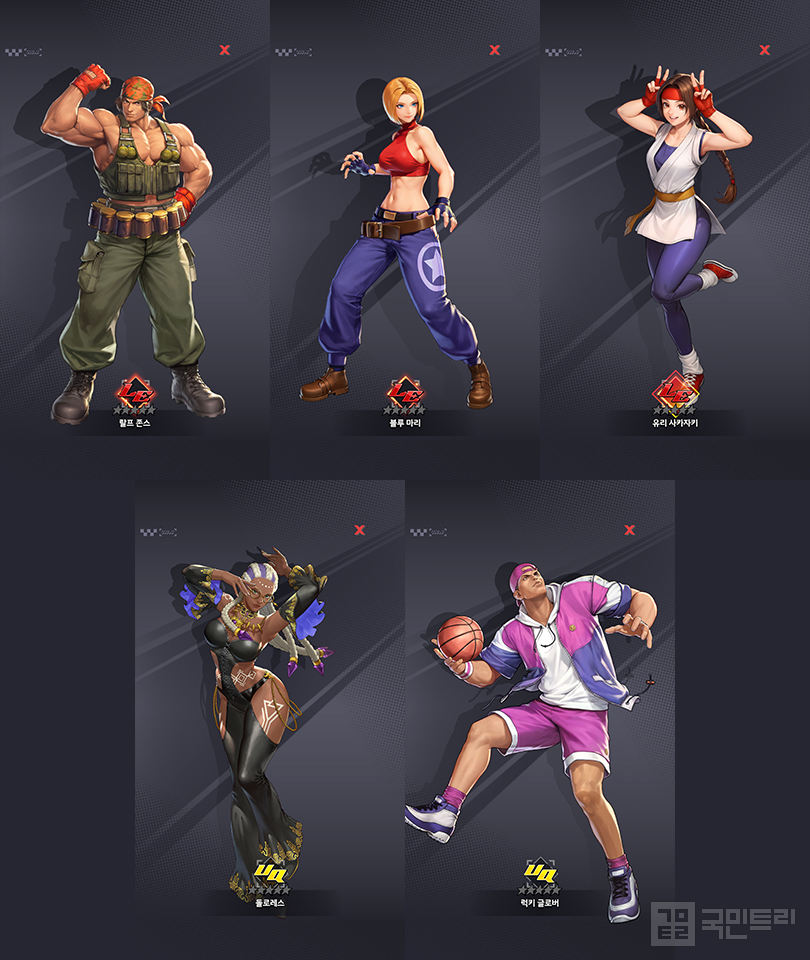
There are five primary fighters for this role: Legends Ralf, Mary, and Yuri, alongside Uniques Dolores and Lucky. Naturally, higher rarity means higher buff levels and beefier coefficients. If you haven't managed to pull the Legends yet, do yourself a favor and slot in one of the Uniques.
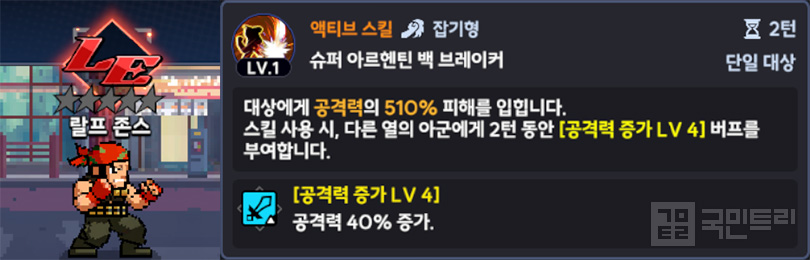
Ralf uses an active skill to grant [Attack Power Increase LV4] for two turns to allies in a different row, bumping attack by 40%. Crucially, don't place Ralf in the same row as the fighter you want to buff. Ralf gains a 20% max HP boost when stationed in the front, making it ideal to keep your main DPS in the back while Ralf holds the line. At 5-star ascension, the coefficient climbs to 50%.
Push Ralf to 7 stars, and the finish skill adds [Crit Damage Increase LV2], granting a 30% crit damage boost. Reach 10 stars, and that level hits 3 with a 45% coefficient. Effectively, a well-invested Ralf acts as a dual-buff machine for your backline. With the 'Solid' synergy, which boosts allied HP and crit damage resistance, Ralf is a sturdy babysitter for any main dealer.
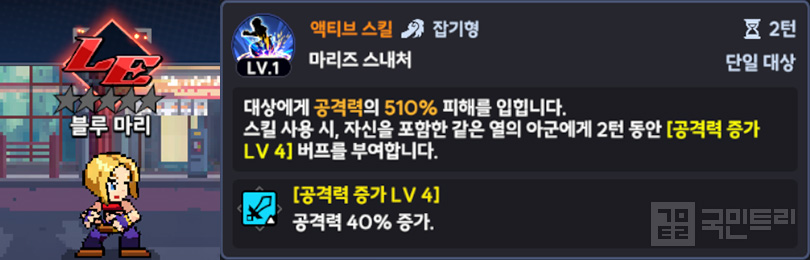
Unlike Ralf, Mary grants [Attack Power Increase LV4] to allies in the same row, including self, for two turns. Since Mary's passive grants a 20% agility boost when placed in the back, pairing Mary with your main DPS in the rear is the way to go.
Like Ralf, Mary sees buff level improvements at 5-star ascension, while the 7-star mark adds [Agility Increase LV2] to the finish skill, shared with allies in the same row. At 10 stars, the buff improves to a total of 30% agility, helping the team cycle their turns faster.
Mary's active and finish skills are 'grapple' types, meaning targets can't evade—a massive plus. Since both are single-target, the damage output is respectable, making Mary a dual-threat buffer and DPS for content with fewer enemies. The downside? The 'Solid' synergy doesn't perfectly gel with Mary's kit. Also, watch out for bosses that are immune to grapples.
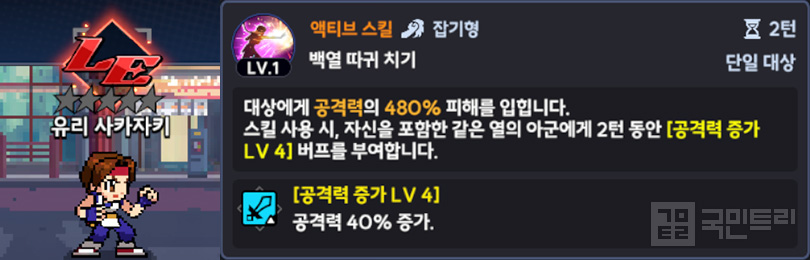
Yuri also buffs the same row, including self, with the same level and coefficient as Ralf and Mary. At 7 stars, Yuri's finish skill gains [Haste LV1], reducing the cooldown of remaining turns by 20% for allies in the same row.
Yuri’s active is a grapple and the finish is a strike-type, both single-target. However, Yuri starts with lower damage coefficients than Mary. Yuri’s 'Wedge' synergy buffs all allies' penetration and HP, which works nicely with the attack buffs given how penetration helps bypass enemy defenses.
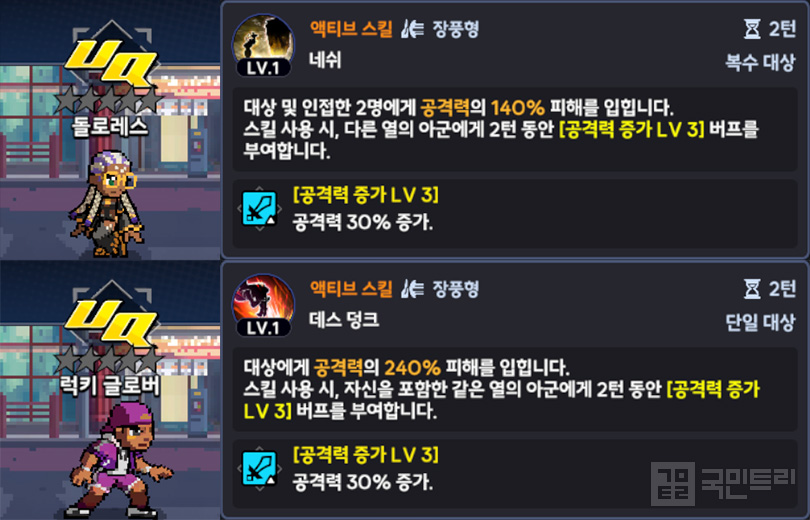
If you are missing the top-tier picks, Uniques Dolores and Lucky are perfectly capable substitutes. Both provide [Attack Power Increase LV3] for 30% attack over two turns. Dolores targets allies in different rows, while Lucky covers the same row. Invest them up to 10 stars, and their buff levels match the base Legend fighters.
Maximizing crit potential: 'Crit Damage'
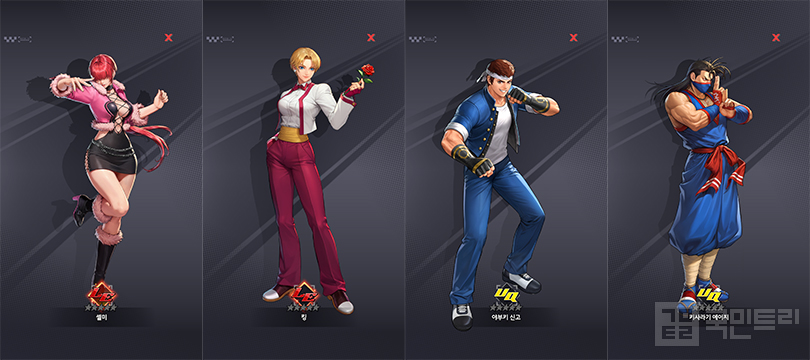
Next, consider your crit damage buffs. Your main options are Shermie and King (Legends) and Shingo and Eiji (Uniques). As always, higher rarity translates to better performance, so prioritize those Legends.
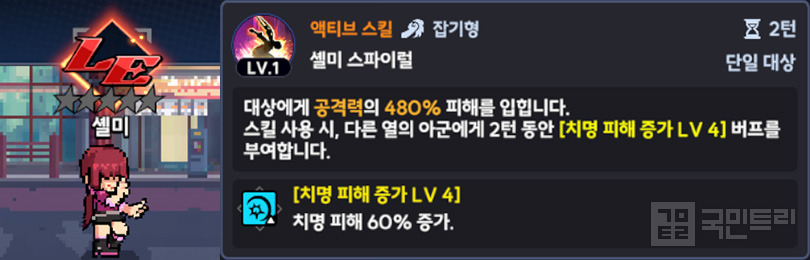
Shermie’s active skill grants [Crit Damage Increase LV4] to allies in a different row for two turns, a massive 60% boost. With a 20% max HP passive in the front, keep Shermie up front to protect your backline dealers.
At 5 stars, the buff hits LV5 with a 75% coefficient. At 7 stars, the finish skill adds [Crit Increase LV2], providing an extra 10% crit rate. Shermie is a self-contained crit engine. The 'Wedge' synergy is the cherry on top, boosting team penetration and HP. Plus, being a grapple-based fighter, Shermie’s hits are guaranteed to land.
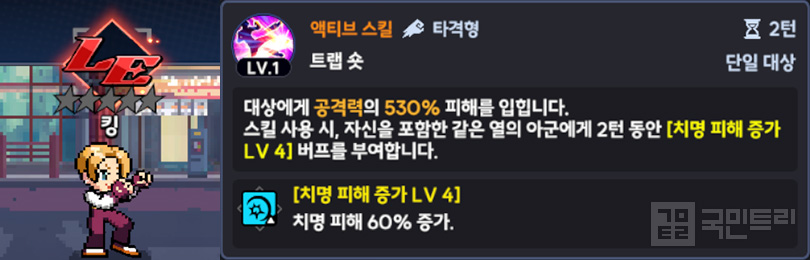
King provides [Crit Damage Increase LV4] to the same row for two turns. With a passive agility boost in the back, King belongs next to your main DPS. Unfortunately, King’s skills are all strike-type, meaning enemies can counter or evade, which is a bit of a gamble.
Like Shermie, King gets buff improvements at 5 stars, and at 7 stars, the finish skill adds [Haste LV1], reducing cooldowns by 20% for allies in the same row.
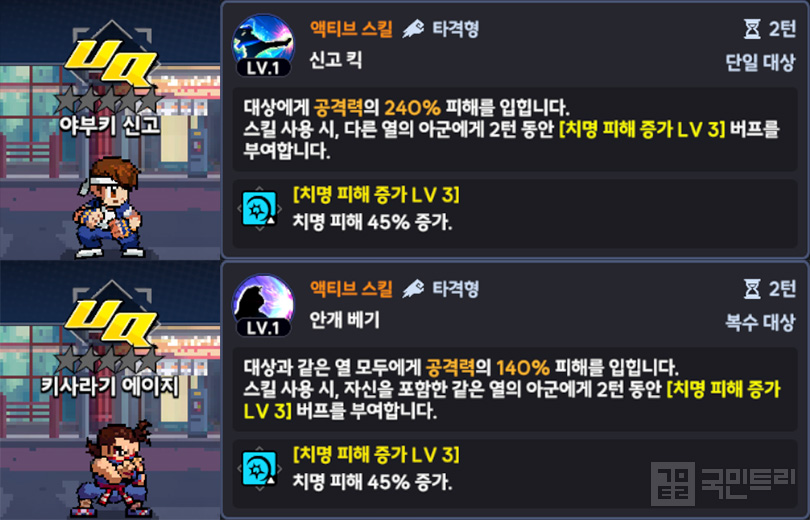
For crit damage, Shingo and Eiji are your go-to Uniques. Shingo buffs different rows, while Eiji handles the same row, both granting 45% crit damage for two turns. Push them to 10 stars, and they hit that 60% threshold, making them more than viable if your Legend roster is looking thin.
'킹 오브 파이터 AFK(이하 킹오파 AFK)'에서 팀을 편성할 때 주로 고려하는 것이 파이터의 시너지와 속성이다. 시너지 효과는 같은 시너지 파이터를 2~3명 구성해야 효과가 발휘되고, 속성은 습격자나 보스의 약점인 속성을 가진 파이터를 쓰면 더 많은 피해를 줄 수 있다.
그런데 이 둘만큼이나 편성 시 주목해야 하는 요소가 있다. 바로 액티브 스킬에 있는 버프와 디버프다. 공격력 및 치명타 피해 증가, 방어력 증가 등 다양한 효과가 있으며, 이를 골고루 잘 편성할수록 팀이 더 강력해진다. 이에 국민트리가 공격 관련 주요 아군 버프인 공격력과 치명 피해 증가 파이터를 정리했다.
메인 딜러 체급을 올려주는 '공격력 증가'
공격력 증가 버프를 주는 주요 파이터는 총 5명으로, 레전드 등급 랄프, 마리, 유리 3명과 유니크 등급 돌로레스, 럭키 2명이다. 등급이 높을수록 버프 레벨이 높고, 계수가 더 크다. 해당 레전드 등급 파이터가 없다면 유니크 등급 중 하나라도 반드시 파티에 편성하자.
우선 랄프는 액티브 스킬로 다른 열의 아군에게 2턴 동안 [공격력 증가 LV4] 버프를 제공한다. 해당 버프는 공격력을 40% 증가시켜 준다. 따라서 버프를 받을 파이터와 랄프가 같은 줄에 있어서는 안 된다. 랄프는 패시브 스킬 효과로 전열 편성 시 본인의 최대 HP가 20% 증가하기 때문에 메인 딜러를 후열에, 랄프를 전열에 배치하는 것이 이상적이다. 공격력 증가 버프는 5성 승급 시 레벨이 오르며 계수가 50%로 바뀐다.
나아가 7성까지 육성하면 피니시 스킬에 [치명 피해 증가 LV2]가 추가된다. 해당 버프를 받으면 치명 피해가 30% 오른다. 10성에는 버프 레벨이 3으로 올라 계수가 45%까지 늘어난다. 랄프만 잘 육성해도 후방 딜러에게 핵심 버프를 2개나 제공할 수 있는 셈이다. 시너지 효과는 ‘견고’로, 아군의 HP와 치명 피해 저항을 높여주기에 든든히 지켜주면서 메인 딜러를 보조하는 역할로 쓸 수 있다.
마리는 랄프와 달리 자신을 포함한 같은 열의 아군에게 2턴간 [공격력 증가 LV4]를 부여한다. 패시브 스킬로 후열 편성 시, 본인의 민첩이 20% 증가하기 때문에, 메인 딜러와 함께 후열로 편성하는 것이 좋다.
랄프와 마찬가지로 5성 승급 시 공격력 증가 버프 레벨이 오르고, 7성 승급 시 피니시 스킬에 추가로 버프가 생긴다. 마리는 [민첩 증가 LV2]가 추가되며, 자신을 포함한 같은 열 아군에게 효과를 공유한다. 10성까지 육성하면 민첩 증가 버프 레벨이 오르며 민첩이 총 30% 증가한다. 민첩이 오르면 자신의 턴이 돌아오는 시간을 단축한다.
마리는 액티브 스킬과 피니시 스킬이 잡기형이라 상대방이 공격을 회피할 수 없다는 장점이 있다. 두 스킬 모두 단일 대상이라 피해 계수도 높다. 등장하는 적의 수가 적은 콘텐츠에서 버퍼 겸 딜러로 활약할 수 있다. 다만, 시너지 효과가 아군 치명 피해 저항과 HP를 높여주는 견고라 스킬 구성과 궁합이 조금 아쉽다. 일부 보스의 경우 잡기형 스킬이 통하지 않는 경우가 있으니 확인 후 마리를 편성하자.
유리도 마리와 마찬가지로 자신을 포함한 같은 열 아군에게 공격력 증가 버프를 준다. 앞서 소개한 랄프, 마리와 버프 레벨 및 계수도 같으며, 5성 승급 시 버프 레벨이 오른다. 유리는 7성이 되면 피니시 스킬에 [가속 LV1] 버프가 추가된다. 자신을 포함한 같은 열 아군에게 남은 턴 쿨타임 20% 감소 효과를 부여한다.
유리는 액티브 스킬은 잡기형, 피니시 스킬은 타격형이며 둘 다 단일 대상을 공격한다. 다만 명함 기준으로 마리에 비해 피해 계수가 낮다. 유리의 시너지는 쐐기로, 모든 아군의 관통력과 HP를 높여준다. 관통력은 공격 시 적의 방어력을 낮추는 만큼 유리의 버프와 궁합이 괜찮은 편이다.
앞서 소개한 파이터가 없다면, 하위 호환인 유니크 등급 파이터를 대신 편성하는 것도 괜찮다. 해당 등급은 돌로레스와 럭키 2명이 있다. 둘 다 아군에게 2턴간 [공격력 증가 LV3] 버프를 제공하며 공격력이 30% 증가한다. 돌로레스는 다른 열 아군에게, 럭키는 자신을 포함한 같은 열 아군에게 제공한다는 차이점이 있다. 10성까지 육성하면 버프 레벨이 1 오르며 레전드 등급 파이터 명함과 같은 수준까지 오르니 참고하자.
치명타 위력 극대화하는 '치명 피해'
다음으로 팀 편성 시 고려해야 할 버프는 치명 피해 증가다. 이를 제공하는 주요 파이터는 4명으로, 레전드 등급 셸미, 킹과 유니크 등급 신고, 에이지가 있다. 공격력 증가 버프와 마찬가지로 등급이 높을수록 버프 효과가 더 좋으니 레전드 등급을 최우선으로 배치하자.
셸미는 액티브 스킬 사용 시 다른 열의 아군에게 2턴 동안 [치명 피해 증가 LV4] 버프를 부여한다. 해당 버프를 받으면 치명 피해가 60% 증가한다. 패시브 효과에 의해 셸미를 전열에 편성하면 본인 최대 HP가 20% 증가하니 셸미를 전열에, 딜러를 후열에 배치하는 것이 바람직하다.
5성 승급 시 치명 피해 증가 버프 레벨이 5가 되며 계수는 75%로 오른다. 이후 7성이 되면 피니시 스킬에 [치명 증가 LV2] 버프가 추가된다. 해당 버프는 치명을 10% 높인다. 혼자서 치명타가 터질 확률과 대미지를 올려주는 버퍼로 활약할 수 있다. 시너지 효과도 모든 아군의 관통력과 HP를 높이는 쐐기라 후방 딜러진을 보조하는 최적의 구성이다. 액티브 및 피니시 스킬이 단일 대상 잡기형이라 상대방이 공격을 회피할 수 없는 등 장점이 많은 파이터다.
킹은 액티브 스킬로 자신을 포함한 같은 열 아군에게 2턴간 [치명 피해 증가 LV4]를 제공한다. 그리고 킹을 후열에 배치하면 본인의 민첩이 20% 증가해 메인 딜러와 함께 후열에 자리 잡는 것이 좋다. 액티브와 피니시 스킬 모두 타격형으로, 상대방의 반격과 회피가 모두 발동할 수 있는 단점이 있다.
앞서 소개한 셸미와 마찬가지로 5성 승급 시 버프 레벨이 오르며, 7성까지 육성하면 피니시 스킬에 버프가 추가된다. 이때 킹은 피니시 스킬로 본인과 같은 열 아군에게 남은 턴 쿨타임이 20% 줄어드는 [가속 LV1] 버프를 제공한다.
치명 피해 증가 버프 역시 유니크 등급 대체 파이터가 있다. 신고와 에이지가 해당 효과를 액티브 스킬에 갖췄다. 신고는 다른 열 아군에게, 에이지는 자신을 포함한 같은 열 아군에게 2턴간 치명 피해를 45% 증가시켜 준다. 두 파이터 모두 10성까지 육성하면 치명 피해 증가 60%로 오르니 레전드 등급 영웅이 없다면 충분히 사용할 만하다.


- Animo Prepares to Open Special No Brand Burger Store Ahead of Launch
- Popup events to be held in Dongdaemun and Yongsan to celebrate the release of Liftbound
- [Today's steam] Animorphs officially released, recording 100,000 Concurrent Players
- GTA 6 Online to support up to 32 players, confirmed through lawsuit documents
- [Today's steam] Normalized new FPS Wardogs surpasses 420,000 Concurrent Players
- An Ensemble Drama with Four Heroes, Fire Emblem Mazachanhong
- Gathering Cheonhwi and Slowly Falling for the Charm of 'Animo'
- [Today's steam] PC version of The War of Genesis Raising achieves 30,000 Concurrent Players
- What is the recently popular indie game genre 'DB Thriller'?
- [Photo] How does Riftbound captured in cards look?





