

[Vampir Tips] Recommended 'Collection' Farming Map for Seogwang-gado in Podinari Territory
[뱀피르 꿀팁] 포디나 영지 서광가도 추천 '컬렉션' 파밍 지도

In 'Vampir', the collection system is broadly split into gear, artifacts, collectibles, and events. Collectibles are unlocked by securing specific items via character codex rewards or dungeon drops. You will start spotting these out in the wild once you hit the Seogwang-gado area, just before the Podinari territory around level 30. Despite being an early-game zone, it is surprisingly generous with core stats like basic attack and accuracy. Since it is considered an entry-level region, even casual players can manage it. KookminTree has done the legwork to map out the best collection stats and locations in Seogwang-gado.
Q. Where should I farm for basic attack and accuracy collections?
A. Farming in Seogwang-gado zones 32, 33, 34, 36, 37, and 46.
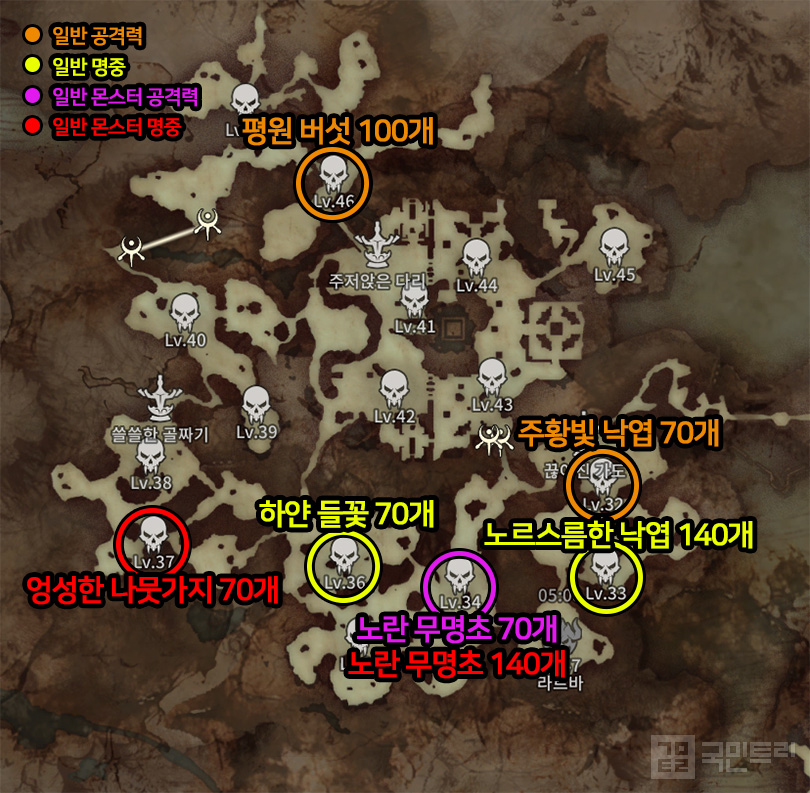
Let’s start at the entrance of Seogwang-gado. You are in luck right out of the gate: the 'Outskirts of Seogwang Forest' (level 32) drops 'Orange Fallen Leaves'. Registering these grants a total of 10 basic attack power. There are two slots requiring 10 and 60 items respectively, totaling 70. Just pick the one that fits your current stat needs. You can snag another 10 attack power by farming 100 'Plain Mushrooms' at the level 46 'Citadel Slope'. Be warned: that area is a real slog even if you are appropriately levelled, so check your gear before heading in.
Just next door in the level 33 'Seogwang Forest', the 'Yellowish Fallen Leaves' collection offers 3 basic accuracy. You will need 40 and 100 items to complete both slots, totaling 140 for a combined 6 accuracy. That is 10 attack power and 6 accuracy secured from the early zones alone, excluding the tougher Citadel Slope.
Next up is the 'Yellow Mugwort' from the level 34 'Radiant Valley'. This is arguably your biggest time sink in Seogwang-gado. You will need to haul in 210 items total—70 for basic monster attack and 140 for basic monster accuracy. Since you will be camping here a while, find a dense spawn point to maximise efficiency. Just to the left of Radiant Valley is the level 36 'Sanctuary of Faith', where you can pick up additional basic accuracy by farming 70 'White Wildflowers'.
At the level 37 'Bivouac Slope', your goal is 70 'Rough Tree Branches' to net another 6 basic monster accuracy. If you have been keeping count, that brings your haul to 20 basic attack, 12 basic accuracy, 10 basic monster attack, and 12 basic monster accuracy. If you are a player who has been rushing the main story and just arrived in Podinari, taking a breather to backtrack and finish these collections is well worth your time.
Q. Where are the best farming spots for 'Max Weight Increase' collections?
A. Seogwang-gado level 45 zones and the World Boss Larva.
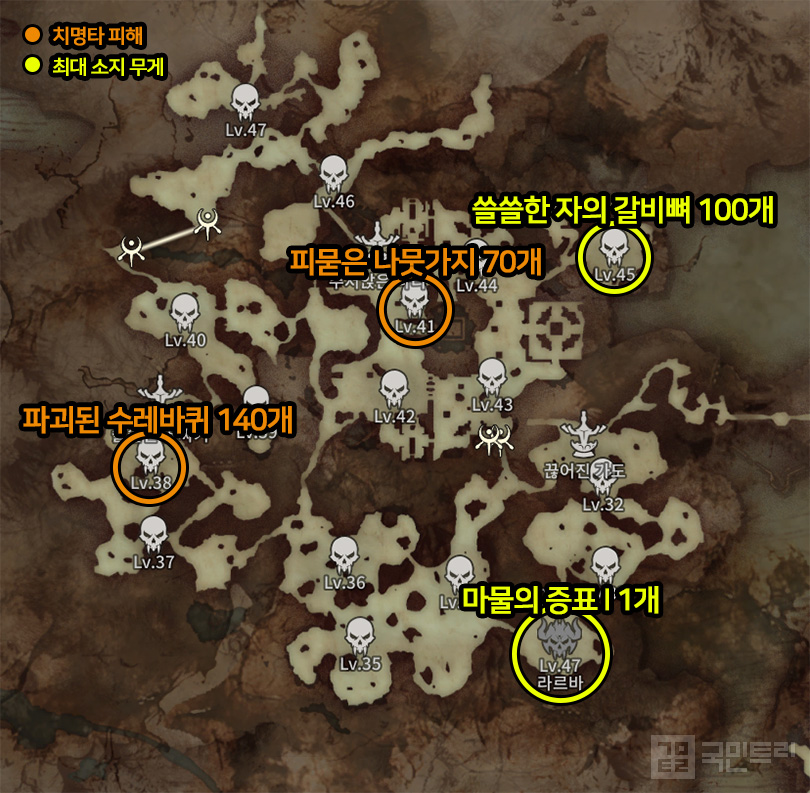
Beyond the general stats, there are two specific ones worth hunting for in Seogwang-gado: Crit Damage and Max Weight Increase. In 'Vampir', the former boosts crit damage, while the latter expands your inventory capacity—a rare stat usually only found on mounts, not gear.
Fortunately, Seogwang-gado has collection items for these as well. For Crit Damage, you will need 40 and 100 'Destroyed Cart Wheels' from the level 38 'Paladin Bivouac', plus 10 and 60 'Bloody Branches' from the level 41 'Remote Prison'. Completing these grants a total of 24 Crit Damage.
As for Max Weight Increase, you need 100 'Ribs of the Lonely' from the level 45 'Temple Clearing' and one 'Proof of Demon I' dropped by the World Boss Larva. The former adds 15 to your weight limit, while the boss drop adds 30. Your best bet is to attend the daily 8 PM Larva raid. Since the 'Vampir' Hero’s Oath event often includes a 'Kill World Boss' mission, you might as well kill two birds with one stone.
Q. Should I ignore the other collection items in Seogwang-gado?
A. Complete the recommended collections first, then proceed to the rest.
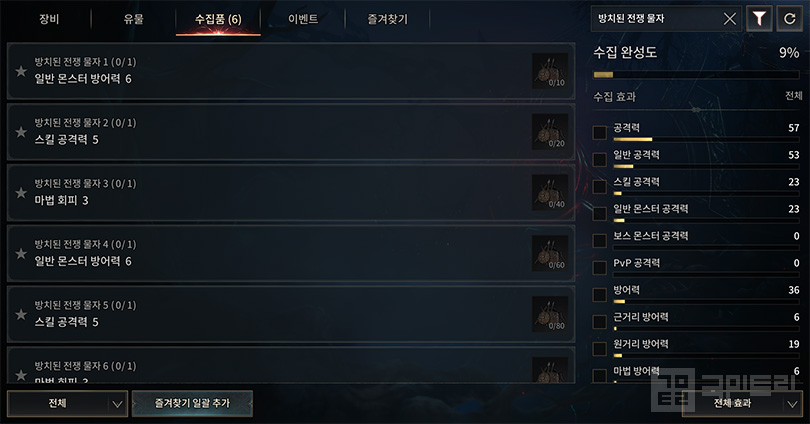
There are indeed other collections in Seogwang-gado. Once you have finished the attack and accuracy sets, I suggest investing in Skill Attack, Accuracy, and Damage Increase. Look out for 'Lotus Petals', 'White Wildflowers', 'Bundles', and 'Abandoned War Supplies'. To find these in 'Vampir', simply tap the Mini-map, click the region icon, and head to the 'Drop Table' to jump straight into the collection menu. You can search by drop items there or check the collection icon once you have obtained an item.
'뱀피르'의 컬렉션은 크게 장비, 유물, 수집품, 이벤트로 나뉜다. 여기서 수집품은 인물 도감 보상이나 던전 드롭 아이템 가운데 전용 아이템을 얻어야 활성화 가능하다. 이는 일반 필드에서도 드롭하는데, 30레벨 즈음 진입하는 포디나리 영지 앞 서광가도부터 컬렉션 전용 아이템이 나온다. 첫 지역임에도 일반 공격력, 명중 등 핵심 능력치를 챙길 수 있다. 이곳은 초반 지역으로 분류되므로 일반 유저도 충분히 도전 가능하다. 이에 국민트리가 서광가도 지역에서 챙기면 좋은 컬렉션의 능력치와 위치를 정리했다.
Q. 일반 공격력, 명중 관련 컬렉션은 어디서?
A. 서광가도 32, 33, 34, 36, 37, 46 지역에서 파밍
서광가도 입구부터 하나씩 훑어보자. 시작부터 운이 좋다. 입구에 자리 잡은 32레벨 몬스터 지역 '서광의 숲 외곽'에서 획득하는 '주황빛 낙엽'을 컬렉션에 등록하면, 일반 공격력 능력치를 총 10 얻는다. 관련 항목은 둘이고, 필요량은 10개와 60개로 총 70개다. 원하는 항목을 골라 목표를 달성하는 시스템이니 일반 공격력 능력치 컬렉션을 고르면 된다. 46레벨 '성채 비탈길' 지역에서 '평원 버섯' 100개를 모아 추가로 일반 공격력 10을 얻을 수 있다. 해당 지역은 동레벨 기준으로도 힘든 곳이니 레벨과 장비를 맞춰 도전하자.
바로 옆 33레벨 '서광의 숲'의 '노르스름한 낙엽' 컬렉션은 일반 명중 3을 제공한다. 모두 달성하기 위해 40개와 100개, 총 140개를 요구한다. 능력치 보상 합계는 일반 명중 6이다. 이걸로 성채 비탈길을 제외한 초입 지역에서만 일반 공격력 10과 일반 명중 6을 챙겼다.
다음은 34레벨 '찬란한 계곡'의 얻는 '노란 무명초' 다. 이번에 소개하는 서광가도에서 가장 많이 얻어야 하는 컬렉션 아이템이다. 일반 몬스터 공격력에 70개, 일반 몬스터 명중에 140개 총 210개 모아야 한다. 그만큼 찬란한 계곡에서 머물러야 하는 시간이 기니, 몬스터 밀집 지역을 체크해 파밍을 시작하자. 찬란한 계곡의 왼쪽 36레벨 '신념의 안식처'는 앞서 소개한 일반 명중을 추가로 획득 가능하다. 필요한 컬렉션 아이템은 '하얀 들꽃' 70개다.
37레벨 '숙영지 비탈길'의 목표는 '엉성한 나뭇가지' 70개다. 일반 몬스터 명중 6을 모을 기회다. 여기까지 모은 보상을 정리하면, 도합 일반 공격력 20, 일반 명중 12, 일반 몬스터 공격력 10, 일반 몬스터 명중 12를 챙겼다. 메인 스토리만 빠르게 밀고 포디나리에 막 진입한 유저라면, 잠시 숨을 돌릴 겸 초입으로 돌아와 컬렉션을 완성해 보자.
Q. 최대 소지 무게 증가 컬렉션 추천 파밍 장소는?
A. 서광가도 45레벨 지역과 월드 보스 라르바
범용 능력치 외에 서광가도에 챙기면 좋은 능력치가 있다. 치명타 피해와 최대 소지 무게 증가다. 뱀피르에서 전자는 치명타 공격에 대한 피해가 증가하고, 후자는 캐릭터의 무게 상한이 늘어난다. 탈 것에 배정돼 장비를 통해선 얻을 수 없는 희귀한 능력치다.
마침, 서광가도 컬렉션 아이템으로 이 능력치를 얻는 항목이 존재한다. 먼저 치명타 피해는 아이템마다 항목을 2개씩 배치했다. 38레벨 '성기사단 숙영지'에서 '파괴된 수레바퀴' 40개, 100개, 41레벨 '외딴 수용소'에서 '피묻은 나뭇가지' 10개, 60개를 모으면 된다. 모두 등록하면, 치명타 피해가 총 24 모인다.
이어서 최대 소지 무게는 45레벨 '신전 공터'의 드롭 아이템 '쓸쓸한 자의 갈비뼈' 100개와 월드 보스 라르바 처치 시 얻는 '마물의 증표 I' 1개가 필요하다. 전자는 최대 소지 무게 15, 후자는 30이 상승한다. 가장 쉬운 건 매일 오후 8시 출몰하는 라르바 토벌 참가다. 뱀피르 상시 이벤트 영웅 서약에서 '월드 보스 처치' 미션이 있으니, 꼭 참여해 컬렉션 보상을 함께 챙기자.
Q. 서광가도의 다른 컬렉션 아이템은 안 모아도 되는가?
A. 추천 컬렉션을 모두 수집 후 완성을 추천
앞서 설명한 것 외에도 뱀피르 서광가도 아이템을 소모하는 컬렉션 항목이 많다. 일반 공격력, 명중을 투자한 뒤에는 스킬 공격력, 명중과 피해량 증가 투자를 추천한다. 해당 컬렉션의 아이템은 '연꽃잎', '하얀 들꽃', '짐꾸러미', '방치된 전쟁 물자'다. 뱀피르에서 관련 정보를 찾는 방법은 다음과 같다. '미니맵 - 지역 아이콘 클릭 - 드롭 테이블'에서 바로 컬렉션 메뉴로 이동한다. 컬렉션 메뉴에서 드롭 아이템을 검색하거나 아이템을 획득한 뒤 컬렉션 아이콘을 눌럴 확인하자.






- [Today's steam] Animorphs officially released, recording 100,000 Concurrent Players
- GTA 6 Online to support up to 32 players, confirmed through lawsuit documents
- An Ensemble Drama with Four Heroes, Fire Emblem Mazachanhong
- Gathering Cheonhwi and Slowly Falling for the Charm of 'Animo'
- [Today's steam] PC version of The War of Genesis Raising achieves 30,000 Concurrent Players
- What is the recently popular indie game genre 'DB Thriller'?
- [TGS 26] A world breathing with the Nexon Games style, Pareidolia
- [Photo] How does Riftbound captured in cards look?
- [TGS 26] Hyung-tae Kim "AI video was an experiment, I apologize"
- [TGS 26] Tokyo Game Show decided to close one day early due to typhoon





