

[Nikke Tips] Analysis of 'Ada', the Defense-Ignoring Damage Supporter
[니케 꿀팁] 방어력 무시 전용 딜포터 '에이다' 분석

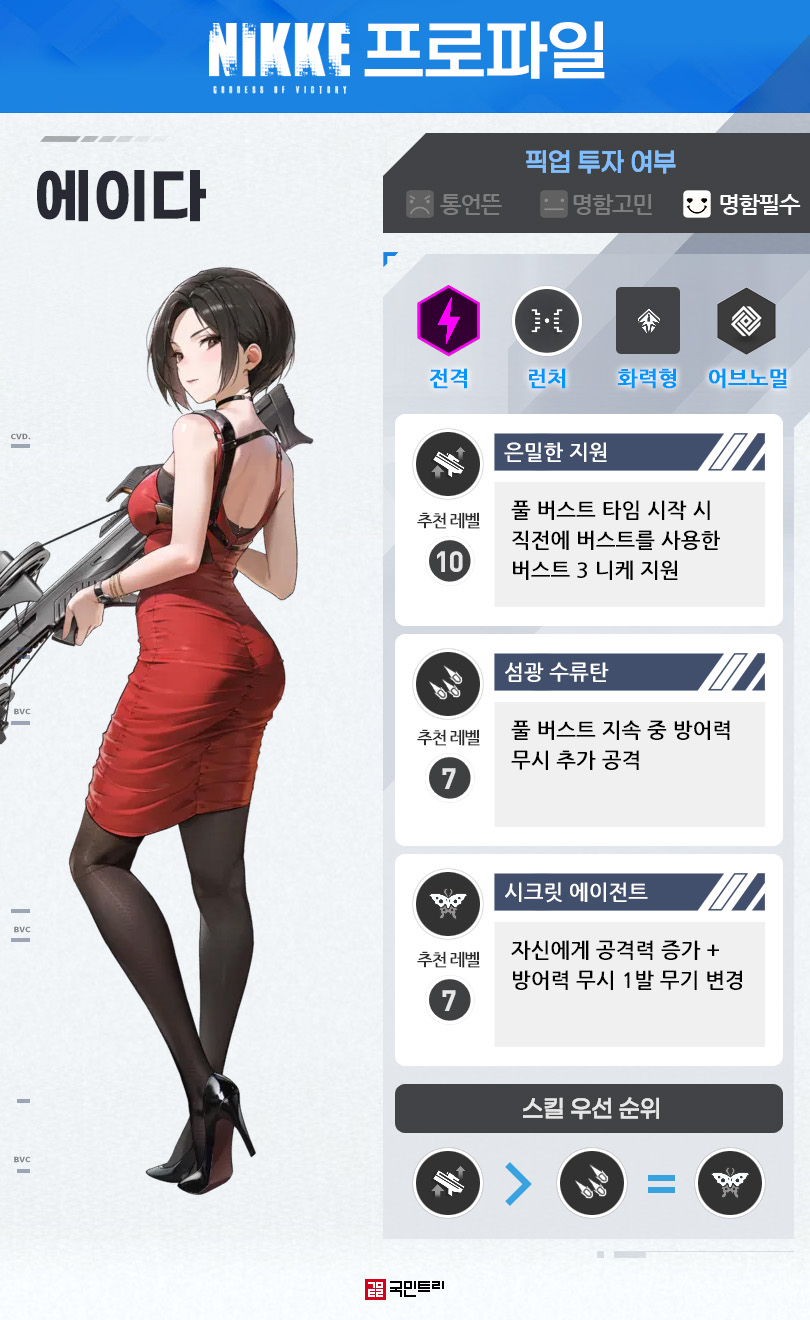
Ada, the new character from the Resident Evil collaboration, has arrived in Goddess of Victory: NIKKE. She comes equipped with her iconic explosive crossbow, staying true to the source material—costume and all. Much like the recently re-evaluated Vesti: Tactical Up, her kit is packed with 'ignore defense damage' skills. With the upcoming Solo Raid boss boasting high defense stats, any player chasing top-tier scores should take note. KookminTree has broken down her skills and combat performance for you.
Q. What is Ada's core mechanic?
A. She supports allies as a Burst III unit capable of dealing ignore defense damage.
Ada is a Burst III Attacker, wielding the Electric code and a launcher. All her damage output revolves around ignoring defense, and she serves to buff other Burst III allies who share this trait.
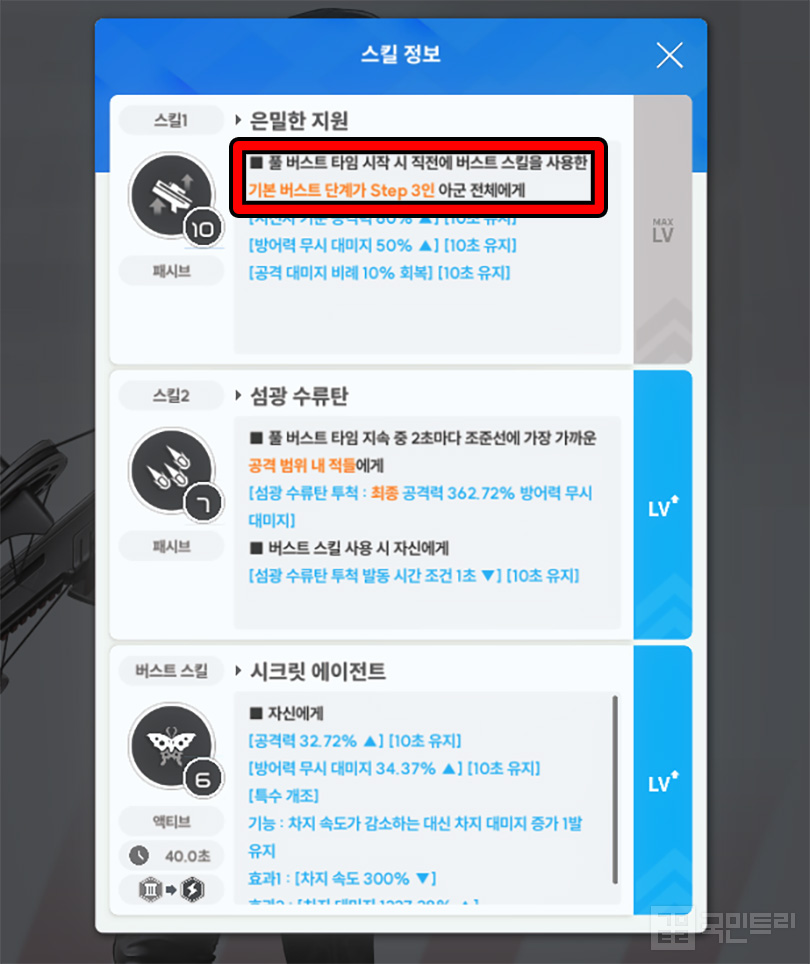
Her Skill 1, 'Covert Support', triggers at the start of Full Burst, buffing the Burst III Nikke who used their skill just before her. This buff—lasting 10 seconds—grants an attack boost scaled to Ada’s own, an increase in ignore defense damage, and life-steal proportional to attack damage. Note that the ignore defense boost only applies to units that already possess such abilities. At level 10, this provides a 60% attack boost, 50% ignore defense damage, and 10% life-steal.
Skill 2, 'Flash Grenade', adds some extra spice to her offensive kit. While in Full Burst, she targets the enemy closest to her crosshair every 2 seconds, dealing ignore defense damage based on her final attack power. When she uses her Burst skill, the cooldown for this grenade is reduced by 1 second. Essentially, she attacks every 2 seconds during other allies' Full Burst, and every 1 second during her own.
Her Burst skill, 'Secret Agent', grants a self-buff and modifies her weapon for 10 seconds. It boosts her attack and ignore defense damage, trading charge speed for a single-shot weapon that hits significantly harder on charge. At level 10, the buffs sit at 40% attack and 42% ignore defense damage.
Q. How should I build a team around Ada?
A. Pair her with other ignore-defense dealers.
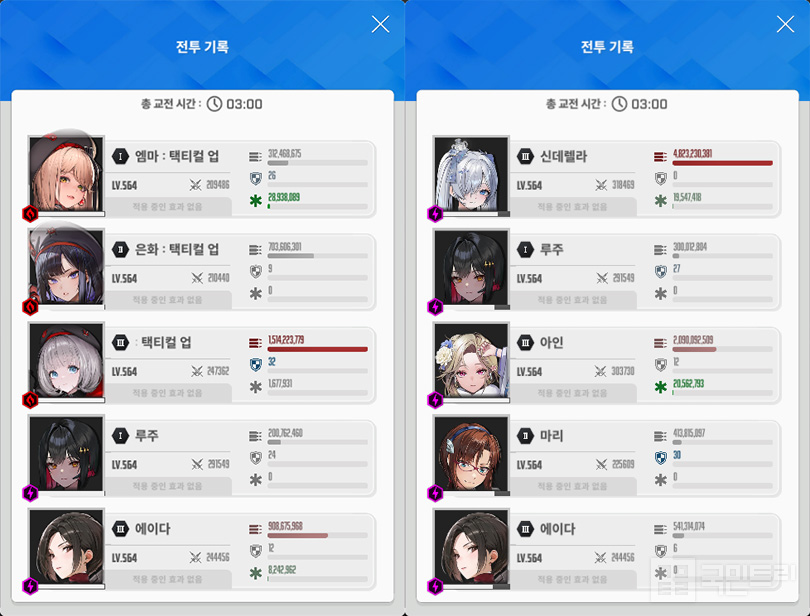
To test her performance, we ran trials in a 3-minute Union Shooting Range simulation against Electric and Fire code-weak bosses. Our Ada was at base copy status with skills at 10/7/6. She was paired with Vesti: Tactical Up and Ein to test her synergy.
The results? Ada’s individual damage was solid, and the output of her ignore-defense teammates climbed accordingly. In the fire-weak environment—where she lacked element advantage—she still put up respectable numbers during her Burst. She isn't quite a 'tier 0' must-pull compared to the absolute meta giants, but she is expected to shine in Solo Raids or specific content featuring high-defense bosses. Given the current Solo Raid boss has high defense and is weak to Electric, her utility here is quite promising.
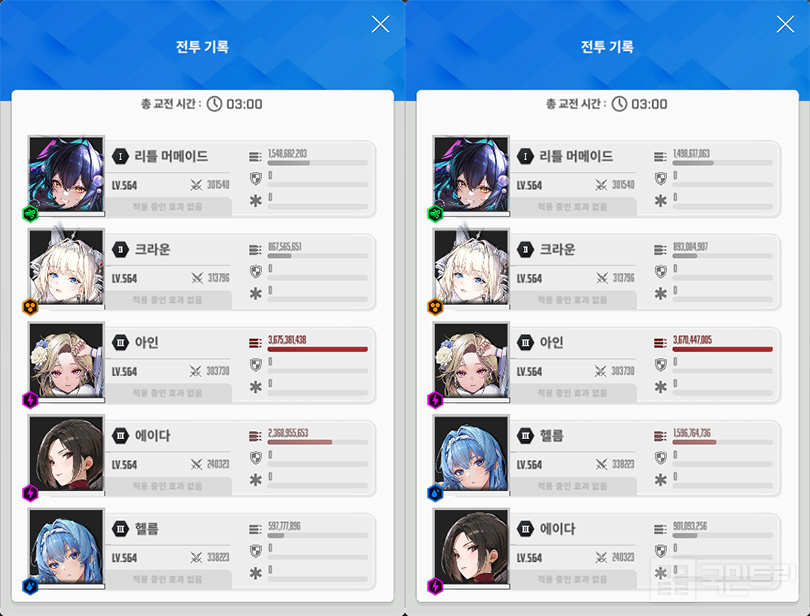
We then conducted a second test pairing her with a tier-0 team. Without her Burst, the team dealt 900 million damage; with her Burst active, that jumped to 2.3 billion—a 2.5x increase. Comparing her to our main dealer Ein, Ein hit 3.6 billion in the same Burst-active test. The difference in elemental advantage was marginal (84.42% for Ein vs 76% for Ada). Considering Ein was at 3-core enhancement while Ada was at base copy, it’s safe to say Ada’s damage potential is on par with, if not better than, Ein’s.
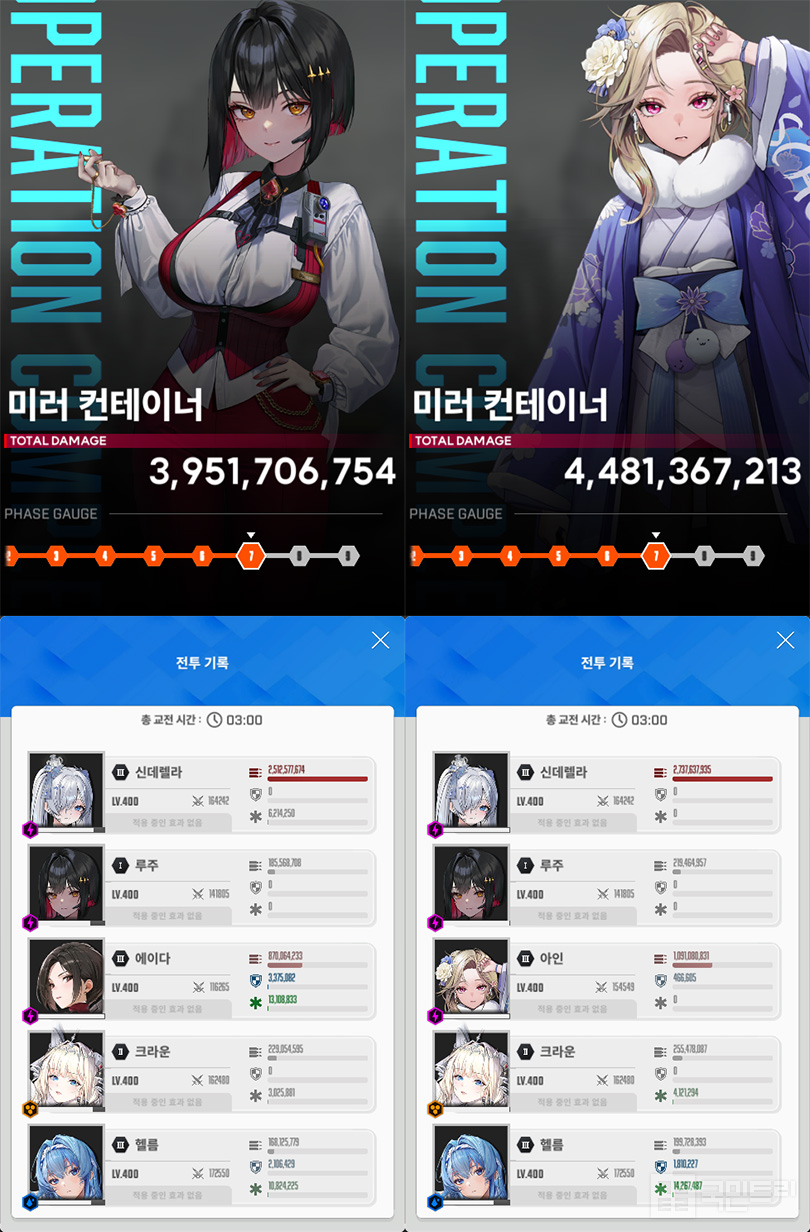
Finally, we tested them in the Interception 'Mirror Container' challenge. Both Ada and Ein reached stage 7 individually, though Ein’s total damage was higher. This was expected, given the elemental and core-enhancement gaps. The fact that a base-copy Ada didn't lag far behind a 3-core unit is impressive enough. If you’re missing Ein, Ada serves as an excellent substitute.
Q. How much should I invest in her?
A. Remember the golden rule of collaborations: at least secure one copy.
Limited collaboration characters in Goddess of Victory: NIKKE rarely return, so we recommend grabbing at least one copy of Ada while you can. It’s not just for Solo Raid scoring; you’ll want her ready in case more ignore-defense Nikkes are released in the future.
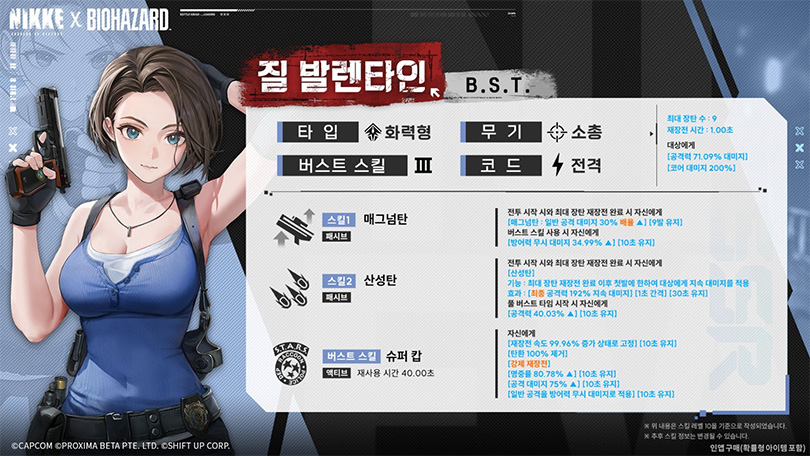
Additionally, the second Resident Evil banner featuring Jill Valentine launched on October 2. She is a pure dealer specialized in ignore defense damage, and the community is already buzzing about her. For the sake of your Solo Raid scores and your team's synergy, secure at least one Ada, save your gems, and go for Jill Valentine. If you’re a newcomer who joined for this collaboration, don't miss out on these units for the long haul.
'승리의 여신: 니케'에 바이오하자드 컬래버레이션 신규 캐릭터 에이다가 등장했다. 원작 코스튬은 물론, 실제로 사용한 폭발형 석궁을 들고나와 고증을 챙겼다. 최근 재평가를 받아 입지가 올라간 베스티: 택티컬 업처럼 '방어력 무시 대미지' 스킬로 무장한 점이 포인트다. 진행 예정인 솔로 레이드 보스가 방어력이 높다고 발표된 만큼 고점을 노리는 유저라면 눈길이 갈 수밖에 없다. 이에 국민트리가 에이다의 스킬 및 성능을 분석했다.
Q. 에이다는 어떤 메커니즘을 지녔나요?
A. 방어력 무시 대미지 효과 탑재 버스트 3으로 아군을 지원합니다.
에이다는 버스트 3 화력형, 전격 코드, 런처 타입 캐릭터다. 모든 스킬 피해가 방어력 무시 대미지와 연관됐고, 해당 효과를 지닌 버스트 3 아군을 보조한다.
1스킬 '은밀한 지원'은 풀 버스트 타임 시작 시 직전에 버스트 스킬을 사용한 버스트 3 니케에게 버프를 제공한다. 버프 효과는 에이다 공격력에 비례해 공격력이 증가, 방어력 무시 대미지 증가, 공격 대미지 비례 회복 능력 부여다. 10초간 유지되며, 방어력 무시 대미지 효과는 해당 능력을 갖추고 있는 니케에게만 적용되니 참고하자. 수치는 10레벨 기준 공격력 60%, 방어력 무시 대미지 50%, 공격 대미지 비례 10%다.
2스킬 '섬광 수류탄'은 추가 공격 능력이다. 풀 버스트 타임 지속 중 2초마다 에이다의 조준선에 가장 가까운 적을 타깃으로 한다. 그리고 에이다의 최종 공격력에 비례한 방어력 무시 대미지를 가한다. 추가 효과로 에이다가 버스트 스킬 사용 시 자신에게 섬광 수류탄 투척 발동 시간 조건을 1초 줄인다. 다른 아군의 풀 버스트 타임 중엔 2초, 자신의 풀 버스트 발동 시 1초마다 추가 공격을 하는 셈이다.
버스트 스킬 '시크릿 에이전트'는 자가 버프를 걸고 무기 효과를 바꾼다. 10초간 공격력 + 방어력 무시 대미지가 상승하고, 차지 속도가 감소하는 대신 차지 대미지가 많이 증가한 한 발 무기로 변경된다. 10레벨 기준 버프 수치는 공격력 40%, 방어력 무시 대미지 42%다.
Q. 에이다 조합은 어떻게 해야 하나요?
A. 방어력 무시 딜러와 함께 파티를 구성하세요.
성능 점검을 위해 에이다 활용 조합을 실험해 보았다. 1차 실험은 전격 코드, 작열 코드 약점 유니온 보스 사격장 3분 환경에서 진행했다. 에이다의 스펙은 명함, 스킬 레벨 10/7/6이다. 에이다의 버프를 받은 니케는 베스티: 택티컬 업, 아인이다.
실험 결과 에이다의 단독 피해량이 쓸만했고, 방어력 무시 니케의 화력도 증가했다. 아울러 우월 코드가 아닌 환경인 작열 약점 실험에선 에이다가 버스트를 사용했는데, 준수한 피해량을 뽑았다. 물론, 0티어 이상 픽은 아니다. 0티어 니케와 비교하면 조금 대미지가 낮다. 방어력이 압도적으로 높은 보스를 상대하는 솔로 레이드나 특정 콘텐츠에서 활약할 것으로 예상된다. 마침, 이번 솔로 레이드는 방어력이 높은 전격 코드 약점 보스라 활약이 기대된다.
이어 0티어 조합에 방어력 무시 니케와 함께 사용하는 2차 실험을 진행했다. 버스트를 사용하지 않은 실험과 버스트를 사용한 조건에서 실험 결과 전자에선 9억, 후자에선 23억의 피해량을 기록했다. 단순 계산으로 약 2.5배가 넘는 차이다. 메인 딜러인 아인과 비교라면, 버스트를 사용한 실험에서 아인이 36억이었다. 우월 코드 옵션은 아인이 84.42%, 에이다가 76%로 8.42% 포인트 차이였다. 더불어 아인은 3코어 강화, 에이다는 명함이다. 대미지 차이는 강화의 차이에서 났다고 봐도 무방하다. 사실상 아인과 동급, 그 이상의 딜 포텐션을 지녔다는 뜻이다.
그리고 이상 개체 요격전 '미러 컨테이너'에서 에이다와 아인을 각각 단독 딜러로 사용해 3차 실험을 진행했다. 그 결과 똑같이 7단계에 도달했지만, 피해량은 아인 단독 채용이 더 높았다. 앞서 이야기한 우월 코드 옵션 차이와 돌파 능력치 차이로 인해 벌어진 차이로 풀이된다. 명함으로 3코어 강화 니케와 큰 차이가 벌어지지 않은 것만으로도 충분한 결과다. 따라서 아인이 없는 유저는 대체 요원으로 에이다를 활용하면 될 것 같다.
Q. 에이다는 얼마나 투자하면 되나요?
A. 컬래버레이션은 하나만 기억하세요, '최소 명함'입니다.
승리의 여신: 니케에서 컬래버레이션 한정 캐릭터는 추후 복각이 불투명하다. 따라서 에이다는 이번 기회에 최소 명함을 챙길 것을 추천한다. 솔로 레이드 고점을 위한 것도 있지만, 혹시 모를 방어력 무시 니케의 추가에 대비해서다.
추가로 10월 2일 바이오하자드 2차 픽업 캐릭터 질 발렌타인이 등장한다. 방어력 무시 대미지로 무장한 퓨어 딜러로, 벌써 유저들의 관심이 집중되는 중이다. 솔로 레이드 고점과 페어 캐릭터의 강화를 위해서라도 에이다는 최소 명함을 챙기고, 쥬얼을 정리해 질 발렌타인까지 노려보자. 이번 컬래버레이션으로 니케를 시작한 유저라면, 미래를 위해 꼭 챙겨가는 것을 권한다.



- [Today's steam] Animorphs officially released, recording 100,000 Concurrent Players
- GTA 6 Online to support up to 32 players, confirmed through lawsuit documents
- An Ensemble Drama with Four Heroes, Fire Emblem Mazachanhong
- Gathering Cheonhwi and Slowly Falling for the Charm of 'Animo'
- [Today's steam] PC version of The War of Genesis Raising achieves 30,000 Concurrent Players
- What is the recently popular indie game genre 'DB Thriller'?
- [TGS 26] A world breathing with the Nexon Games style, Pareidolia
- [Photo] How does Riftbound captured in cards look?
- [TGS 26] Hyung-tae Kim "AI video was an experiment, I apologize"
- [TGS 26] Tokyo Game Show decided to close one day early due to typhoon





