

[Seven Knights Re:BIRTH Tips] A Deep Dive into the Hero 'Amelia' Appearing in Guild Wars
[세나 리버스 꿀팁] 길드전에 나타난 히어로 '아멜리아' 톺아보기

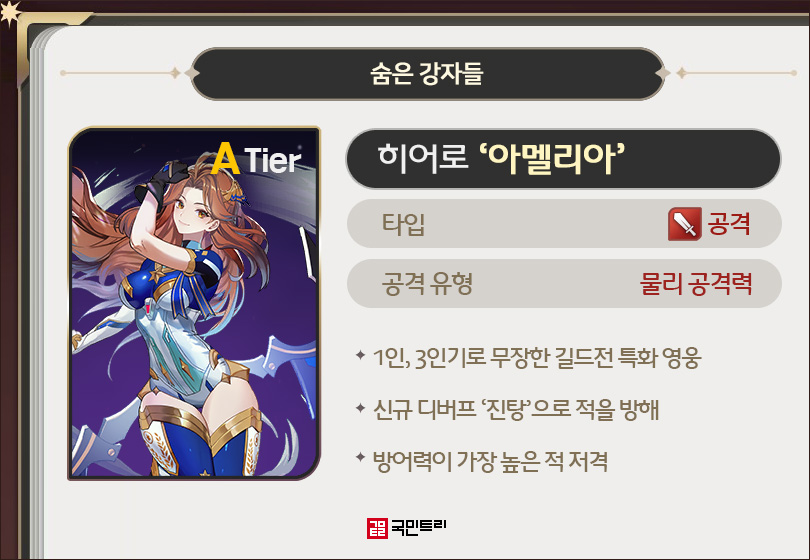
The latest heroes to grace 'Seven Knights Re:BIRTH' are Amelia and Kagura. Amelia, in particular, has caught our eye with a kit tailor-made for the competitive 'Guild War' scene. As previously hinted in official livestreams, she brings a mix of single and multi-target attacks, along with a rather nasty suite of debuffs. The best part? You won't need to empty your wallet on a standard banner; she is accessible via Guild War currency, allowing you to secure at least two copies. KookminTree has taken a deep dive into whether this newcomer is truly the breath of fresh air the mode needs.
Q. What kind of hero is Amelia?
A. She is a physical damage dealer built specifically for the Guild War.
Amelia is a physical attacker that toggles between single and three-target strikes. As the devs promised in their notes and broadcasts, she is engineered to thrive in Guild War environments. That specific targeting logic is clearly intentional.
'Curfew' deals physical damage to three enemies and grants her a shield scaling with her physical attack for three turns. More importantly, it has a 60% chance to apply 'Concussion'—this is the real bread and butter of her kit. Scaling increases from 60% to 70% upon enhancement.
'Crisis Response' targets the enemy with the highest defence, applying a 'Recovery Block' debuff with 100% certainty for four turns. Her 2nd and 6th Transcendence levels are dedicated to buffing this skill. At 2nd Transcendence, the targeting expands from one to two enemies, while at the 6th, it adds a 55% health conversion effect. Enhancing this skill boosts its scaling from 135% to 165%.
Her passive, 'Advanced Nano Suit', is a bit of a Swiss Army knife. It grants a permanent 40% buff to effect accuracy and allows her to revive once per battle upon death. Even better, when she falls, she bestows a physical attack-scaling shield for two turns and cleanses three debuffs from two allies (up to twice per battle). At max enhancement, the accuracy buff hits 49%. Considering the Shaman 4-set effect only provides 35%, she is essentially a walking stat stick.
Q. What are Amelia's key buffs and debuffs?
A. 'Concussion' and 'Recovery Block' are the stars of the show.
Amelia introduces a unique debuff: 'Concussion'. While it effectively locks the target's actions, the real kicker is the duration extension mechanic. If a target suffering from Concussion is hit twice, the duration extends by one turn, though it cannot exceed its base duration of two turns. It's a clever bit of design that keeps the pressure on.
Her 'Recovery Block' is a tactical sniper shot aimed at the highest-defence units—think Platin, Karma, or Rudy in the current meta. Platin, the backbone of defensive teams, relies on health recovery; Amelia is clearly designed to shut that down. Similarly, Karma loses the self-sustain from 'Storm of Despair'. It is a potent tool that will likely see play in the Arena as well. We wait with bated breath to see how she disrupts the ladder.
Q. What is the recommended gear setup for Amelia?
A. We suggest focusing on effect accuracy and resistance.
The Shaman set is the go-to choice here. Even with her innate passive accuracy, competitive players are stacking effect resistance, making it vital to push her accuracy as high as possible. The 4-set bonus from Shaman provides a 10% increase to effect application probability, which is indispensable.
Since Shaman is the only gear that offers this specific benefit, it is highly recommended. If you opt for alternatives like Mediator or Gatekeeper, ensure you roll effect accuracy as your primary stat. Beyond that, prioritise block chance and effect resistance. Since she is a PvP-focused unit, your ability to dodge incoming debuffs and survive is what will determine your win rate. Best of luck on the battlefield.
'세븐나이츠 리버스(이하 세나 리버스)' 신규 영웅 아멜리아와 카구라가 등장했다. 이 중 아멜리아는 길드 경쟁 콘텐츠 '길드전'에 특화한 능력을 지녀 관심이 쏠렸다. 과거 공식 방송에서 언급한 대로 1인, 3인을 공격하며, 적을 방해하는 전용 디버프까지 탑재했다. 일반 픽업이 아닌 길드전 재화로 최소 2명을 교환 가능한 접근성도 포인트다. 길드전에 새로운 바람을 불러올 히어로 아멜리아를 국민트리가 분석했다.
Q. 아멜리아는 어떤 영웅인가요?
A. 길드전 특화 물리 딜러 영웅입니다.
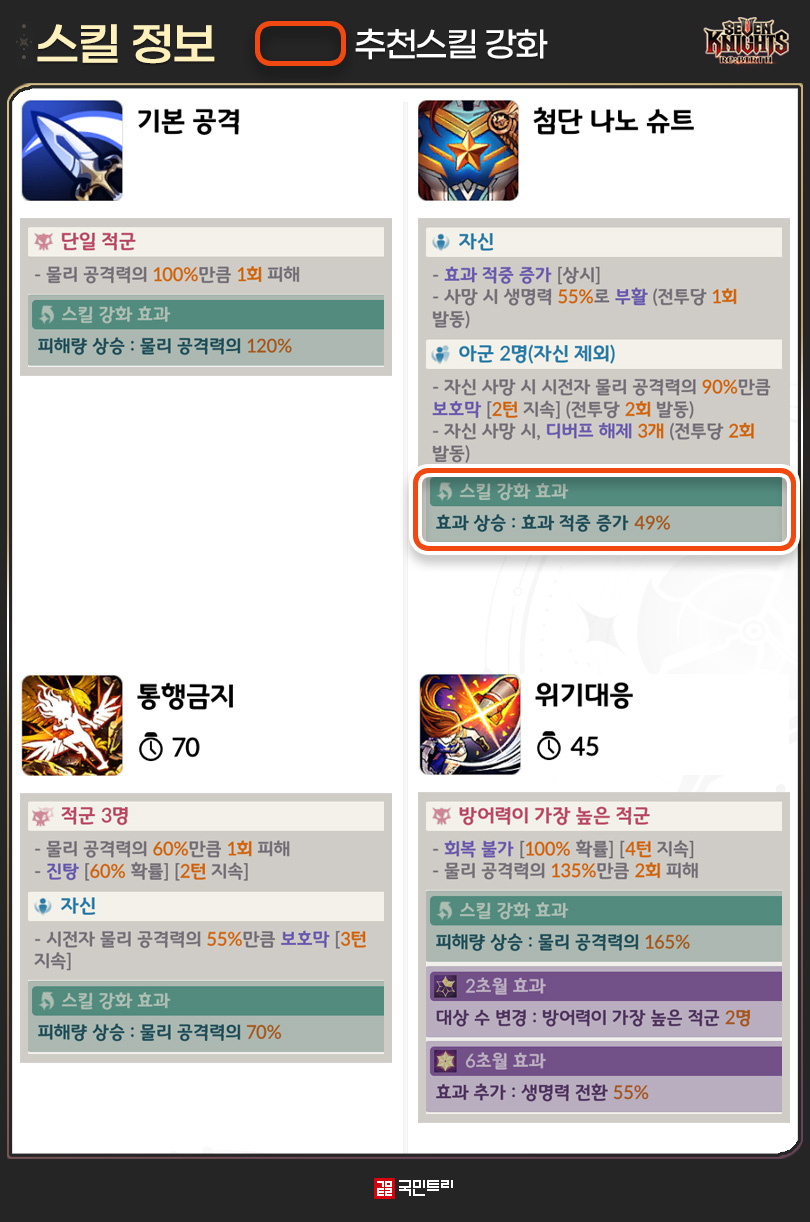
아멜리아는 1인, 3인 공격 스킬을 탑재한 물리 딜러 영웅이다. 아울러 개발자 노트와 공식 방송에서 공언했던 것처럼 길드전에서 활약하도록 설계했다. 공격 스킬의 대상이 1인과 3인인 게 바로 이 때문이다.
'통행금지'는 적군 3명에게 물리 피해를 주고 자신에게 3턴간 물리 공격력 비례 보호막을 부여한다. 여기에 더해 60% 확률로 '진탕'을 부여하는데, 아멜리아의 핵심 능력이다. 스킬 강화 시 계수가 60%에서 70%로 상승한다.
'위기대응'은 방어력이 가장 높은 적 1명을 공격하고, 100% 확률로 회복 불가 디버프를 건다. 지속 시간은 4턴이다. 아멜리아의 2초월, 6초월은 위기대응 강화에 집중된다. 2초월 시 공격 대상이 1명에서 2명으로 늘어난다. 6초월 시 생명력 전환 55% 효과가 추가된다. 스킬 강화에 성공하면, 스킬 계수가 135%에서 165%로 증가한다.
패시브 '첨단 나노 슈트'는 다양한 효과를 탑재했다. 먼저 자신에게 효과 적중 40% 증가 상시 버프를 부여한다. 그리고 전투당 1회에 한해 사망 시 부활한다. 자신을 제외한 아군 2명에겐 아멜리아가 사망 시 물리 공격력 비례 보호막 [2턴]과 디버프를 3개 해제한다. 이 효과는 전투당 2회 발휘된다. 스킬 강화 시 효과 적중 수치가 40%에서 49%가 된다. 주술사 4세트 효과가 효과 적중 35%인 걸 생각하면, 단독으로 4세트 효과 이상을 발휘하는 셈이다.
Q. 아멜리아의 핵심 버프와 디버프는?
A. 진탕과 회복 불가 디버프입니다.
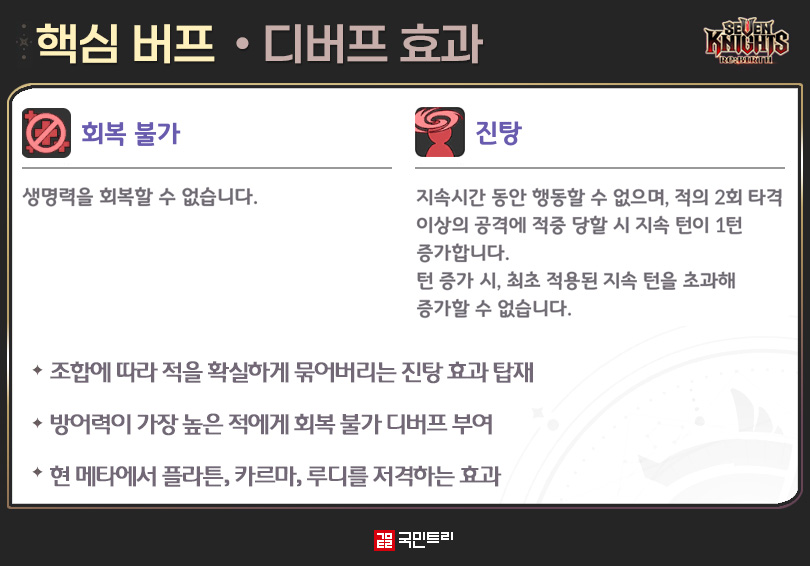
아멜리아는 고유 디버프를 들고 등장했다. 앞서 언급했던 진탕이다. 새로 추가된 디버프로, 지속시간 동안 행동이 막힌다. 여기에 그치면 다른 효과와 다를 게 없지만, 진탕은 조건에 따라 턴이 연장된다. 디버프가 걸린 대상이 2회 타격 이상을 당하면 지속 턴이 1턴 증가한다. 다만, 턴 증가 시 최초 적용된 지속 턴을 초과해 증가할 수 없다. 즉, 아멜리아의 진탕은 2턴이라 최대 2턴 이상으로 턴이 증가하지 않는다.
아멜리아가 거는 회복 불가는 대상이 정해져 있다. 방어력이 가장 높은 적으로, 현재 메타에서는 주로 플라튼, 카르마, 루디가 해당된다. 특히 플라튼은 현재 방덱의 메인으로 활약하고 있어 이를 저격하기 위한 능력으로 분석된다. 플라튼은 2초월 기준 전투 1회당 생명력을 3번 회복하는데, 이를 억제해 플라튼을 빠르게 처리할 수 있다. 카르마는 '절망의 폭풍' 스킬의 생명력 회복 효과를 받을 수 없게 된다. 이는 길드전 뿐만 아니라 결투장에서도 유용한 능력으로 사용될 가능성이 높다. 이후 결투장에서의 활약을 기대해 보자.
Q. 아멜리아의 추천 장비 세팅은?
A. 효과 적중과 저항을 추천합니다.
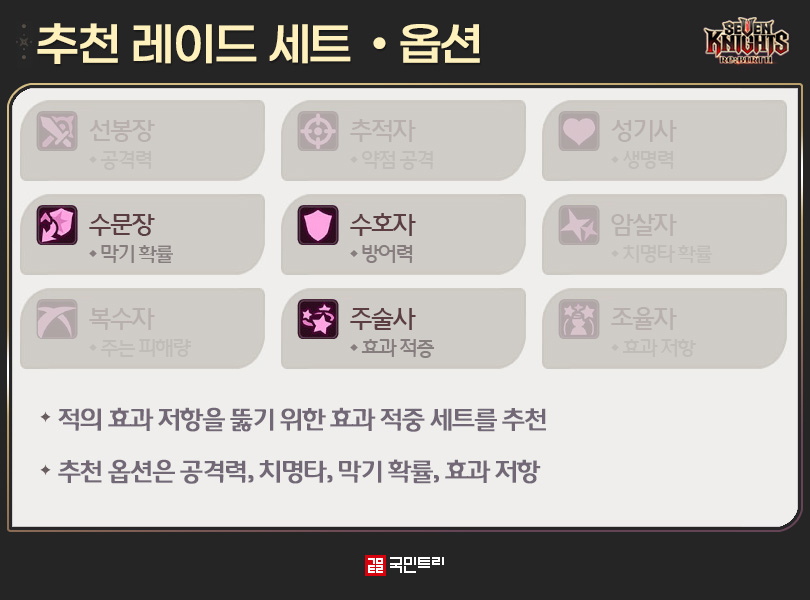
아멜리아의 추천 장비 세트는 주술사다. 패시브로 최소 40%의 효과 적중을 챙겼지만, 길드전에 특화된 유저들은 효과 저항 세팅도 높게 세팅한다. 이를 위해 효과 적중을 최대한 높게 잡는 게 좋다. 특히 주술사 4세트 옵션엔 효과 적용 확률 10% 증가가 붙어 있다.
이 효과를 따로 챙길 수 있는 장비는 주술사가 유일하다. 진탕과 회복 불가 적중을 위해 꼭 필요한 능력이니 되도록 주술사 세트를 채용하자. 주술사를 제외한 조율자, 수문장 등의 세트를 착용할 땐 효과 적중을 메인 옵션으로 챙기자. 효과 적중 외에 추천하는 옵션은 막기 확률, 효과 저항이다. 주 활약처가 PvP 콘텐츠인 만큼 적의 디버프 회피와 생존이 중요하기 때문이다.
- [Today's steam] Animorphs officially released, recording 100,000 Concurrent Players
- GTA 6 Online to support up to 32 players, confirmed through lawsuit documents
- An Ensemble Drama with Four Heroes, Fire Emblem Mazachanhong
- Gathering Cheonhwi and Slowly Falling for the Charm of 'Animo'
- [Today's steam] PC version of The War of Genesis Raising achieves 30,000 Concurrent Players
- What is the recently popular indie game genre 'DB Thriller'?
- [TGS 26] A world breathing with the Nexon Games style, Pareidolia
- [Photo] How does Riftbound captured in cards look?
- [TGS 26] Hyung-tae Kim "AI video was an experiment, I apologize"
- [TGS 26] Tokyo Game Show decided to close one day early due to typhoon





