

[Meca Ranking] The choice of Champion Arena top 8 rankers in Goddess of Victory: NIKKE is 'Shotgun'
[메카 랭킹] 니케 챔레나 8강 랭커들의 선택은 '샷건'

'Goddess of Victory: NIKKE' Champion Arena Season 14 has officially wrapped up, and we are already gearing up for Season 15. Unlike the previous run, Season 14 saw a significant surge in ranked players leaning heavily into shotgun-wielding units. In fact, two of the six Burst III units that achieved a 100% pick rate were the backbone of these shotgun decks. While its overall pick rate dipped slightly, the 'Tactical Up' Vesti (or 'Tactical Vesti') continued to make its presence felt. We have broken down all the tactical shifts below.
Champion Arena Top 8 Ranker Squad NIKKE Pick Rates
※ Based on data from 40 squads used by Top 8 rankers in the 'Champion Arena' between October 8 and October 22.
※ Please note that the tracking group changes with every season.
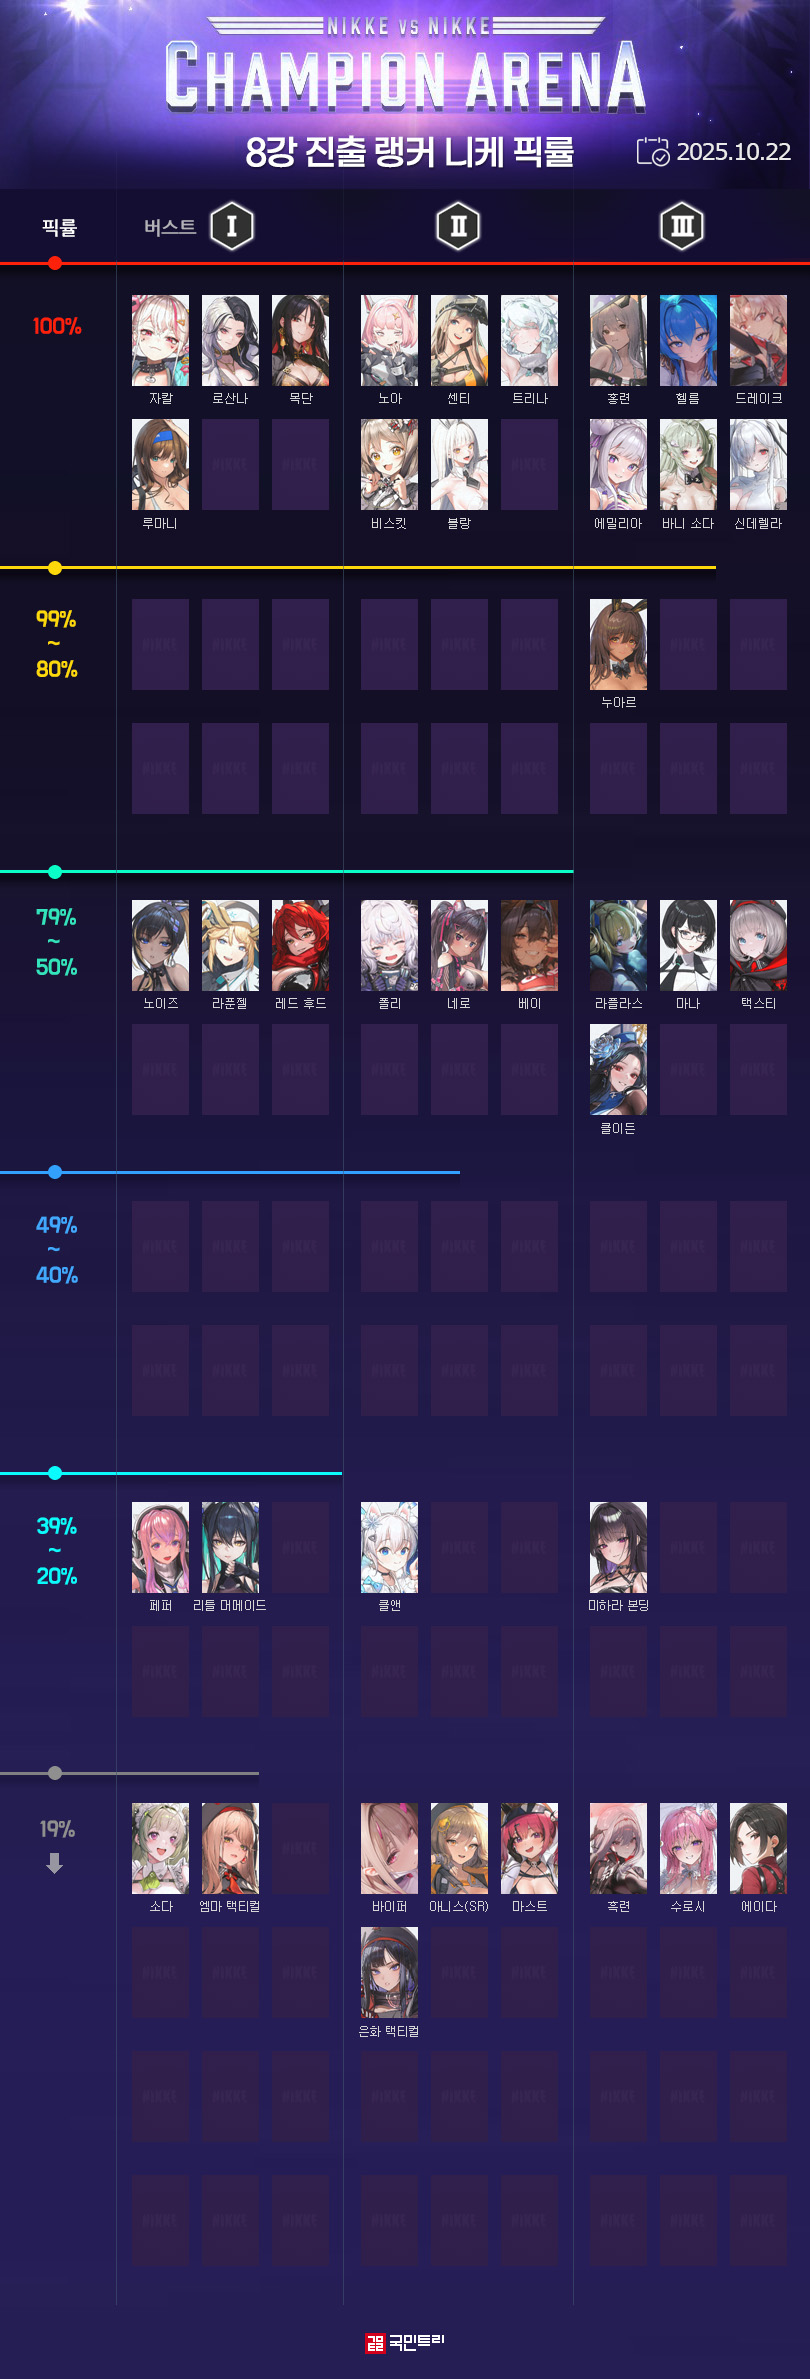
The choices made by the Top 8 in the Champion Arena Beta Season 14 showed a distinct shift from Season 13. For Burst I, Rumani replaced Rapunzel, while Blanc dominated Burst II. As for Burst III, the trio of Bunny Soda, Cinderella, and Treasure Drake hit a 100% pick rate—all staples of high-tier arena play. Analyzing the Burst III data, it is clear that the rankers converged on a specific shotgun-centric composition. Treasure Drake is now mandatory for these builds, usually paired with Bunny Soda as the main damage dealer, while Noir—seen in 7 out of 8 squads—acts as the anchor for the shotgun setup.
Tactical Vesti, which stole the show last season, was used by only six rankers this time around. Don't let the numbers fool you, though; it remains a powerhouse. As you will see, the eventual champion relied on it. Furthermore, that very same champion was one of only five players in the Top 64 to field Ada.
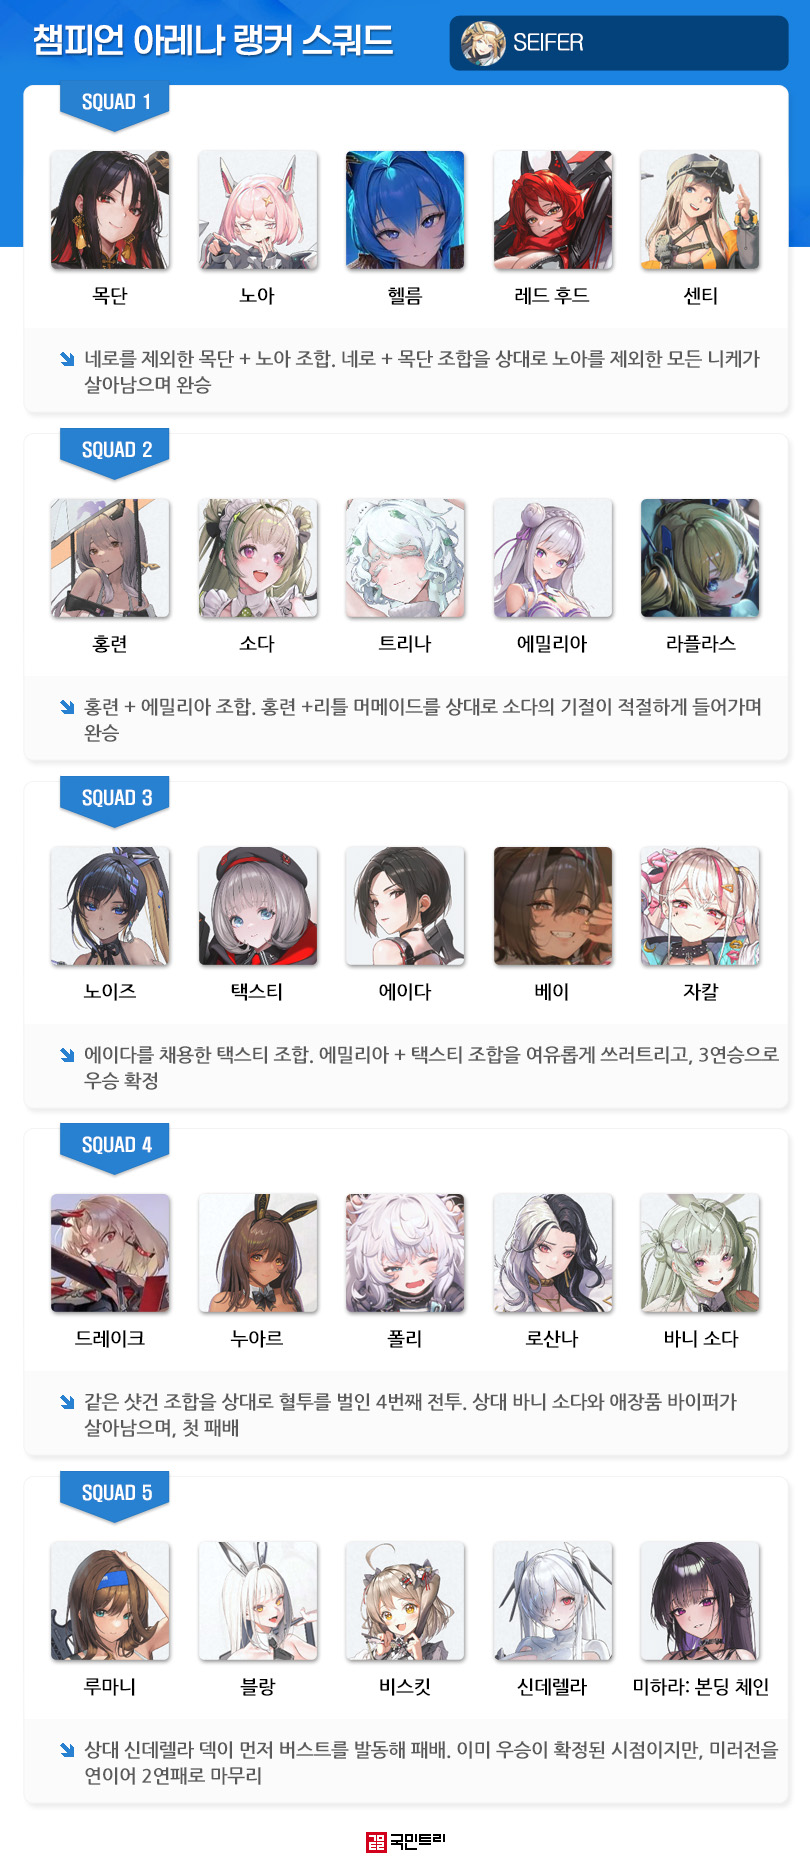
Let’s look at the winning squad from SEIFER, who leveraged both Tactical Vesti and Ada. After stalling out in the Round of 16 last season, SEIFER clawed his way to victory by taking down the dark horse, Helvet, in the semi-finals, followed by a clean three-game sweep. A second career title is certainly nothing to sniff at. As mentioned, he was the only player in the Top 8 to successfully deploy Ada.
The secret to the three-game sweep? The Mokdan-Noah deck, the Scarlet-Emilia deck, and the Tactical Vesti-Ada combination. In the final, he dismantled his opponent's Nero-Mokdan setup. Noah’s invulnerability is a fantastic tanking tool, though you have to be wary—if your opponent fields Rosanna, Noah’s invulnerability and Mokdan’s buffs can be stripped away in a heartbeat.
SEIFER’s Scarlet deck featured Soda at Burst I, Emilia at Burst III, and Treasure Laplace. By utilizing Soda’s stun to disrupt the enemy’s burst window, he bought enough time for Emilia and Laplace to fire off their own, effectively neutralizing the opponent's Scarlet squad.
The final deck that secured the trophy was the Tactical Vesti-Ada combo. Ada provides a defence-ignore damage buff, which synergises perfectly with Tactical Vesti’s innate defence-ignore mechanics. Adding Jackal, Bay, and Noise to spread incoming damage was a stroke of genius. He walked away with three wins against the opponent’s Emilia-Tactical Vesti deck without losing a single unit.
Arena Meta Analysis
Little Mermaid vs. Soda
In an arena meta where the speed of your burst execution is everything, a well-timed stun is a devastating debuff. This is why top players are constantly cycling between Little Mermaid and Soda. While Little Mermaid currently holds a higher pick rate, the recent championship win proves that Soda still has a seat at the table.
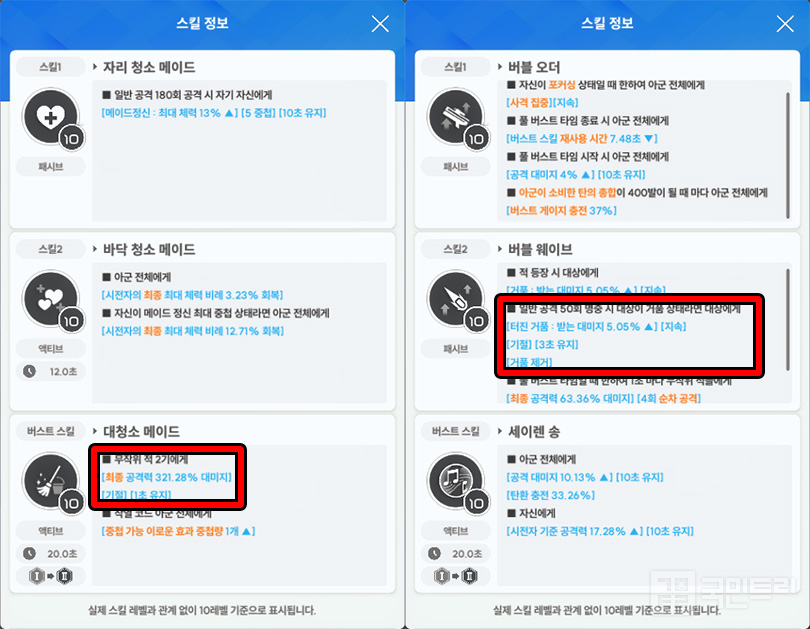
Soda’s stun lasts for 1 second, whereas Little Mermaid’s lasts for 3, providing a much longer window of opportunity. Soda applies the stun to two random enemies upon bursting, whereas Little Mermaid procs it after landing 50 basic attacks on a 'Bubble' state target. The trade-off is clear: Soda hits more targets, but Little Mermaid is more focused. Soda’s stun is admittedly RNG-dependent, but catching an enemy Burst I or II unit in that stun can ruin their entire timing. It can even turn the tide if you burst second, shutting down their main dealer mid-rotation.
Little Mermaid’s stun requires 50 basic attacks on a 'Bubble' target. Because the Arena is automated, aiming is tricky. Often, the stun hits a taunting unit like Noise or Noah instead—meaning your defensive measures can accidentally become your greatest liability. Champion Arena rewards good drafting, but remember that in Special Arena, you can adjust your order to counter the opponent. Just don't forget that raw unit growth is still the most important factor of all.
NIKKE News
Check your total gear stats via the Shifti Pad!
Are you using the official Blabla community? It is the central hub for NIKKE players worldwide to catch official news and participate in exclusive events for extra rewards. It even allows you to sync your account to view your unit stats without logging into the game.
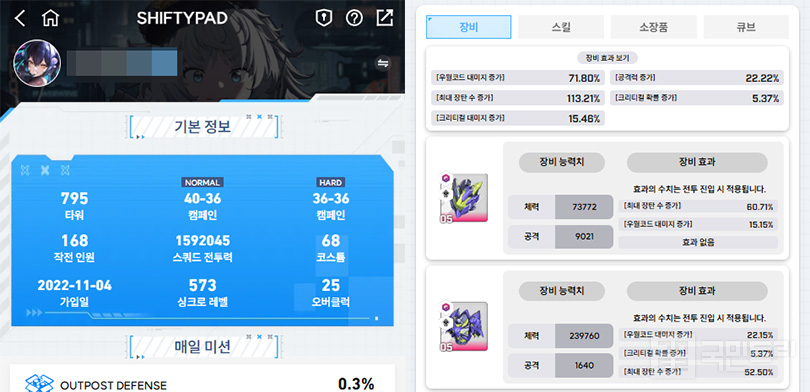
The 'Shifti Pad' is particularly useful. Since in-game displays only show Overload gear stats per piece, you would normally have to do the manual arithmetic to find your total elemental damage. The Shifti Pad does the heavy lifting for you, aggregating all gear effects. It is a massive time-saver for checking total elemental damage and attack power before heading into demanding content like Solo Raid.
User Poll - The Top Priority for Overload Options?
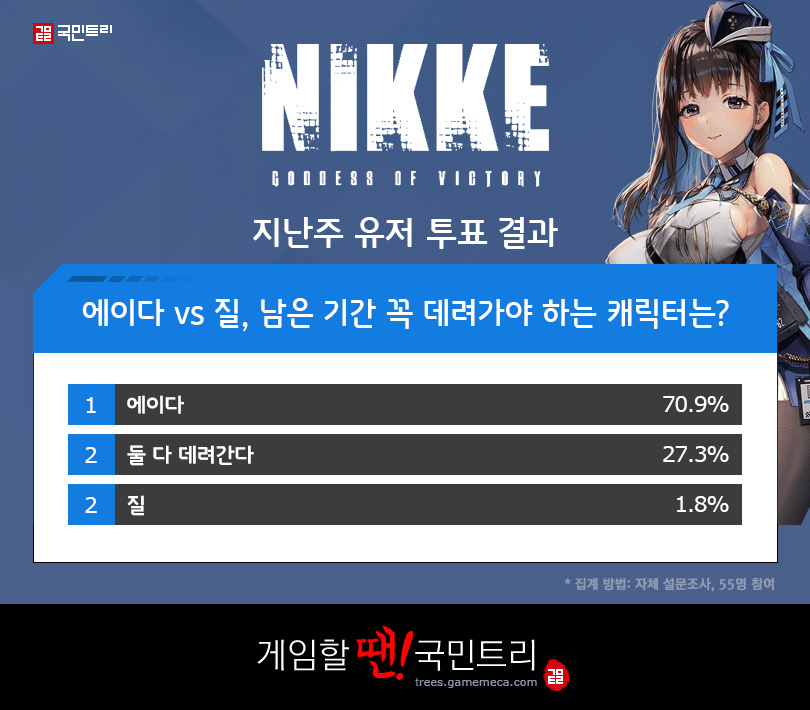
Our last poll asked about investments in the Resident Evil collab characters. The results? 70.9% of players chose to pull only for Ada. She proved her worth in both the Arena and Solo Raid, becoming the 'must-have' recruit for the community. In second place was 'both,' while Jill trailed in third. While Jill is a pure damage dealer, the consensus is that existing units already perform well enough that she wasn't strictly necessary.
Overload gear is the heart of character progression. Elemental damage increase, max ammo increase, and attack power increase—often abbreviated as the 'holy trinity'—are the most sought-after stats. With the 3rd anniversary on the horizon, we are seeing a flood of guides for returning and new players. What is your go-to Overload priority? Cast your vote, and we will reveal the results in next week’s Meca Ranking.

'승리의 여신: 니케' 챔피언 아레나 시즌 14가 마무리되고, 시즌 15 개최를 준비 중입니다. 시즌 14는 직전과 다르게 샷건 니케를 사용한 랭커들이 많이 올라왔죠. 픽률 100%를 기록한 버스트 3 니케 6명 중 2명이 샷건 덱의 핵심 니케들이기도 했습니다. 아울러 이번엔 픽률이 감소했지만, 베스티: 택티컬 업(이하 택스티)의 활약도 이어졌죠. 관련 내용을 본문에 정리했습니다.
챔피언 아레나 8강 진출 랭커 스쿼드 니케 픽률
※ 10월 8일~10월 22일 진행한 ‘챔피언 아레나’ 8강 진출 랭커 기준 총 40개 스쿼드 정보를 기준으로 합니다.
※ 매 시즌 집계 그룹이 달라지는 점 참고 바랍니다.
챔피언 아레나 베타 시즌 14 8강 랭커들이 선택한 니케는 시즌 13과 조금 다른 양상이었습니다. 버스트 1에선 라푼젤 대신 루마니가, 버스트 2는 블랑이, 버스트 3은 바니 소다와 신데렐라, 애장품 드레이크가 픽률 100%를 기록했죠. 모두 아레나에서 활용성이 높은 니케들입니다. 이 중 버스트 3의 픽률을 토대로 분석해보면, 모든 랭커들이 비슷한 조합의 샷건 덱을 애용한 것을 알 수 있습니다. 애장품 드레이크는 샷건 조합의 필수 요소이며, 메인 딜러로 바니 소다를 채용했죠. 8명 중 7명이 사용한 누아르도 샷건 덱의 중심을 맡았습니다.
지난 시즌 부각된 택스티는 이번엔 6명의 랭커만 사용했습니다. 하지만, 픽률이 소폭 떨어졌어도 여전히 강한 건 변함이 없었죠. 이어 소개할 우승 랭커가 택스티를 사용했거든요. 아울러 해당 랭커는 64강에서 에이다를 쓴 다섯 명 중 한 명이었습니다.
택스티와 에이다를 활용해 우승한 SEIFER 님의 스쿼드를 알아보죠. 지난 시즌 16강에 그쳤으나, 이번에 다크호스 赫爾薇特 님을 4강에서 꺾고 올라와 3연승으로 우승의 영광을 안았습니다. 개인 통산 2회째 우승이라 감회가 남다를 것 같네요. 앞서 잠깐 언급한 것처럼 에이다를 쓴 유일한 8강 진출 랭커입니다.
3연승의 주역은 목단·노아 덱, 홍련·에밀리아 덱, 택스티·에이다 덱이었습니다. 결승전에서 상대의 네로·목단 덱을 쓰러트렸죠. 노아의 무적으로 확실한 탱킹이 가능한 장점이 있습니다. 대신 상대가 로산나를 채용했을 경우, 노아의 무적과 목단의 버프가 벗겨져서 주의가 필요합니다.
SEIFER 님이 사용한 홍련 덱은 버스트 1 소다, 버스트 3 에밀리아, 애장품 라플라스를 사용했습니다. 소다의 기절을 사용해 적 버스트를 방해하고, 에밀리아와 라플라스로 더 빠른 버스트 충전을 노린 거죠. 노림수가 제대로 들어가, 상대 홍련 덱을 격침시켰습니다.
우승을 안겨준 마지막 덱은 택스티·에이다 조합입니다. 에이다가 방어력 무시 대미지 버프를 제공하는데, 택스티가 방어력 무시 딜러거든요. 자칼과 베이, 노이즈를 넣어 대미지 분산을 노린 것도 정답이었습니다. 상대의 에밀리아·택스티 덱을 상대로 아무도 죽지 않고 3승을 기록해 무난하게 승리했습니다.
아레나 메타 분석
리틀 머메이드 vs 소다
버스트를 얼마나 빨리 발동하느냐가 관건인 아레나에서 기절은 굉장히 강력한 디버프입니다. 이를 위해 랭커들은 리틀 머메이드와 소다를 사용하고 있죠. 픽률 기준으로 보면 리틀 머메이드가 우세하지만, 앞서 소개한 우승 랭커처럼 소다를 넣은 사례도 있습니다.
소다는 1초, 리틀 머메이드는 3초로 기절 유지 시간이 훨씬 길죠. 소다는 버스트 발동 시 무작위 적 2기에게, 리틀 머메이드는 '거품' 상태인 대상에게 일반 공격 50회 명중 시 기절이 부여됩니다. 대상은 소다가 더 많고, 리틀 머메이드는 단독 대상이라는 차이점이 있죠. 소다의 기절은 무작위인 만큼 운에 기대야 합니다. 그 대신 적 버스트 1이나 버스트 2 니케를 기절시키면, 상대의 풀 버스트 타이밍을 늦출 수 있죠. 또한, 상대보다 늦게 사용했어도 풀 버스트 타임 중인 적 딜러를 잠시 무력화시켜 승리를 가져올 수 있습니다.
리틀 머메이드의 기절 효과는 거품 상태인 적에게 일반 공격을 50회 맞춰야 작동합니다. 그러나 아레나는 자동으로 진행되기에 누군가를 노리고 사용하는 건 힘들죠. 대신, 노이즈나 노아 등 도발 니케가 여기에 휩쓸려 기절이 걸리는 사례가 자주 나옵니다. 아군을 보호하기 위해 넣은 수단이 오히려 약점이 되는 거죠. 챔피언 아레나는 첫 편성으로 대진운이 갈리닙니다. 다만, 스페셜 아레나는 공격 시 상대 덱에 맞춰 순서를 바꿀 수 있으니, 이점을 착안해 활용해 보세요. 물론, 해당 니케의 성장 여부가 더 중요하다는 걸 잊어선 안 됩니다.
니케 이슈
장비 효과 통합 수치는 시프티 패드에서 체크!
공식 커뮤니티 블라블라는 이용 중이신가요? 전세계의 니케 유저들이 한 곳에 모이는 곳이고, 공식 소식과 독자 이벤트를 개최해 추가 보상을 챙길 수 있습니다. 아울러 계정을 연동시켜 게임에 접속하지 않아도 보유중인 니케들의 정보를 보는 기능도 있죠.
대표적으로 '시프티 패드'가 유용합니다. 오버로드 장비의 수치를 인게임에선 부위 별로만 보여주기에 현재 니케의 우월 코드 합계가 몇인지는 직접 계산해야 하죠. 그러나 시프티 패드를 이용하면, 니케의 장비 효과를 한 번에 정리해 보여줍니다. 따로 계산할 필요가 없어 우월 코드, 공격력 합을 동시에 파악 가능할 수 있답니다. 솔로 레이드 등 수치가 중요한 콘텐츠에 앞서 한눈에 파악하기 쉬우니, 해당 기능을 꼭 활용하세요.
유저 투표 - 오버로드 옵션 중 최우선 순위는?
지난 시간 바이오하자드 캐릭터 투자 관련 주제로 투표를 진행했습니다. 투표 결과 에이다만 뽑은 유저가 가장 많았습니다. 70.9%라는 압도적인 선택을 받았죠. 아레나, 솔로 레이드 양쪽에서 성능을 입증해 유저 사이에서 최소 명함은 챙겨 가라고 추천한 캐릭터였죠. 2위는 둘 다 데려간다, 3위는 질이었습니다. 질은 퓨어 딜러로 등장했으나, 먼저 나온 니케들의 성능이 뛰어나 굳이 챙길 이유가 없었다는 게 중론이었습니다.
오버로드 장비는 니케 육성의 핵심입니다. 우월 코드 대미지 증가, 최대 장탄 수 증가, 공격력 증가는 유저들이 꼽는 핵심 옵션입니다. 주로 '우장공'이라 묶어서 표현하죠. 3주년이 다가오는 지금, 새로 유입될 신규 유저와 오랜만에 복귀할 유저를 위해 가이드를 작성하는 유저도 많아지는 추세입니다. 여러분이 추천하는 최우선 오버로드 옵션은 어떤 건가요? 투표를 부탁하며, 결과는 다음 주 메카 랭킹에서 공개하겠습니다.


- [Today's steam] Animorphs officially released, recording 100,000 Concurrent Players
- GTA 6 Online to support up to 32 players, confirmed through lawsuit documents
- An Ensemble Drama with Four Heroes, Fire Emblem Mazachanhong
- Gathering Cheonhwi and Slowly Falling for the Charm of 'Animo'
- [Today's steam] PC version of The War of Genesis Raising achieves 30,000 Concurrent Players
- What is the recently popular indie game genre 'DB Thriller'?
- [TGS 26] A world breathing with the Nexon Games style, Pareidolia
- [Photo] How does Riftbound captured in cards look?
- [TGS 26] Hyung-tae Kim "AI video was an experiment, I apologize"
- [TGS 26] Tokyo Game Show decided to close one day early due to typhoon





