

[Nikke Tips] Is this the true power of the Burst II supporter 'Nayuta'?
[니케 꿀팁] 이것이 2 버스트 지원형 '나유타'의 힘?

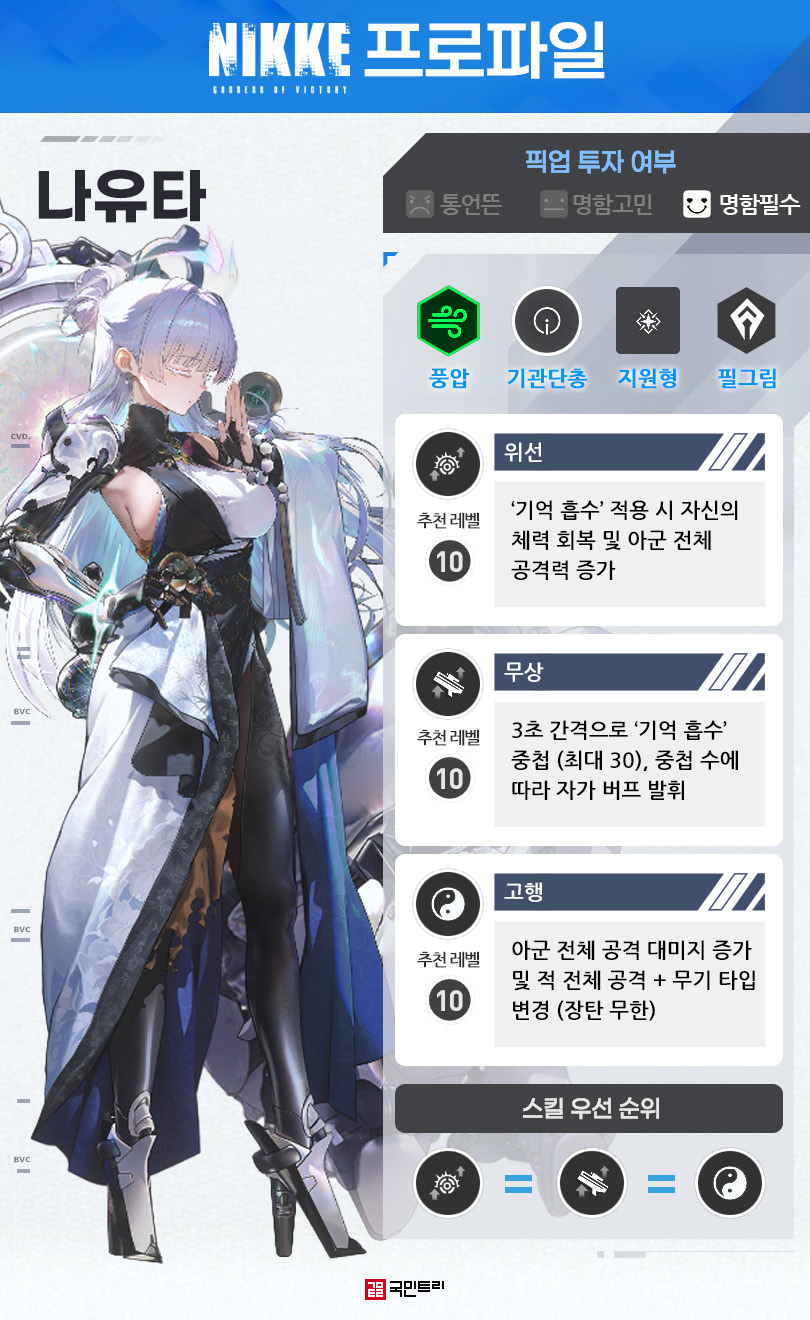
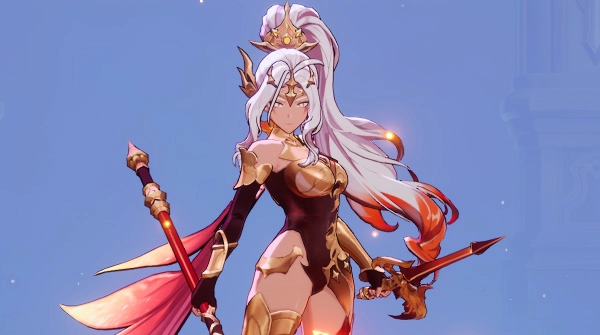
To celebrate the 3rd anniversary of Goddess of Victory: NIKKE, three new Pilgrims have joined the fray. Among them, the first banner unit, Nayuta, has become the talk of the town. She is making waves in both the main story and the 3rd-anniversary event, proving her worth with stats that truly befit a Pilgrim. Most notably, she is a Burst 2 dealer, shattering the tired old stereotype that 'Burst 2 units lack punch.' Naturally, the community is currently debating her efficiency, and we at KookminTree have put her to the test.
Q. What is Nayuta's core mechanism?
A. She is a 'deal-support' unit that buffs herself and her allies while dealing significant damage.
Nayuta is a Supporter, Burst 2, SMG-wielder, and Wind-code NIKKE. While 'Supporter' might tempt you to pigeonhole her as a pure buffer, she is a proper 'deal-support.' She packs a serious punch herself while bolstering the team. Historically, Burst 2 units in Goddess of Victory: NIKKE have been relegated to pure support roles, often trailing far behind Burst 3 damage output. Nayuta, however, bridges that gap with her own buffs and a kit that rivals top-tier damage dealers.
Her Skill 1, 'Hypocrisy,' grants her an Indomitable effect at the start of battle—a one-time deal that lasts for 9 seconds. When her Skill 2's 'Memory Absorption' stacks, she applies 'Core Damage increase + Attack boost based on caster + HP recovery distribution' to all allies for 5 seconds. She also gains a self-heal based on her max HP. The distribution effect is a neat bonus for team sustainability. Furthermore, when she performs a full charge attack while in 'Memory Combustion,' she deals damage to all enemies, with extra damage against targets. You might wonder why an SMG unit has full-charge mechanics; keep reading to find out.
Skill 2, 'Gratuitousness,' builds 'Memory Absorption' stacks every 3 seconds. Each stack boosts Accuracy, capping at 30. Like Skill 1, it provides self-buffs based on these stacks. At skill level 10, it grants a 15.2% Attack increase, 20.27% Attack Damage, and 21.05% Core Damage.
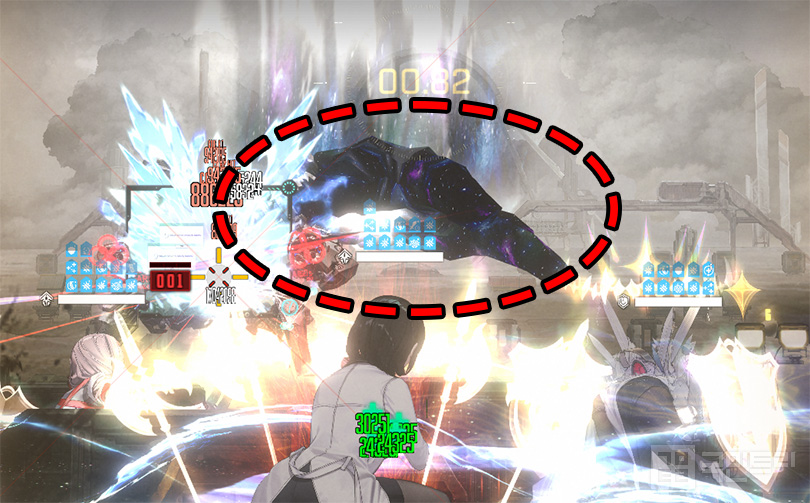
Her Burst, 'Penance,' grants all allies a 15-second Attack Damage buff and strikes all enemies. She then forces a weapon change to a fixed 1.8-second charge time. Her Skill 1's full-charge mechanic is designed to sync with this. During this window, her ammo is infinite, meaning no reloading. The attack is calculated as a screen-wide hit, capable of destroying incoming projectiles. You'll know it's triggered when you see a giant hand slamming down on the battlefield.
Q. How does she actually perform?
A. Stronger than Mana and on par with Wind-Asuka.
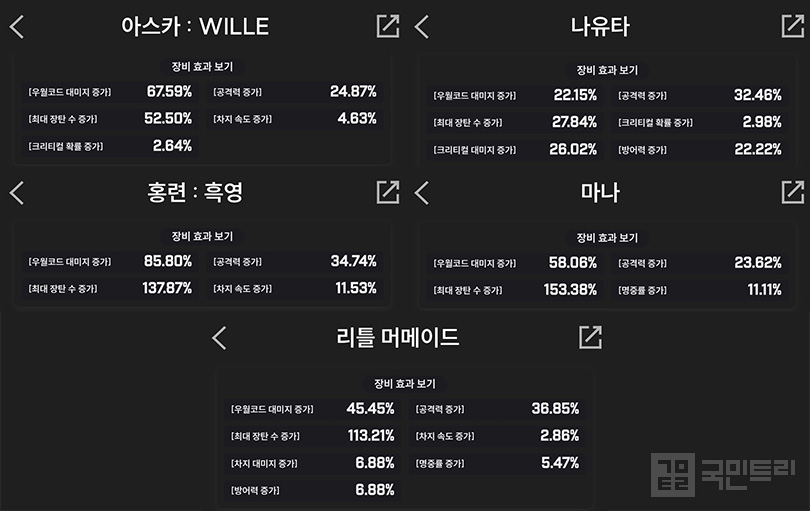
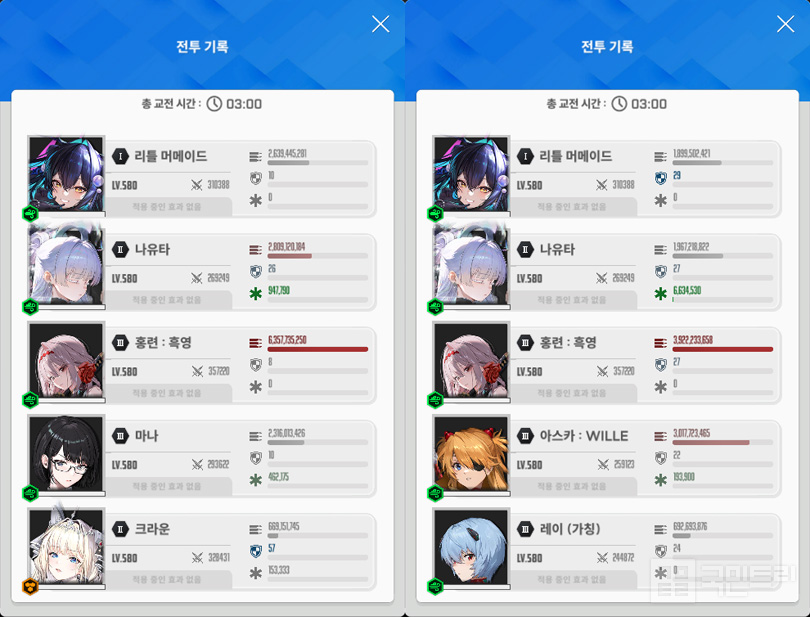
Let's get down to the numbers. We tested her against the Kraken in the Solo Raid and the Union Shooting Range (3-minute boss battle). Nayuta's specs: 0-star, skill levels at 10, SR Collection Item level 10, and Relic Bear Cube level 15. Refer to the image above for her Overload gear options.
In the Union Shooting Range, she outperformed a 3-star Mana. Despite having a 35.91% lower elemental code damage bonus, she compensated with 8.84% higher Attack, resulting in a raw damage lead of 493,106,758. For a Burst 2 Supporter, this is frankly absurd.
Compared to Asuka Langley (Wind-Asuka), who had 45.44% higher elemental damage but 7.59% lower Attack, Nayuta trailed by 1,050,504,643 damage. When accounting for the stat discrepancies, it's clear they are in the same weight class. In tests with synchronized settings, Nayuta actually managed to edge out Wind-Asuka.
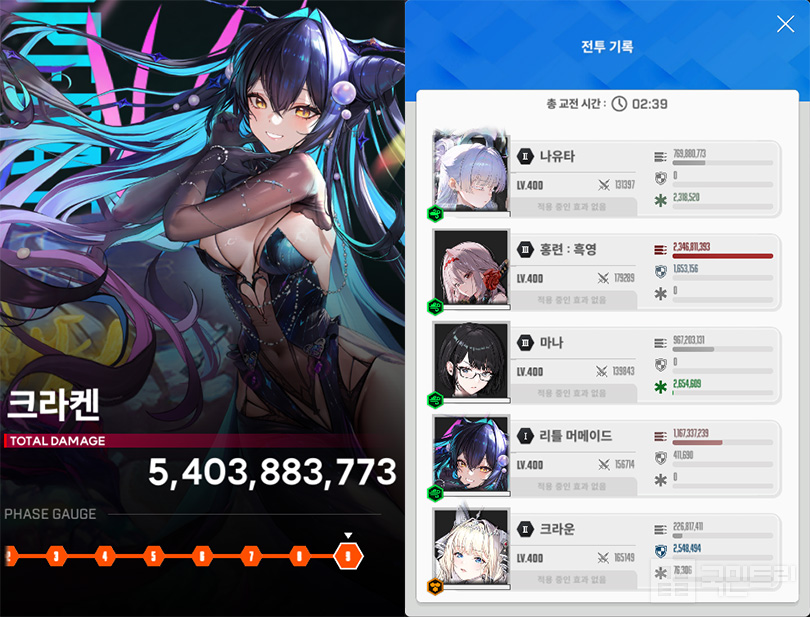
We then took her to the Kraken in the Solo Raid. The team comp was 'Nayuta - Scarlet: Black Shadow - Mana - Little Mermaid - Crown.' We rotated bursts between Crown and Nayuta. Replacing Maid Mast with Nayuta resulted in a successful Stage 9 clear. If you lack Maid Mast, Nayuta is your ticket to that stage.
For those asking, 'Can she replace Crown?'—the short answer is no; they serve different purposes and are best used together. Crown provides overwhelming buffs but lacks personal DPS, while Nayuta brings massive damage but offers no team protection beyond healing. They are complementary, not interchangeable.
Q. How much should I invest in Nayuta?
A. Just pull. Pull twice. Pull three times.
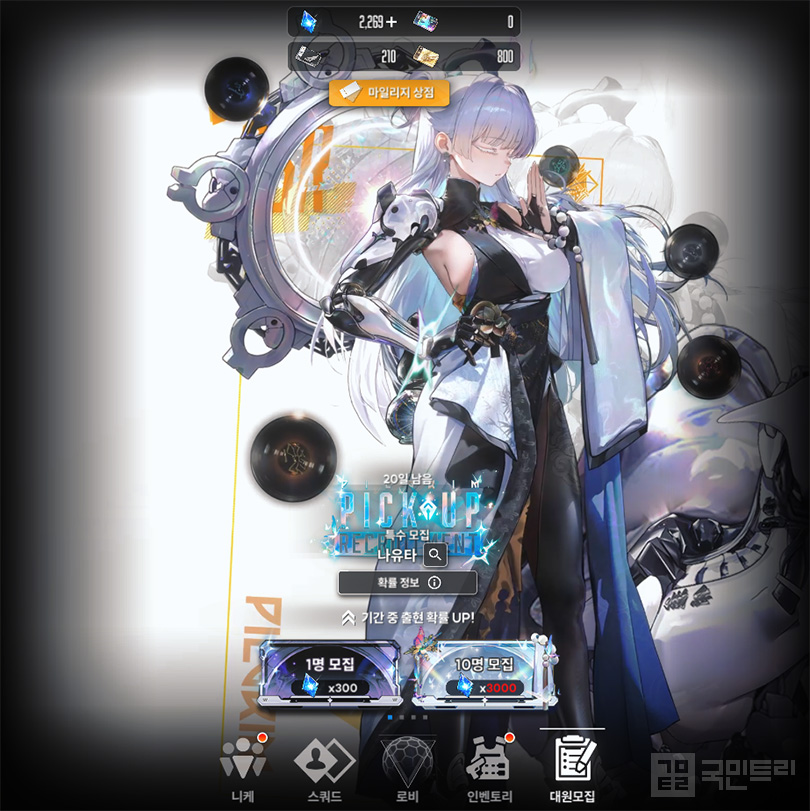
Finally, should you invest? Without a doubt, secure at least one copy. Even if it means dropping 200 Gold Mileage tickets, it is worth it. As mentioned, her performance is top-tier. You’ll want every capable supporter you can get for upcoming Solo Raids, especially considering the scarcity of viable Wind-code units.
That said, don't dump your entire savings just yet. The 3rd-anniversary event is handing out Advanced Recruit Vouchers and daily free pulls. Pace yourself until the banner ends. Keep in mind that the Riberio banner is coming next week, so manage your Jewels and tickets wisely.
'승리의 여신: 니케' 3주년을 맞이해 3명의 필그림이 전장에 합류했다. 그중 첫 번째 모집 대상인 나유타가 유저 사이에서 큰 화젯거리다. 메인, 3주년 스토리 양쪽에서 활약하며, 필그림에 걸맞은 성능으로 무장했기 때문이다. 특히 강력한 2버스트 딜러인 점이 포인트다. '2 버스트는 딜이 약하다'라는 선입견을 부순 첫 사례로 대두했다. 이에 현재 유저들의 성능 평가가 이뤄지는 중인데, 국민트리 또한 신규 필그림 나유타의 성능을 분석했다.
Q. 나유타는 어떤 메커니즘을 지녔나요?
A. 아군과 자신에게 버프를 제공하고, 강력한 피해를 주는 딜포터입니다.
나유타는 지원형, 2 버스트, 기관단총, 풍압 코드 타입 니케다. 지원형이라 퓨어 버퍼를 생각할 수 있지만, 나유타는 딜포터다. 스스로 강력한 딜을 넣고, 아군을 보조한다. 그동안 승리의 여신: 니케의 2 버스트 니케들은 대부분 퓨어 버퍼였고, 딜러 니케의 대미지는 3 버스트 니케와 격차가 컸다. 그러나 나유타는 특유의 강력한 버프와 스킬 구성으로 3 버스트 니케에 비견된다.
1스킬 '위선'은 전투 시작 시 나유타에게 불굴 효과를 부여한다. 전투 중 1회 발동되며, 9초 유지된다. 2스킬의 '기억 흡수'가 중첩될 때 모든 아군에게 '코어 대미지 + 시전자 기준 공격력 증가 + 체력 회복 균등 분배'를 적용한다. 유지 시간은 5초다. 동시에 자신에겐 최종 최대 체력 비례 회복을 부여한다. 균등 분배 효과 덕에 아군 전체가 회복하는 건 덤이다. 아울러 풀 차지 공격 시 자신이 '기억 연소' 상태라면 적 전체에게 피해를 주고, 타깃이라면 추가 대미지를 입힌다. 기관단총 니케에게 왜 풀 차지 관련 효과가 있는지는 이어서 확인하자.
2스킬 '무상'은 3초마다 자신에게 기억 흡수 스택을 쌓는다. 1스택 당 명중률이 상승한다. 스택은 최대 30중첩까지 올라간다. 1스킬과 마찬가지로 기억 흡수가 적용될 때 자체 버프를 발휘한다. 중첩량에 따라 공격력, 공격 대미지, 코어 대미지가 증가하는 구조다. 스킬 10레벨 기준 공격력 15.2%, 공격 대미지 20.27%, 코어 대미지 21.05%다.
버스트 '고행'은 아군 전체에게 15초짜리 공격 대미지 증가 버프를 부여하며, 모든 적을 공격한다. 그 후 차지 시간 1.8초 고정 무기로 강제 변경된다. 1스킬의 풀 차지 관련 효과는 버스트와 연계되는 방식이다. 지속 시간 동안에는 장탄이 무한이라 재장전하지 않는다. 해당 공격은 적 전체를 공격하는 판정이라 투사체까지 파괴한다. 발동 여부는 전투 화면에 거대한 손이 내려치는 이펙트로 판별할 수 있다.
Q. 나유타의 실제 성능은 어떤가요?
A. 마나보다 강하고 풍스카와 비등한 수준입니다.
본격적인 나유타의 성능을 파악해 보자. 실험 장소는 이상 개체 요격전 크라켄과 유니온 사격장 철갑 코드 3분 보스전이다. 나유타의 스펙은 명함, 모든 스킬 레벨 10, SR 소장품 10단계, 렐릭 베어 큐브 15단계를 착용했다. 오버로드 옵션은 상단의 이미지를 참고하자.
먼저 유니온 사격장에서의 실험 결과, 3돌파 마나보다 더 높은 피해량을 달성했다. 공격력이 8.84% 포인트 높은 대신, 우월코드 대미지 증가는 35.91% 포인트 낮았다. 정확한 대미지 차이는 4억 9,310만 6,758로 나유타가 앞섰다. 2 버스트 지원형 니케의 대미지라곤 믿기지 않는 수준이다.
반대로 우월코드 대미지가 45.44% 포인트 높고, 공격력이 7.59% 포인트 낮은 아스카 빌레(이하 풍스카)보단 대미지가 적게 나왔다. 차이는 10억 5,050만 4,643이었다. 공격력과 우월코드의 차이와 비슷한 수치였고, 이를 토대로 분석해보면 풍스카와 어깨를 나란히 하는 수준이다. 실제로 사격장의 동기화 옵션으로 동일한 조건에서 써본 결과 나유타가 근소하게 풍스카보다 높은 대미지를 달성했다.
이어서 이상 개체 요격전 크라켄에서 실험을 진행했다. 조합은 '나유타 - 홍련: 흑영 - 마나 - 리틀 머메이드 - 크라운'이다. 버스트는 전체 공격 시에만 크라운, 이외 패턴에는 나유타의 버스트를 사용했다. 마스트: 로망틱 메이드(이하 메이드 마스트)를 대신해 넣은 결과는 9단계 클리어였다. 따라서 메이드 마스트가 없는 유저라면, 나유타를 채용해 크라켄 9단계에 도전하자.
'그럼 크라운 대신 쓸 수 있나?'라고 묻는 유저가 있을 것이다. 결론부터 말하면, 서로 결이 달라 대체할 수 없다. 오히려 둘을 함께 사용하는 게 이득이다. 크라운은 스스로의 공격 능력은 낮은 대신 압도적인 버프를 제공한다. 나유타는 훌륭한 대미지를 자랑하나, 체력 회복 외엔 아군을 보호하는 능력이 없다. 서로 일장일단이 있는 셈이다.
Q. 나유타는 얼마나 투자하면 되나요?
A. 그냥 뽑으세요. 두 번 뽑으세요. 세 번 뽑으세요.
마지막으로 나유타 투자 여부다. 두말할 것 없이 무조건 명함을 챙겨가자. 골드 마일리지 200장을 사용해서라도 얻는 게 좋다. 소개했듯이 나유타의 성능은 뛰어난 축에 속한다. 앞으로 있을 솔로 레이드를 위해서 조금이라도 서포터는 많은 게 좋다. 특히 풍압 코드 니케는 그 수가 적다.
물론, 모든 재화를 투자하는 건 추천하지 않는다. 3주년을 기념해 고급 모집 티켓과 매일 1회 무료 모집을 제공 중이다. 이를 최대한 활용해 픽업 종료 전까지 명함을 얻는 걸 목표로 두자. 아울러 다음 주 리버렐리오 모집이 예정되어 있다. 그러니, 준비한 쥬얼과 티켓을 적당량 사용해 투자 분산에 신경 쓰자.


- [Today's steam] Animorphs officially released, recording 100,000 Concurrent Players
- GTA 6 Online to support up to 32 players, confirmed through lawsuit documents
- An Ensemble Drama with Four Heroes, Fire Emblem Mazachanhong
- Gathering Cheonhwi and Slowly Falling for the Charm of 'Animo'
- [Today's steam] PC version of The War of Genesis Raising achieves 30,000 Concurrent Players
- What is the recently popular indie game genre 'DB Thriller'?
- [TGS 26] A world breathing with the Nexon Games style, Pareidolia
- [Photo] How does Riftbound captured in cards look?
- Valve's New VR Device 'Steam Frame' Goes on Sale, Priced at 1.42 Million Won
- [TGS 26] Leaping into a global event, Tokyo Game Show 2026 opens





