

[Nikke Tips] The New Partner for Scarlet: Black Shadow, 'Liberelio'
[니케 꿀팁] 홍련: 흑영의 새로운 파트너 니케 '리버렐리오'

The second pickup for the 3rd anniversary of Goddess of Victory: NIKKE has arrived: Liberelio. Having charmed the community in the main story a week prior, anticipation was high. Players wasted no time stress-testing her on day one, and the consensus is in: she is the new partner for the God tier game character Scarlet: Black Shadow (hereinafter 'BS'). However, her skill set is a bit of a maze, requiring some serious number-crunching to master. KookminTree has put Liberelio's performance to the test.
Q. What is Liberelio's core mechanic?
A. Her self-buffs shift based on the target, and she provides specialized buffs to specific allies.
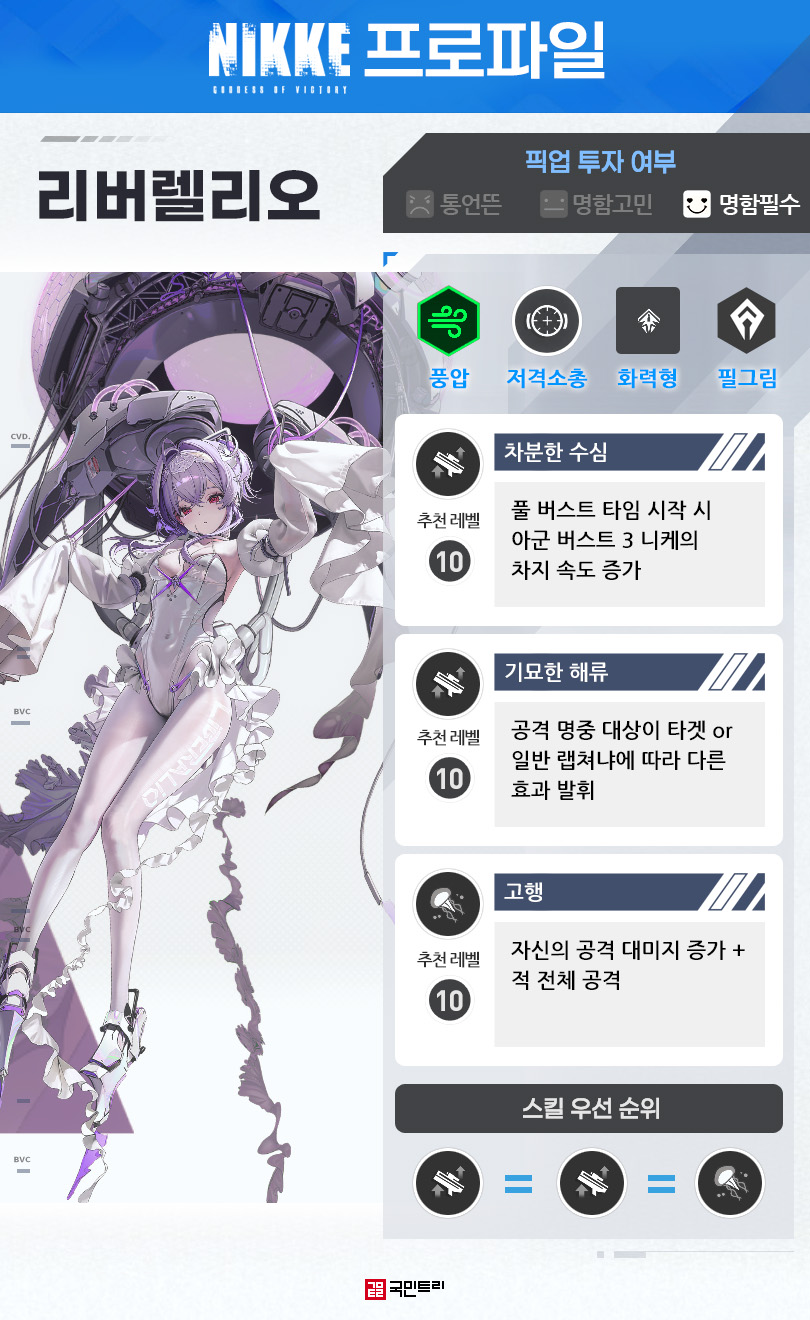
Liberelio is a Wind Code, Burst 3, Sniper Rifle, Attacker type Nikke. Her effects vary based on the target and trigger upon entering Full Burst or landing full-charge shots.
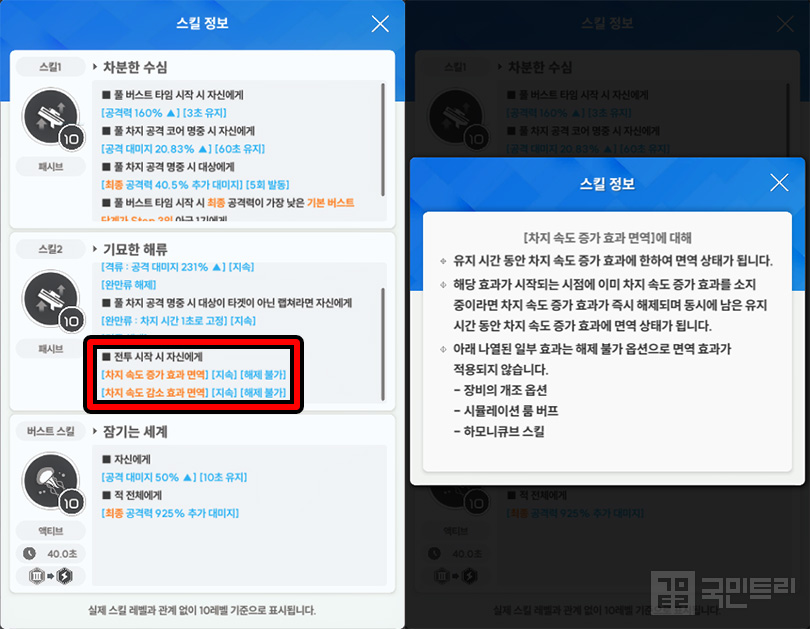
Skill 1, 'Calm Depth,' has two effects triggered by full-charge shots and two by entering Full Burst. The former grants a 60-second attack damage buff to herself on a 'Core' hit, or bonus damage on a regular hit. The latter gives her a massive 3-second attack power buff and increases the charge speed of the Burst 3 ally with the lowest final attack power. The attack buff is a staggering 160% at level 10, clearly designed so that she doesn't receive the charge speed buff herself—which is crucial, as she shouldn't be buffed in that department. The charge speed increase is 12.74% at level 10. Why she shouldn't receive this buff becomes clear in Skill 2.
Skill 2, 'Strange Currents,' changes based on whether the target is a boss or a regular Rapture. Hitting a boss grants an attack damage buff, while hitting a regular Rapture locks her charge time to 1 second. She also gains immunity to charge speed buffs/debuffs at the start of battle. This immunity is why she must avoid the Skill 1 charge speed buff. This isn't affected by equipment modification, Simulation Room buffs, or Harmony Cube skills. Her Burst, 'Submerged World,' is a straightforward screen-clearer that also grants her a 47.73% attack damage buff for 10 seconds.
The condition for the Skill 1 charge speed buff—targeting the 'Burst 3 ally with the lowest final attack power'—is surprisingly tricky. If your primary Burst 3 units are well-invested, Liberelio often ends up having the lowest attack power herself. If you're running two Burst 3 units and the buff isn't triggering, it means the other unit's attack power is higher. In Goddess of Victory: NIKKE, 'final' attack power factors in base stats, equipment, modification effects, and combat buffs. She needs to have a lower total than the other unit, even after factoring in her own self-buffs.
Even if she doesn't receive the buff, you might run into issues where it lands on the wrong unit. Many players plan to use her with BS and Helm (Treasures), but reports suggest the buff sometimes drifts to Helm instead. I highly recommend running a few tests in the Shooting Range to ensure your setup works as intended.
Q. What is the recommended team composition for Liberelio?
A. We recommend pairing her with BS.
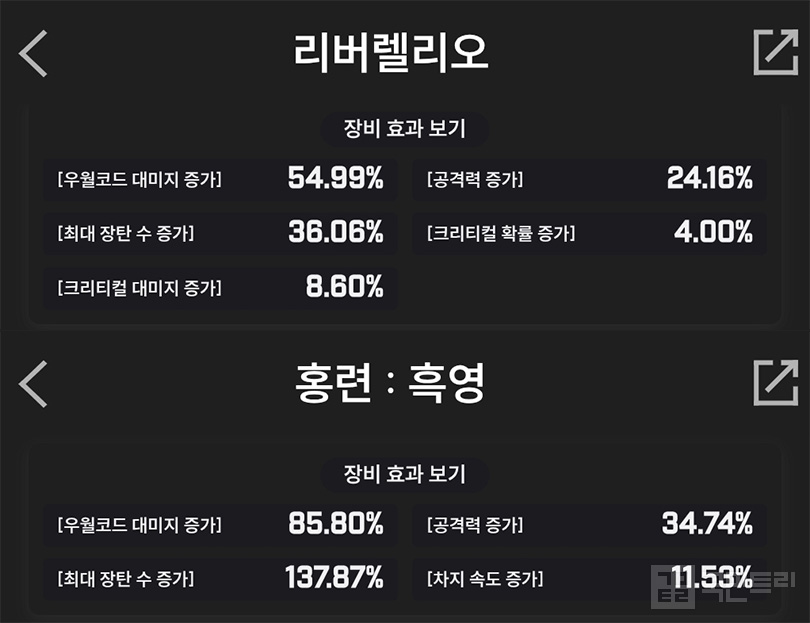
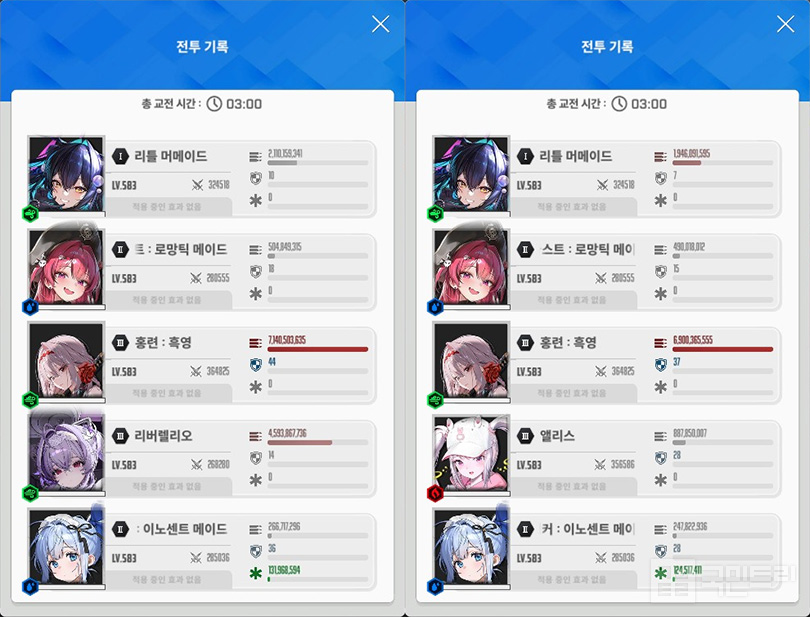
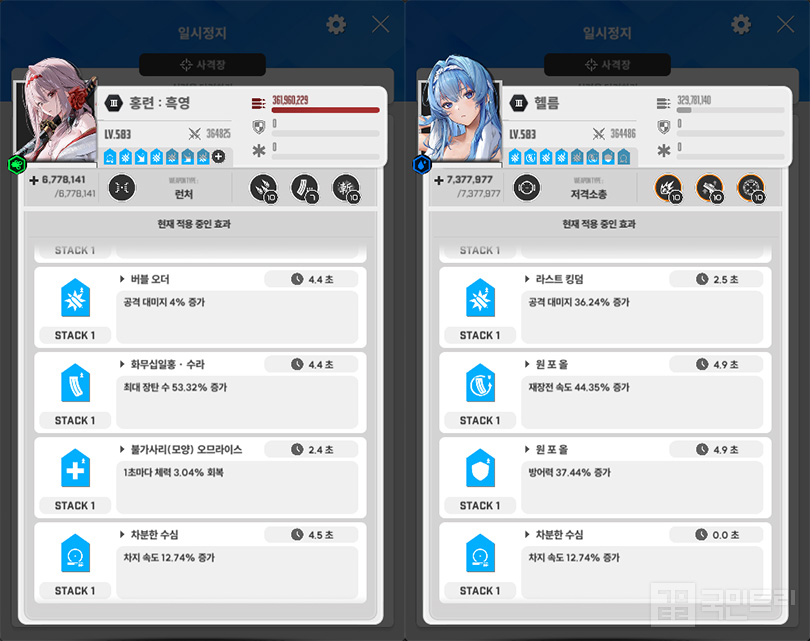
Liberelio's charge speed boost makes her a perfect match for BS. We compared this to the traditional Alice pairing. Liberelio was at 1-star, skills 10/8/9, SR Collection level 15, and Relic Bear Cube level 15. BS was at 2-core, skills 10/7/10, SR Collection level 15, and Relic Bear Cube level 15. Buffs included Maid Mast, Anchor, and Little Mermaid. The test was conducted on a 3-minute Wind-weakness Union Shooting Range boss.
The results? The BS + Liberelio combo out-damaged the Alice combo by 240,138,080. Despite the charge speed benefit being only 1.07% points higher than Alice’s 11.67%, the actual output gap was massive. If you're a new player joining for the 3rd anniversary, you no longer need to tether Alice to BS. Expect even higher ceilings in Wind-weakness environments.
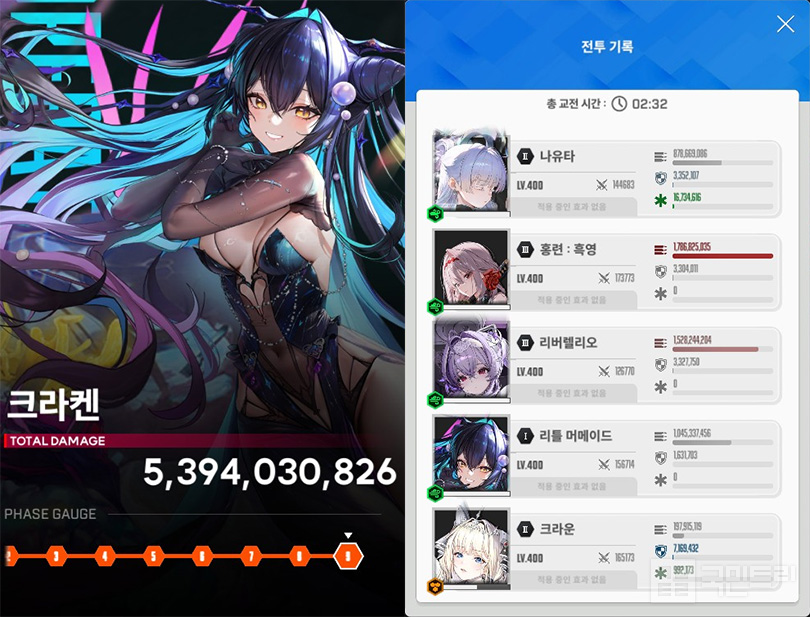
We continued testing in the Kraken Interception. The team was 'Nayuta - BS - Little Mermaid - Liberelio - Crown.' Crown's buffs were timed strictly to the full-burst window. Replacing Mana with Liberelio, we cleared Stage 9 with ease. BS recorded 1,786,825,035 damage, while Liberelio hit 1,528,244,204. The ~260 million difference was mostly due to gear variance. I'm very much looking forward to seeing her in next week's Solo Raid.
Q. How much should I invest in Liberelio?
A. Secure Nayuta first, then aim for at least one copy of Liberelio.
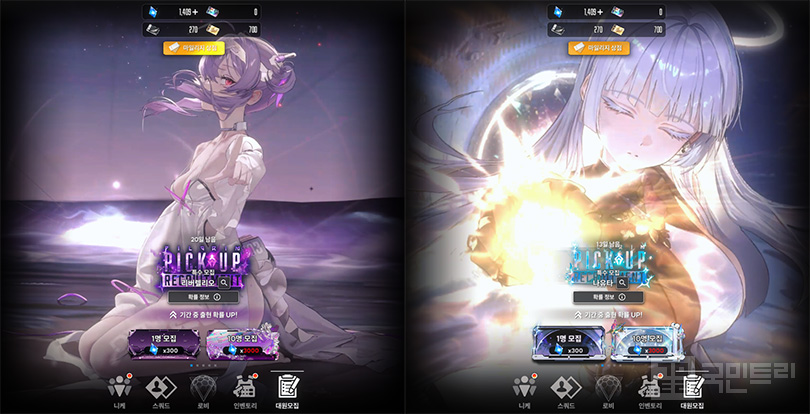
With two Pilgrim recruitments running, the priority dilemma is real. If you want both, grab Nayuta first. It’s not about who is 'better,' but the schedule. Nayuta's pickup ends a week earlier, and she is a high-performance unit you shouldn't skip. Use your gems and Advanced Recruit Vouchers for Nayuta, then pour the remainder into Liberelio.
The Solo Raid starts on November 13th, and with a Wind-weak boss, not having Liberelio will make hitting high scores quite a struggle. This is especially true for new players who missed the second Evangelion collaboration unit, Asuka Shikinami. Whether you're a new, returning, or veteran player, don't miss out on adding Liberelio to your roster.
'승리의 여신: 니케' 3주년 두 번째 픽업 니케 리버렐리오가 등장했다. 일주일 앞서 메인 스토리에서 매력을 뽐낸 덕에 많은 유저가 기다리고 있었다. 모집 첫날에 대다수의 유저가 성능 검증에 들어갔고, 0티어 니케 홍련: 흑영(이하 흑련)의 새로운 파트너라는 결론이 나왔다. 그런데 스킬 구조가 꽤 복잡하고, 제대로 활용하기 위해서는 계산과 검증이 필요하다. 이에 국민트리가 신규 니케 리버렐리오의 성능을 직접 실험했다.
Q. 리버렐리오는 어떤 메커니즘을 지녔나요?
A. 공격 대상에 따라 자가 버프 효과가 달라지고, 특정 조건의 아군을 강화합니다.
리버렐리오는 풍압 코드, 버스트 3, 저격 소총, 화력형 타입 니케다. 공격 대상에 따라 다른 효과가 발동하고, 풀 버스트 타임 시작 시와 풀 차지 공격 명중 시 효과가 있다.
1스킬 '차분한 수심'은 풀 차지 공격 명중 시 발동하는 효과가 2개, 풀 버스트 타임 시작 시 발동하는 효과가 2개 있다. 전자는 '코어' 명중 시 자신에게 60초 동안 공격 대미지 증가, 그냥 명중 시 대상에게 추가 대미지를 준다. 후자는 자신에게 3초간 공격력 대폭 증가, 최종 공격력이 가장 낮은 3 버스트 아군 1기의 차지 속도 증가다. 공격력 버프가 10레벨 기준 160%로 굉장히 높은데, 이는 차지 속도 버프를 위한 설계로 보인다. 자기 공격력을 최대한 올려 서 본인이 차지 속도 증가 버프를 받지 않아야 하기 때문이다. 차지 속도 증가 수치는 10레벨 기준 12.74%다. 해당 버프를 받으면 안되는 이유는 2스킬에 있다.
2스킬 '기묘한 해류'는 리버렐리오의 공격 명중 대상이 타겟인지 일반 랩쳐인지에 따라 달라진다. 보스급으로 분류되는 타겟에게 명중 시 공격 대미지 증가 버프를 얻고, 일반 랩쳐라면 차지 시간을 1초로 고정하는 상태가 된다. 아울러 전투 시작 시 자신에게 차지 속도 증가, 감소 효과 면역 상태가 적용된다. 이 면역 효과 때문에 1스킬 차지 속도 버프를 리버렐리오 본인이 받아서는 안된다. 장비의 개조 옵션, 시뮬레이션 룸 버프, 하모니 큐브 스킬은 영향받지 않는다. 버스트 '잠기는 세계'는 심플한 전체 공격기다. 부가효과로 자신에게 10초간 공격 대미지 증가 버프를 제공한다. 증가 수치는 47.73%다.
1스킬 차지 속도 증가의 적용 조건인 '최종 공격력이 가장 낮은 3 버스트'는 의외로 까다롭다. 왜냐하면, 기존에 주력으로 사용하던 버스트 3 니케들이 육성이 잘 되어 있다면, 리버렐리오의 최종 공격력이 가장 낮은 경우가 쉽게 발생하기 때문이다. 리버렐리오를 포함해 3 버스트를 2명 사용했을 때 차지 속도 증가 버프가 적용되지 않았다면, 대상 니케가 리버렐리오보다 공격력이 높다는 것이다. 승리의 여신: 니케에서 말하는 '최종'이라는 표현은 '기본 니케 스탯 + 장비 스탯 + 개조 장비 효과 + 전투 중 적용되는 효과'를 뜻한다. 따라서 동일한 버프를 받고, 리버렐리오의 자체 공격력 증가 버프를 포함한 수치보다 낮아야 하는 셈이다.
리버렐리오가 해당 버프를 받지 않더라도 해당 조건 때문에 곤란한 경우가 또 있다. 바로 원하는 메인 딜러 니케가 아닌, 다른 니케에게 버프가 들어가는 것이다. 주로 흑련과 리버렐리오 + 애장품 헬름을 사용하려는 유저가 많을 텐데, 이때 애장품 헬름이 버프를 받는 경우가 유저들 사이에서 종종 보고되고 있다. 따라서 사격장에서 미리 실험해보는 걸 추천한다.
Q. 리버렐리오 조합은 어떻게 해야 하나요?
A. 흑련과 함께 쓰는 조합을 추천합니다.
리버렐리오는 차지 속도를 올려줘 흑련과 궁합이 좋다. 이에 흑련과 함게 많이 사용하는 앨리스와 비교 실험을 진행했다. 리버렐리오는 1돌파, 스킬 레벨 10/8/9, SR 소장품 15단계, 렐릭 베어 큐브 15단계를 장착, 흑련은 2코어 강화, 스킬 레벨 10/7/10, SR 소장품 15단계, 렐릭 베어 큐브 15단계를 착용했다. 사용 버프는 메이드 마스트·앵커와 리틀 머메이드다. 실험 장소는 풍압 약점 유니온 사격장 3분 보스다.
실험 결과 흑련 + 리버렐리오 조합이 앨리스 조합보다 2억 4,013만 8,080이나 높은 대미지를 달성했다. 앨리스의 차지 감소 효과 11.67%보다 1.07% 포인트 높았을 뿐인데, 그 차이는 훨씬 컸다. 3주년에 맞춰 시작한 유저라면, 이제 굳이 앨리스와 흑련을 세트로 묶어서 쓰지 않아도 될 정도다. 풍압 코드 약점 환경에선 훨씬 높은 고점이 기대된다.
이상 개체 요격전 크라켄에서 실험을 이어갔다. 이번엔 '나유타 - 흑련 - 리틀 머메이드 - 리버렐리오 - 크라운' 조합을 사용했다. 크라운의 버프는 전체 공격 타이밍에만 맞춰 사용했다. 기존 조합에서 마나 대신 리버렐리오가 들어간 구성이다. 결과는 9단계를 무난하게 클리어하고, 흑련이 17억 8,682만 5,035, 리버렐리오가 15억 2,824만 4,204를 기록했다. 약 2억 6,000만 정도의 차이가 있었으나, 이는 오버로드 옵션의 차이로 발생한 결과다. 다음 주 솔로 레이드에서의 활약이 매우 기대된다.
Q. 리버렐리오는 얼마나 투자하면 되나요?
A. 나유타를 뽑은 후, 리버렐리오 명함을 목표로 투자
필그림 모집이 동시에 2개가 열린 만큼 우선순위 고민이 생긴 유저가 있을 것이다. 만약 2개를 모두 얻고 싶다면, 나유타 명함을 먼저 챙긴 후 도전하는 걸 추천한다. 성능이 더 좋아서가 아니라 픽업 기간 때문이다. 일주일 먼저 픽업을 시작한 나유타는 리버렐리오보다 먼저 픽업 모집이 끝난다. 나유타 또한 그냥 넘기면 안 되는 고성능 니케다. 따라서 나유타 명함을 건진 이후 남은 쥬얼과 고급 모집 티켓을 이용해 리버렐리오를 데려오도록 하자.
특히 11월 13일에 솔로 레이드가 시작한다. 풍압 약점 보스라 리버렐리오가 없다면, 고득점을 달성하기 힘든 구조다. 에반게리온 2차 컬래버 캐릭터 아스카 빌레가 없는 신규 유저라면 더더욱 그렇다. 그러니 신규, 복귀, 기존 유저 모두 리버렐리오를 뽑을 기회를 놓치지 않도록 하자.




- [Today's steam] Animorphs officially released, recording 100,000 Concurrent Players
- GTA 6 Online to support up to 32 players, confirmed through lawsuit documents
- An Ensemble Drama with Four Heroes, Fire Emblem Mazachanhong
- Gathering Cheonhwi and Slowly Falling for the Charm of 'Animo'
- [Today's steam] PC version of The War of Genesis Raising achieves 30,000 Concurrent Players
- What is the recently popular indie game genre 'DB Thriller'?
- [TGS 26] A world breathing with the Nexon Games style, Pareidolia
- [Photo] How does Riftbound captured in cards look?
- [TGS 26] Hyung-tae Kim "AI video was an experiment, I apologize"
- Valve's New VR Device 'Steam Frame' Goes on Sale, Priced at 1.42 Million Won





