

[Nikke Tips] A Deep Dive into the Returned Goddess 'Snow White: Innocent Days'
[니케 꿀팁] 돌아온 갓데스 '스노우 화이트 : 헤비암즈' 톺아보기

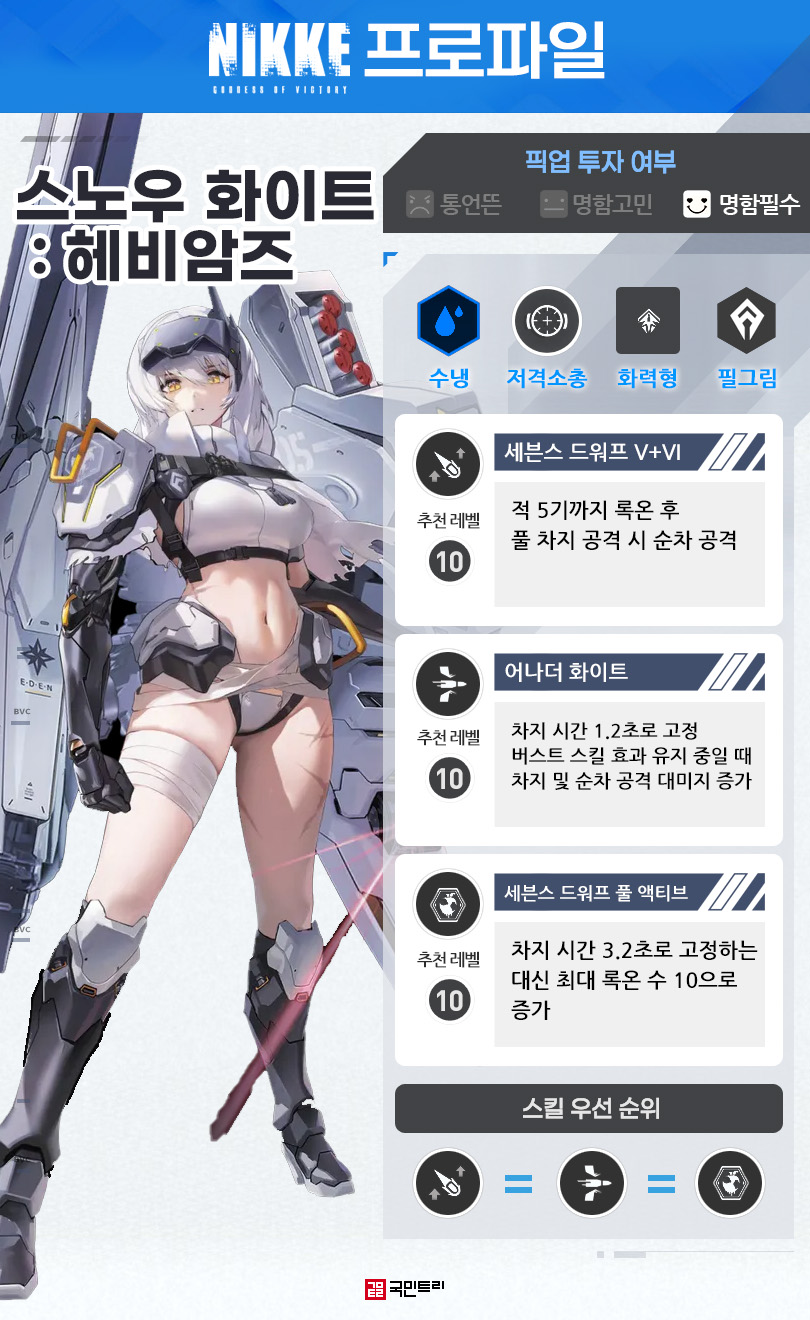
'Goddess of Victory: NIKKE's 2026 New Year NIKKE is 'Snow White: Innocent Days'. Players have affectionately dubbed her 'Awakened Snow', or 'Gak-Seol' for short. Following the devastating events of the 3rd anniversary, this is a reborn Snow White equipped with cutting-edge gear from Eden. She boasts an arsenal that rivals the volume of her original form. With performance to match, she is poised to dominate the upcoming Champion Arena and the 'Only One' Solo Raid. KookminTree has put this jewel-hungry powerhouse through its paces to see if she lives up to the hype.
Q. What kind of NIKKE is Gak-Seol?
A. She is a potent piercing damage dealer capable of raining down sequential attacks on both single targets and crowds.
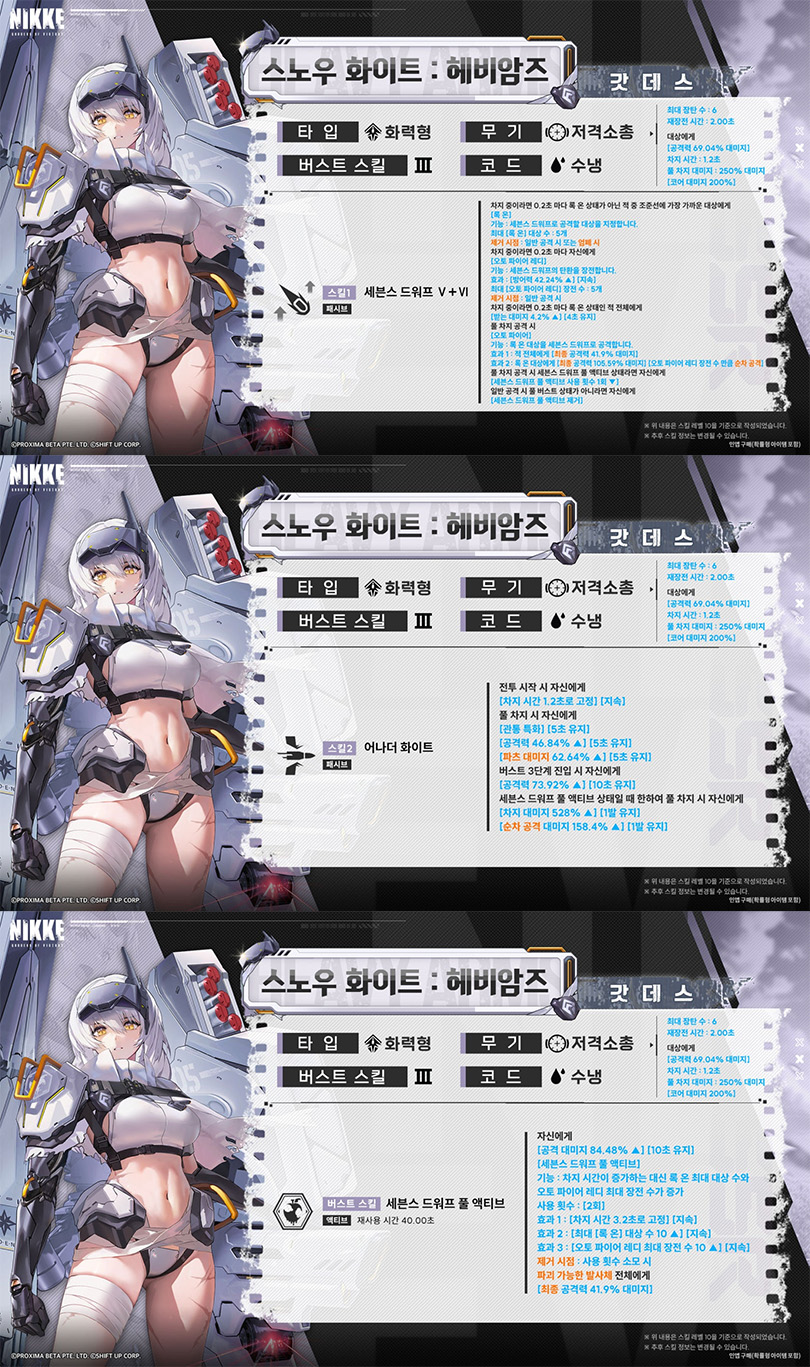
Gak-Seol is a Burst III, Attacker, Water Code, Sniper Rifle (SR) type. She is the first sniper to feature a gimmick that hits multiple targets simultaneously. As proof of her complexity, her skill text is dense and pedantic—a perfect fit for the 'boring and pedantic' meme.
Her Skill 1, 'Seventh Dwarf V+VI', triggers three effects every 0.2 seconds while charging, plus additional effects upon a Full Charge attack. First, she 'locks on' to up to 5 targets near her reticle every 0.2 seconds. Simultaneously, she gains a defense buff and loads 5 'Auto Fire' rounds. As a bonus, she applies a debuff that increases the damage enemies take for 4 seconds.
Once you unleash a Full Charge attack, the Auto Fire sequence begins. She deals damage proportional to her final attack power to all enemies, with additional sequential attacks hitting the 'lock-on' targets. The number of attacks depends on the Auto Fire rounds loaded. When combined with her Burst effect, you are looking at a barrage of anywhere from 5 to 15 sequential hits.
Skill 2, 'Another White', locks her charge time at 1.2 seconds at the start of battle. Crucially, this means she cannot benefit from 'Charge Speed Increase' options on Overload gear. In exchange, she grants herself 'Piercing Specialization' and 'Attack/Part Damage Increase' buffs for 5 seconds upon a Full Charge. Entering Burst III mode further boosts her attack for 10 seconds. When using a Burst skill, her Full Charge attacks apply a 'Charge Damage and Sequential Attack Damage' bonus to the very first strike.
Finally, her Burst, 'Seventh Dwarf Full Active', grants a 10-second buff to attack damage. While it locks her charge time to 3.2 seconds, it expands her lock-on limit and maximum Auto Fire capacity to 10 each. This buff dissipates after two Full Charge attacks. As a side effect, she deals final attack-proportional damage to all destructible projectiles.
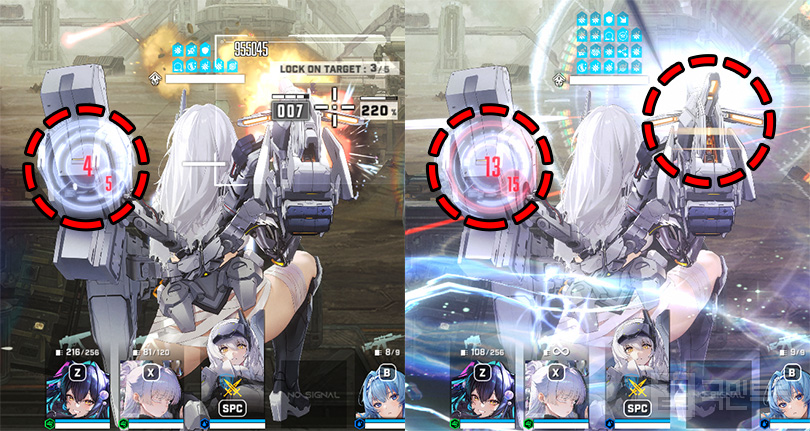
In short, Gak-Seol is a NIKKE that demands Full Charge attacks to maximize her potent buffs. Because her sequential attacks concentrate on a single target if only one is present, she suffers zero damage loss in boss encounters. However, because all her effects rely on Full Charge and her charge time is fixed, the traditional sniper 'tap-firing' technique will actually tank your DPS.
Her indiscriminate firepower makes her a must-have for new and returning players starting at the 3rd anniversary, serving as a core carry for stage progression. The 5-target lock-on makes her an absolute menace in 5v5 Arena matches, where she can tag the entire enemy team with just basic attacks. She also generates Burst gauge rapidly, ensuring you reach Full Burst status in no time.
Q. Where and how should I use her?
A. She shines in campaign stages, Water Code-weakness Solo Raids, and the Harvester Interception.
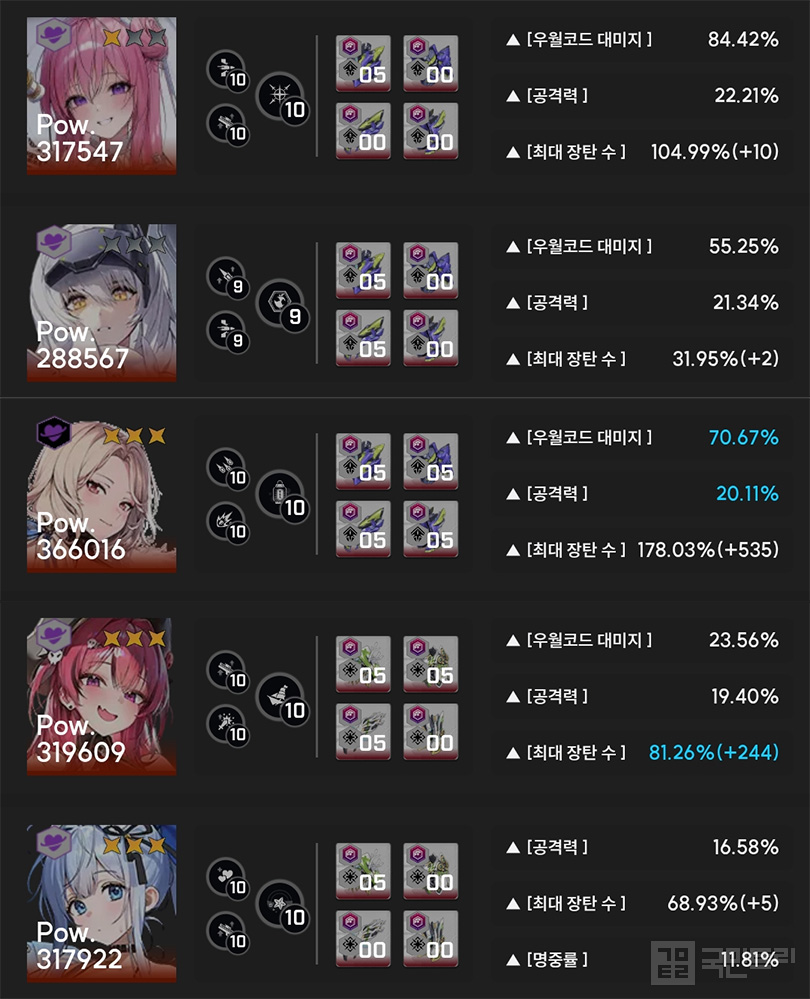
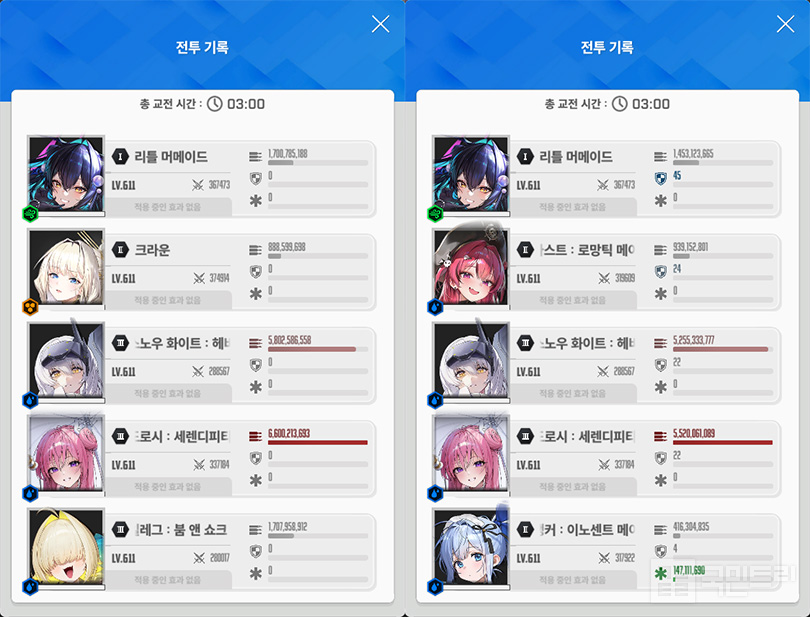
We conducted performance tests comparing Gak-Seol against water-code powerhouses 'Dorothy: Serendipity' (Summer Rosanna) and 'Ludmilla: Winter Owner'. Gak-Seol was tested at base copy with a Tier 5 SR Collectible, Summer Rosanna at 1-star with Tier 10 SR, and Ludmilla at 3-star with Tier 15 SR. Check the image for specific Overload gear details.
In the Union Shooting Range against a Fire Code boss, despite a 30% gap in elemental damage options, the gap between Gak-Seol and Summer Rosanna was only about 12-14%. When accounting for gear and limit breaks, Gak-Seol's potential is clearly immense.
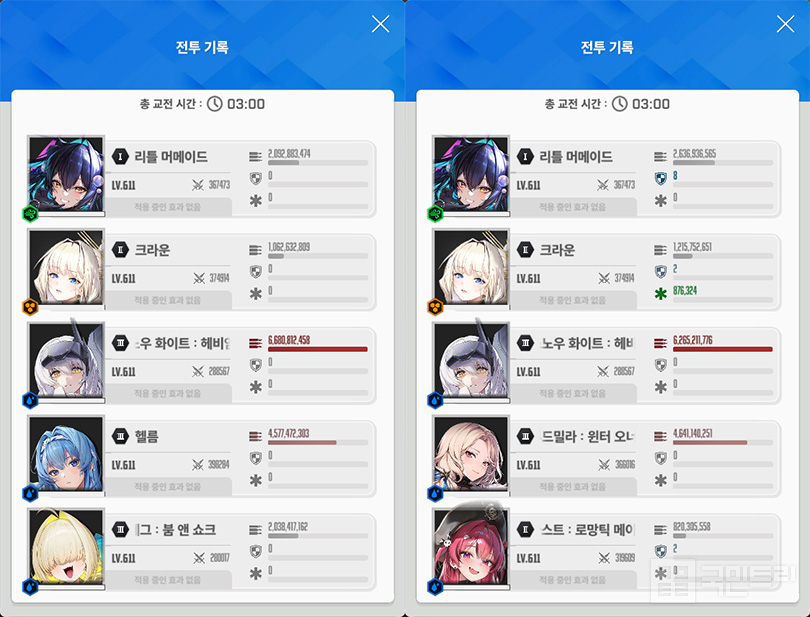
Next, we tested her in a pure Water Code composition without Summer Rosanna, as most players need to split their rosters for Solo Raids. Gak-Seol outperformed the Summer Rosanna team. While our 3-star Ludmilla hit 4.6 billion, Gak-Seol clocked in at 6.2 billion, overcoming the deficit in investment and elemental gear stats.
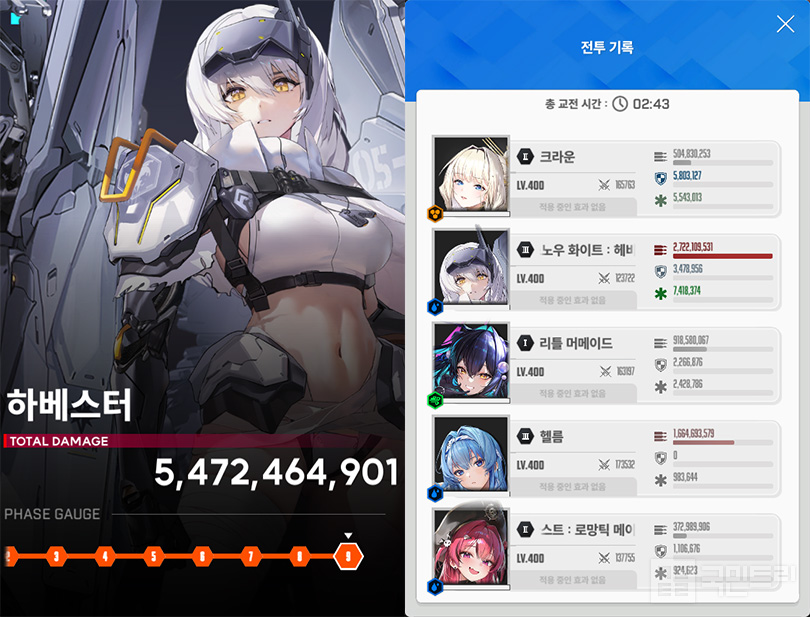
Finally, we took her to the Interception Harvester. With a team of 'Crown - Gak-Seol - Little Mermaid - Helm (Treasured) - Mast: Romantic Maid', we cleared the fight with 17 seconds to spare. She has definitively proven herself as a 0-tier unit.
Q. Is she a must-pull?
A. Do not hesitate; we highly recommend recruiting her.
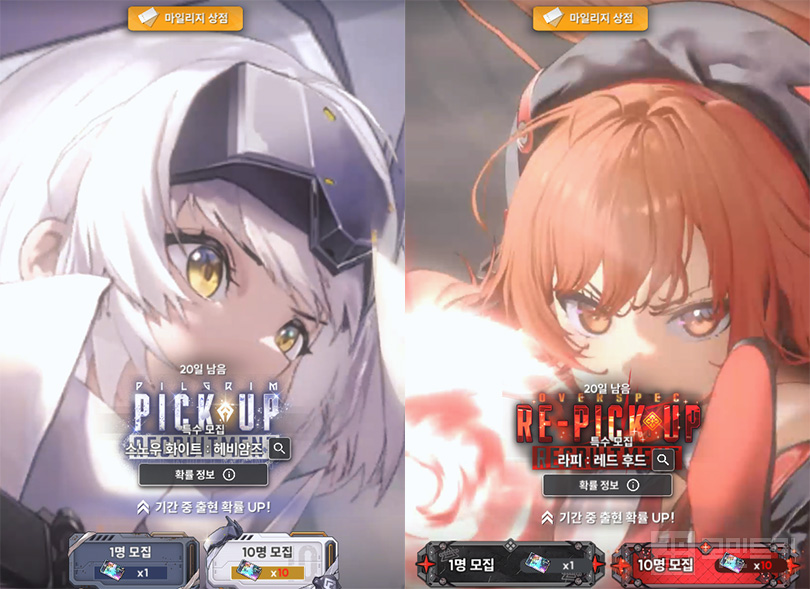
Our tests confirm Gak-Seol is a top-tier unit that everyone should aim for. With the January Solo Raid featuring a Water weakness, her debut stage is perfectly set. However, new and returning players might be torn between her and the simultaneously featured 'Red Hood: Rapi'.
Red Hood: Rapi is an incredibly versatile all-rounder. If you don't have Red Hood, prioritize her. If you already own her, dumping your resources into Gak-Seol is the efficient play. Use the special recruitment tickets provided in early January and save your 6,600 jewels for the 'Step-Up' recruitment. It’s wise to burn your tickets over the weekend before making a final decision on your jewels.
'승리의 여신: 니케'의 2026년 신년 니케는 '스노우 화이트 : 헤비암즈'다. 유저들 사이에서는 각성 스노우 화이트 또는 더 줄여 '각설'이라는 귀여운 별명으로 불린다. 3주년의 충격적인 스토리를 뒤로하고 재기한 스노우 화이트가 에덴에서 받은 신형 장비를 갖춘 모습이다. 기존 스노우 화이트의 볼륨에 밀리지 않는 압도적인 무장을 자랑한다. 이에 걸맞은 뛰어난 성능을 바탕으로 곧 열릴 챔피언 아레나와 솔로 레이드 '온리 원'에서 맹활약을 예고했다. 새해 첫날 유저들의 쥬얼을 공략할 압도적 성능의 니케를 국민트리가 직접 실험하고 검증했다.
Q. 각설은 어떤 니케인가요?
A. 적 다수 및 단일 대상에게 순차 공격을 퍼붓는 강력한 관통 딜러입니다.
각설은 버스트 3, 화력형, 수냉 코드, 저격 소총(SR) 타입 니케다. 저격 소총 최초로 다수의 적을 동시에 타격하는 기믹을 지녔다. 이를 증명하듯 스킬 설명이 매우 방대하고 현학적이다. 유명한 밈에 나오는 '지루하고 현학적이다'라는 표현이 딱 어울린다.
1스킬 '세븐스 드워프 V+VI'는 '차지 중 0.2초마다' 발동하는 세 가지 효과와 '풀 차지 공격 시' 발동하는 효과를 포함한다. 우선 0.2초마다 조준선에 인접한 대상 최대 5기를 '록 온'한다. 동시에 각설의 방어력이 오르며 '오토 파이어' 5발을 장전한다. 4초간 지속하는 '받는 대미지 증가' 디버프 부여는 덤이다.
이후 풀 차지 공격을 가하면, 오토 파이어 효과가 나타난다. 적 전체에게 최종 공격력 비례 대미지를 입히고, 록 온 대상에게는 최종 공격력 비례 순차 공격을 추가로 가한다. 공격 횟수는 오토 파이어 장전 수에 비례한다. 뒤이어 소개할 버스트 효과까지 더해 최소 5번에서 최대 15번에 이르는 순차 공격을 쏟아낸다.
2스킬 '어나더 화이트'는 전투 시작 시 각설의 차지 시간을 1.2초로 고정한다. 이 효과로 인해 각설은 오버로드 장비의 '차지 속도 증가' 옵션을 적용받지 못한다. 대신 풀 차지 시 5초간 자신에게 '관통 특화'와 '공격력 및 파츠 대미지 증가' 버프를 부여한다. 여기에 버스트 3단계 진입 시 10초간 공격력을 더 끌어올린다. 버스트 스킬 효과를 적용한 상태에서 풀 차지 공격 시 '차지 대미지 및 순차 공격 대미지' 증가 효과가 첫 공격에 실린다.
마지막으로 버스트 '세븐스 드워프 풀 액티브'는 10초간 공격 대미지 증가와 동명의 버프를 얻는다. 차지 시간을 3.2초로 고정하는 대신 최대 록 온 대상 수와 오토 파이어 최대 장전 수를 각각 10개씩 늘린다. 해당 버프는 풀 차지 공격 2회 완료 시 소멸한다. 부가 효과로 파괴 가능한 모든 발사체에 최종 공격력 비례 피해를 입힌다.
정리하자면, 각설은 풀 차지 공격을 전제로 강력한 공격력 버프를 쏟아붓는 니케다. 순차 공격은 적이 단일 개체일 경우 모든 공격을 집중하는 방식이라 보스전에서도 딜로스가 발생하지 않는다. 다만 모든 효과가 풀 차지 기준이고 차지 시간이 길어, 저격 소총 니케 특유의 '톡톡이' 컨트롤을 사용 시 오히려 화력이 급감한다.
대상을 가리지 않는 화력 덕분에 3주년에 시작한 신규 및 복귀 유저에게는 스테이지 공략의 핵심 딜러로 자리 잡을 전망이다. 록 온 숫자가 5개인 점은 5 대 5 전투가 기본인 아레나에서 일반 공격만으로 적 전체를 타격하는 강점으로 자리잡았다. 버스트 충전량 또한 높아 빠른 풀 버스트 진입이 가능하다.
Q. 각설은 어디서 어떻게 쓰나요?
A. 스테이지, 수냉 약점 솔로 레이드, 요격전 하베스터에서 활약합니다.
이어서 각설의 실제 성능 실험을 진행했다. 비교 대상은 수냉 코드 주력 딜러인 '도로시 : 세렌디피티(이하 수로시)'와 '루드밀라 : 윈터 오너(이하 클드밀라)'다. 각설은 명함 상태에 SR 소장품 5단계, 수로시는 1돌파에 SR 10단계, 클드밀라는 3돌파에 SR 15단계를 장착했다. 상세 오버로드 옵션은 상단 이미지를 참고하자.
유니온 사격장 작열 코드 보스전 결과, 우월코드 대미지 옵션이 30%가량 차이 났음에도 각설과 수로시의 대미지 격차는 약 12~14% 수준에 그쳤다. 장비 옵션과 한계 돌파 차이를 고려하면, 각설의 잠재력이 상당함을 알 수 있다.
이어 수로시를 제외한 수냉 코드 조합 실험을 진행했다. 5개 스쿼드가 필요한 솔로 레이드 특성상 수로시와 각설은 분리 운영이 일반적이기 때문이다. 그 결과 수로시 포함 조합보다 더 높은 대미지를 기록했다. 3돌파 클드밀라가 46억을 기록할 때, 각설은 62억을 뽑아냈다. 각설이 클드밀라보다 육성 수준과 우월코드 대미지 옵션이 낮음에도 차이를 극복했다.
끝으로 '특특요' 하베스터 공략에 투입했다. '크라운-각설-리틀 머메이드-애장품 헬름-마스트 : 로망틱 메이드' 조합으로 도전해 17초를 남기고, 토벌에 성공했다. 이로써 각설은 엄연한 0티어 니케임을 스스로 증명했다.
Q. 무조건 뽑아야 할까요?
A. 망설이지 말고 영입을 추천합니다.
실험 결과에서 보았듯 각설은 모든 유저가 확보해야 할 고성능 니케다. 특히 1월 솔로 레이드 온리 원이 수냉 약점이라 데뷔 무대도 완벽하다. 다만 신규 및 복귀 유저는 동시에 모집 중인 '라피 : 레드 후드'와 우선순위를 고민할 법하다.
라피 : 레드 후드는 범용성이 뛰어난 올라운더 딜러다. 만약 레드 후드가 없다면 라피를 우선한다. 이미 보유한 유저는 각설에 모든 재화를 투자하는 방향이 효율적이다. 1월 초 지급하는 특수 모집 티켓과 '스텝업 모집'에 필요한 6,600 쥬얼을 남긴 뒤 전략적으로 활용하자. 주말까지 모은 티켓을 먼저 소진한 뒤 쥬얼 투자를 결정하는 것이 현명하다.
- Animo Prepares to Open Special No Brand Burger Store Ahead of Launch
- Popup events to be held in Dongdaemun and Yongsan to celebrate the release of Liftbound
- GTA 6 Online to support up to 32 players, confirmed through lawsuit documents
- Deepening Crisis in Snezhnaya, Genshin Impact Version 7.1 Starts on the 23rd
- [Today's steam] Animorphs officially released, recording 100,000 Concurrent Players
- [Today's steam] Normalized new FPS Wardogs surpasses 420,000 Concurrent Players
- An Ensemble Drama with Four Heroes, Fire Emblem Mazachanhong
- Gathering Cheonhwi and Slowly Falling for the Charm of 'Animo'
- [Today's steam] PC version of The War of Genesis Raising achieves 30,000 Concurrent Players
- What is the recently popular indie game genre 'DB Thriller'?





