

[Raven 2 Tips] Belinda’s Summoning Class, Contract Summons Count Too
[레이븐2 꿀팁] 벨린다 소환술 교실, 계약 소환도 카운트합니다

Taking a look at the current event landscape in Raven 2, we find ourselves in the midst of the Novatheron and Belinda seasons. While Novatheron is likely to wrap up in the first week of February, leaving the Belinda season to carry on, treat this as a four-week marathon. I have broken down the connections, resource management, and strategies you need to survive.
Q. Belinda’s Summoning Class: Just how many summons do I need?
A. Hard to say for sure, but the requirements for Saintly items and Familiars are actually lower than they appear.
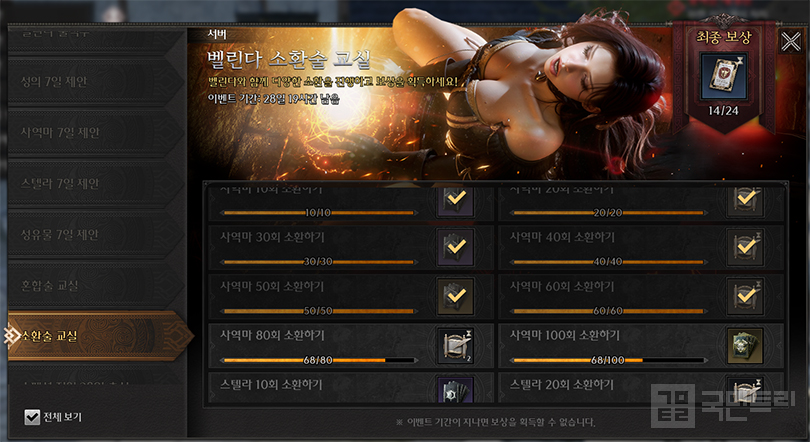
Raven 2 introduced the new 'Mixing Arts' content in its fourth-week update of January. If you are level 70 or higher, you can use this to juice up the buffs on your food items. To get players hooked, they’ve launched the 'Belinda’s Summoning Class' event. The goal? Perform 100 summons each for Saintly items, Familiars, and Stellas to bag the 'Summoning Education Certificate' crafting material.
While those are the stated figures, the actual number of summons needed for Saintly items and Familiars is often lower. From my own time playing Raven 2, I’ve confirmed that contract summons count toward the total. Depending on your luck and the results, you might not need to hit the full 100. Use any extra summoning scrolls you’ve scraped together from other events, and keep this in mind for future missions.
Be warned: Stella synthesis does not count as a summon. You have to hit that 100-mark through pure summoning. Thankfully, you get 11-pull scrolls at the 10, 30, and 50-pull milestones to take the edge off. The event is a long-haul affair running until 4:59 AM on February 25th. Make sure to grab those two daily Stella summon scrolls from the in-game shop.
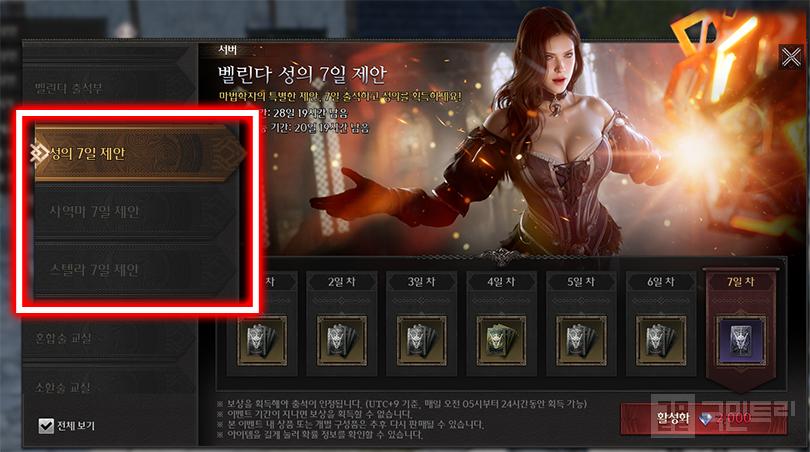
If your pockets are lined with enough Diamonds, consider the '7-Day Proposal for Saintly/Familiar/Stella' event. It’s essentially a drip-feed of summoning scrolls over a week, totaling 66 summons plus a final 'Blessing' summon. It’s a decent chance to fish for Rare or Hero-grade gear while you’re at it.
Q. The event rewards feel a bit… off, don't they?
A. You’ve still got more of Belinda’s Class events on the horizon.
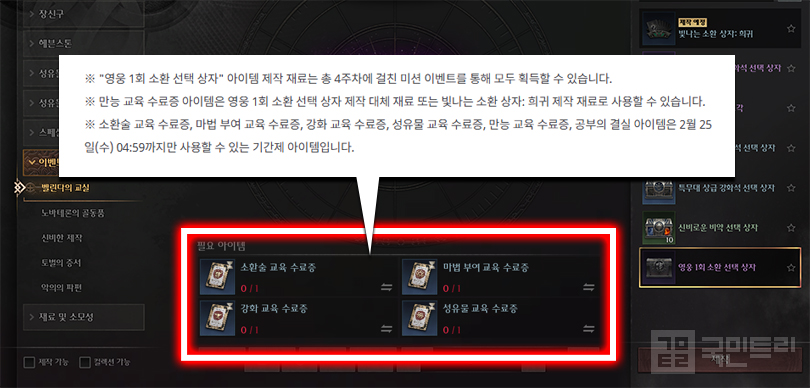
The final rewards for Belinda’s Mixing Arts and Summoning Class include a 'Universal Education Certificate' and the aforementioned Summoning Education Certificate. The former is used in the 'Event - Belinda’s Class' crafting menu to swap for a Hero-grade summon choice box or to prepare for the upcoming Shining Summon Box: Rare.
Now, the correct recipe for the Hero-grade summon choice box requires one of each: Summoning, Enchanting, Reinforcement, and Relic Education Certificates. If you were scratching your head wondering how to get anything other than the Summoning certificate, don't panic—you’re not missing anything. Belinda’s Class is a four-week series. Expect missions for Enchanting, Reinforcement, and Relics to roll out soon. I suggest hoarding your Magic Crystals, Relic Reinforcement Stones, and boxes for now. There’s no rush to burn them.
However, you need to decide if you’re going the distance with the Mixing Arts class. The final mission requires one attempt at Mixing Arts, which is locked behind a level 70 requirement. If you can’t hit that level, you won’t be finishing the set. Plan your crafting around the '5 Fruits of Study' reward accordingly; that amount is enough to craft any item except for the Mysterious Elixir choice box.
Q. Should I be crafting Hero-grade Design Fragments?
A. That depends on what’s left in your inventory; look at the long game.
Looking at the Belinda’s Class crafting page again, you can craft Hero-grade Design Fragments. You’re capped at 10 times per server, costing 5 Fruits of Study and 3 existing Hero-grade Design Fragments. Just click the arrow to select which fragments you want to swap. Every craft nets you 5 Hero-grade Design Fragments.
The value proposition here is a bit murky. Since you need 100 fragments for one finished Hero-grade design, this event won't hand you a complete item on its own. Unless you have leftover fragments or are planning for future events, this might be a low priority.
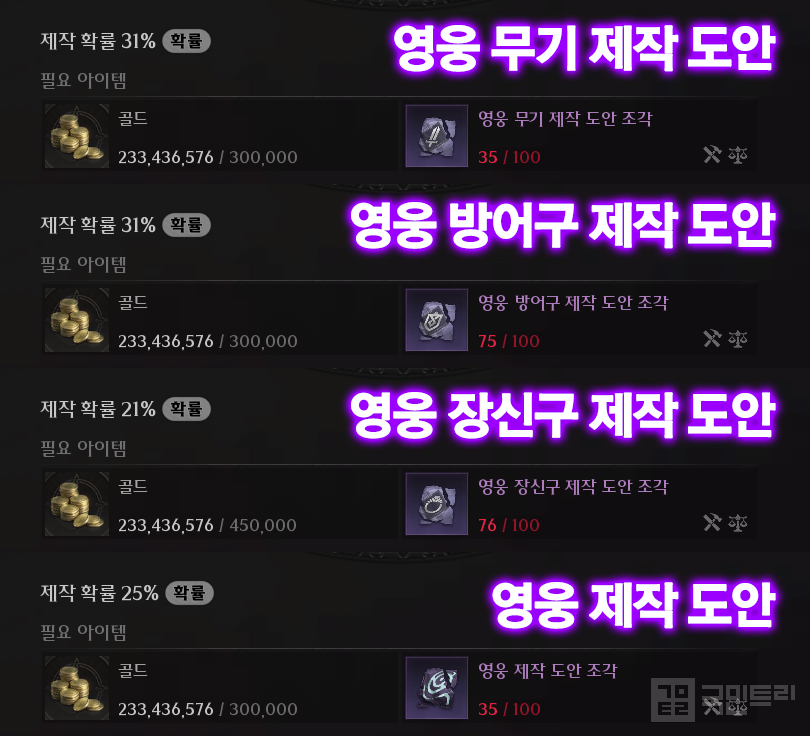
Do the math on the fragments needed versus your odds of success.Since the Hero-grade design acts as a wildcard for other designs, it’s effectively worth two pieces of fodder.The success rate for crafting Hero-grade weapon and armor designs is 31%, while accessories sit at 21%. At 25%, the Hero-grade design is slightly easier to craft than an accessory design. If you need a Hero-grade accessory design or just want to gamble on the numbers to optimize your inventory, it’s a viable path.
개최 중인 이벤트를 기준으로 했을 때, '레이븐2'는 현재 노바테론과 벨린다 시즌이 공존 중이다. 노바테론은 2월 1주차에 이벤트를 종료할 가능성이 높고, 그 후에는 벨린다 시즌만 남을 것이다. 벨린다 시즌은 약 4주에 걸친 마라톤으로 풀이된다. 관련 이벤트의 연결고리와 자원 관리, 공략법을 정리했다.
Q. 벨린다 소환술 교실, 얼마나 소환해야 할까요?
A. 확답은 힘들지만, 성의·사역마는 보이는 것보다 적습니다.
레이븐2는 1월 4주차 업데이트로 신규 콘텐츠 혼합술을 추가했다. 70레벨 이상 유저는 이 기능을 사용해 음식 카테고리 아이템의 버프 성능을 높일 수 있다. 동시에 혼합술 사용을 독려하는 이벤트를 개최했는데, 그중 하나가 미션 행사 '벨린다의 소환술 교실'이다. 성의와 사역마, 스텔라를 100회씩 소환하면 모든 목표를 달성한다. 최종 보상은 이벤트 제작 재료 '소환술 교육 수료증'이다.
표기 수치는 이렇지만, 성의와 사역마는 목표 수량과 실제로 필요한 소환 횟수가 다르다. 직접 레이븐2를 플레이하며 확인한 결과 계약 소환도 성의와 사역마를 소환한 것으로 카운트했다. 즉, 소환 결과와 운에 따라서는 필요한 소환 재화가 100회보다 적다. 다른 이벤트로 얻은 소환서를 사용해 횟수를 채우자. 앞으로 레이븐2가 비슷한 미션을 개최할 경우 이 방법을 접목할 수 있는지 체크하는 것도 좋을 듯싶다.
다만, 스텔라 합성은 소환으로 판정하지 않았다. 순수하게 소환으로 100회를 채워야 한다. 다행히 10회와 30회, 50회 보상으로 11회 소환서를 3번 지급한다. 어느 정도 난도를 낮출 방법은 마련해 둔 셈이다. 이벤트는 2월 25일 새벽 4시 59분까지 진행하는 마라톤이다. 인게임 상점에서 매일 2회 골드로 판매하는 스텔라 소환서라도 꾸준히 이용하자.
다이아가 넉넉한 유저는 '성의·사역마·스텔라 7일 제안' 이벤트 활성을 염두에 두자. 활성화 시 7일에 걸쳐 대량의 소환서를 획득한다. '66회분 + 마지막 날의 축복 1회 소환서' 구성이다. 이벤트를 진행하는 겸 희귀, 영웅 아이템을 노릴 기회다.
Q. 이벤트 보상이 조금 이상한 것 같은데요?
A. 아직 개최할 벨린다의 교실 이벤트가 남았습니다.
벨린다의 혼합술, 소환술 교실의 최종 보상은 '만능 교육 수료증'과 상술한 상술한 소환술 교육 수료증이다. 전자는 제작 페이지 '이벤트 - 벨린다의 교실'에서 영웅 1회 소환 선택 상자의 대체 재료나 추후 개방할 빛나는 소환 상자: 희귀 마련에 사용한다.
그중 영웅 1회 소환 선택 상자의 올바른 제작식은 소환술/마법 부여/강화/성유물 교육 수료증 각 1장이다. '소환술 교육 수료증 말고는 구할 길이 없던데?'라는 생각이 들었다면, 정상이다. 레이븐2 벨린다의 교실 시리즈는 4주에 걸쳐 열린다. 각 행사 이름으로 보아 추후 마법 부여와 강화, 성유물 관련 미션을 제시할 가능성이 높다. 그러니 한동안 마정석과 성유물 강화석, 상자 등을 킵 해두는 걸 추천한다. 뚜껑이 열린 뒤 내용물을 보고 써도 늦지 않다.
다만, 혼합술 교실은 끝까지 달릴지 또는 적당한 선에서 멈출지 판단해야 한다. 마지막 미션 과제가 혼합술 1회 시도다. 혼합술 개방 조건은 캐릭터 레벨 70 이상이다. 행사 기한 내에 도달하기 힘들다면, 올 클리어는 물 건너간다. 이걸 고려해서 해당 미션 보상인 제작 재료 '공부의 결실 5개'와 만능 교육 수료증을 이벤트 제작 계획에 반영하면 된다. 공부의 결실 5개는 신비로운 비약 선택 상자를 제외한 아이템 1회 제작에 필요한 분량이다.
Q. 영웅 제작 도안 조각, 만들어야 하나요?
A. 남은 도안 조각에 따라 결정합니다, 장기적으로 보세요.
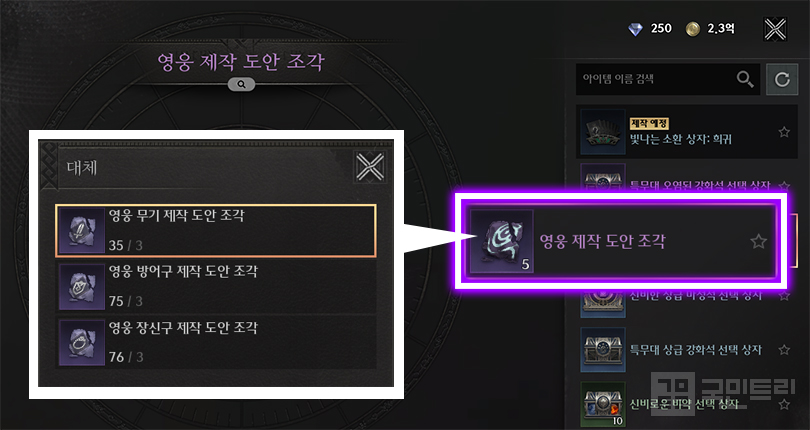
계속해서 벨린다의 교실 제작 페이지를 보자. 공부의 결실로 제작 가능한 아이템 중 영웅 제작 도안 조각이 있다. 서버 당 10회 만들 수 있고, 비용은 '공부의 결실 5개 + 영웅 ○○ 제작 도안 조각 3장'이다. 아이콘 오른쪽의 화살표 버튼을 눌러 사용할 도안 조각을 고른다. 한 번 만들 때마다 영웅 제작 도안 조각 5개를 얻는다.
그런데 이 영웅 제작 도안 조각의 입지가 참 오묘하다. 첫 번째로 완제품인 영웅 제작 도안 1장 마련에 필요한 도안 조각은 총 100개다. 즉, 제공한 기회로는 완제품을 마련할 수 없다. 따라서 기존에 남은 영웅 제작 도안 조각에 보태거나 추후 이벤트를 예상하고, 큰 그림을 그려야 한다. 따라서 둘 다 해당하지 않는다면, 우선순위를 미뤄도 좋다.
영웅 제작 도안 완제품 1장에 필요한 조각 수와 성공 확률도 계산하자. 영웅 제작 도안은 다른 영웅 도안을 대신하는 마스터 키이므로, 수량으로만 따지면 2장 이득이다. 영웅 무기와 방어구 제작 도안의 성공 확률은 31%, 장신구는 21%다. 영웅 제작 도안은 25%로 장신구보다 미묘하게 높다. 영웅 장신구 도안이 필요할 경우 이쪽이 이득이다. 또는 실패 확률을 감수하더라도 도안 조각 숫자로 이점을 얻고 싶을 때 제작한다.


- Animo Prepares to Open Special No Brand Burger Store Ahead of Launch
- Popup events to be held in Dongdaemun and Yongsan to celebrate the release of Liftbound
- GTA 6 Online to support up to 32 players, confirmed through lawsuit documents
- Deepening Crisis in Snezhnaya, Genshin Impact Version 7.1 Starts on the 23rd
- [Today's steam] Animorphs officially released, recording 100,000 Concurrent Players
- [Today's steam] Normalized new FPS Wardogs surpasses 420,000 Concurrent Players
- An Ensemble Drama with Four Heroes, Fire Emblem Mazachanhong
- Gathering Cheonhwi and Slowly Falling for the Charm of 'Animo'
- [Photo] How does Riftbound captured in cards look?
- [Today's steam] PC version of The War of Genesis Raising achieves 30,000 Concurrent Players





