

Seven Knights Re:BIRTH 'Sudden Raid' requires the strength of every adventurer
모든 모험가의 힘이 필요한 세나 리버스 '돌발 레이드'

A fresh 'Sudden Raid' has hit Seven Knights Re:BIRTH, and the entire server is currently scrambling to bring the beast down. It feels familiar, yet the mechanics require a cheeky shift in your hero roster. If you are a newcomer who jumped in with the latest collaboration, you might feel a bit lost staring at this surprise encounter. Fear not; KookminTree has broken down the essentials for you.
What is a Sudden Raid?
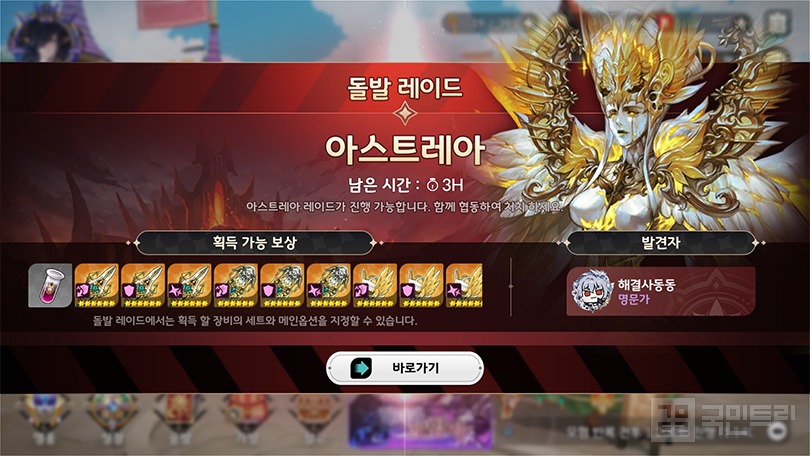
First, let's get the basics down. A Sudden Raid has a chance to trigger after you clear Level 11-15 of the 'Eyes of Ruin - Ox Demon - Iron Predator' raids. This probability climbs as the total raid clears from the entire community accumulate, resetting once a Sudden Raid is triggered. You can track this status via the 'Strategy' button next to the main Raid menu, or by looking for the shimmering effect on the main raid screen.
The boss will be one of three: 'Leonid - Astrea - Callistra,' chosen at random. Once spawned, all adventurers have a 10-hour window to challenge it. Even if the boss's HP bar hits zero, you can still participate for the remainder of those 10 hours. The primary goal here is farming 6-star raid gear. Note that you will need a separate entry ticket, which can be purchased in the Content Shop with rubies or obtained as a random drop from 11-15 level raids.
You get to hand-pick the gear stats and main options for your drops—four options each for weapons and armor. We suggest 'Crit Rate - Crit Damage - All ATK (%)' for weapons, and 'Damage Taken Reduction - Block Rate - All ATK (%)' for armor. Just fill the final slot according to your set requirements.
The Goal is Total Completion: Breaking Down Sudden Raid Bosses
Astrea: The Ox Demon’s High-Octane Upgrade
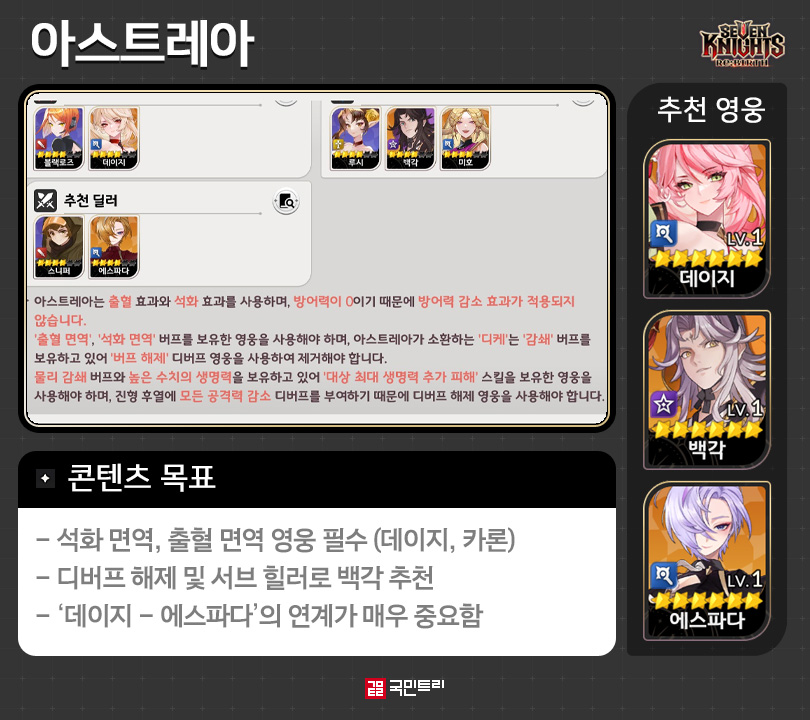
Let's dive into the boss mechanics and hero picks. First up is Astrea, the first boss encountered since the launch of the Sudden Raid. The core strategy is to quickly dispose of the minion 'Dike' and then deal 'Bonus damage proportional to Max HP' to Astrea. It is the exact same gimmick as the Ox Demon raid.
Astrea inflicts 'Bleed' and 'Petrification'. You can negate these by bringing heroes with the right immunities. For Petrification, 'Daisy' is your go-to. For Bleed, look at 'Karon' or the collab hero 'Lee Joo-hee'. Daisy is particularly useful; she not only provides Petrification immunity but also purges Dike’s 'Damping' buff, deals AoE damage, and boosts your team’s Magic ATK—perfect for buffing your main DPS, 'Espada'. If you don't have Daisy, the rare hero 'Black Rose' is a solid alternative.
Espada deals bonus damage based on the target’s Max HP. She is currently the top dog in Seven Knights Re:BIRTH and a staple in the Ox Demon raid. Just remember the skill rotation: Daisy’s 'Fire Butterfly' followed by Espada. Make sure your gear is up to snuff, as you need that Fire Butterfly to wipe out Dike in one hit for a smooth run.

Rewards for Sudden Raids are scaled by individual scores. To snag the top SS rank, you need to clear it in under 50 turns. Each round grants a 100,000-point bonus, so hitting the mark at 49 turns is the golden ticket. Otherwise, there is no turn limit; just taking the boss down nets you 2 million points.
Unless you are chasing a spot on the leaderboard, just aim for completion. For that, we recommend this party: 'Baek Gak - Karon or Lee Joo-hee - Espada - Daisy or Black Rose - Biscuit'. You can get Baek Gak at 2-transcendence for free via the '1st Hero Expedition' event. He acts as a sub-healer and a debuff cleanser for your backline.
If you are gunning for a high score, swap Baek Gak for 'Orly' (at least 2-transcendence). Lee Joo-hee, from the 'Solo Leveling' collaboration, is easy to max-transcend. While her healing range is limited to three targets compared to Karon, she is far more accessible for new players who cannot afford to transcend Karon right away.
Leonid: No Guan Yu or Baek Ryong? No Chance.
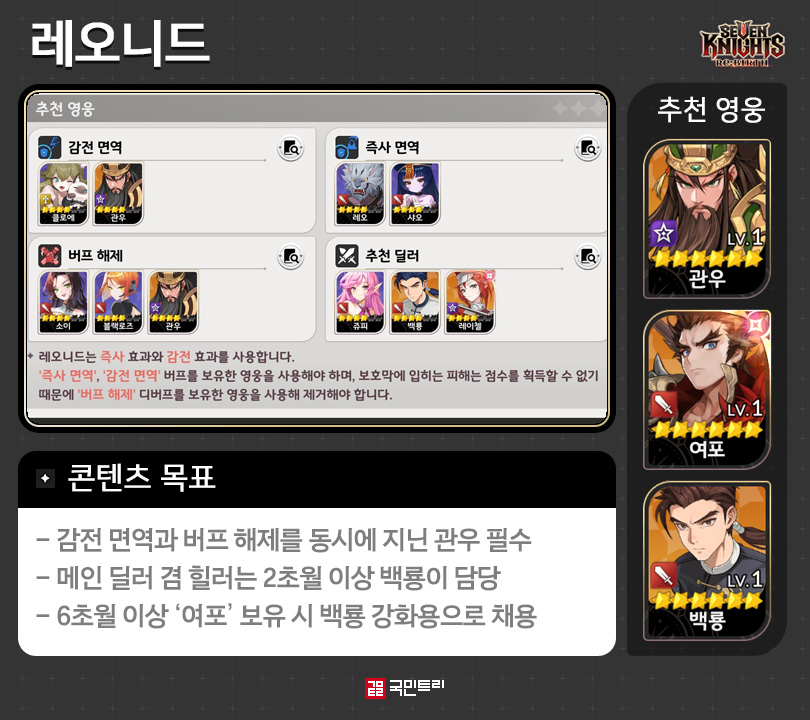
Next is Leonid, who has been terrorizing players recently. His defense is sky-high, so you need a 'Defense Ignore' dealer. He is also quite cheeky, constantly putting up a shield. Since you cannot score points against the shield, you must strip it off immediately.
For a smooth Leonid run, 'Guan Yu' and 'Baek Ryong' are non-negotiable. Guan Yu is a reward from the '3rd Hero Expedition' (2-transcendence), and you can snag Baek Ryong from the Arena Shop or Wish List. Aim for at least 2-transcendence on Baek Ryong. To counter Leonid’s 'Instant Death', bringing 'Leo' or 'Xiao' is mandatory. We recommend a 6-transcendence Xiao for high-score runs.
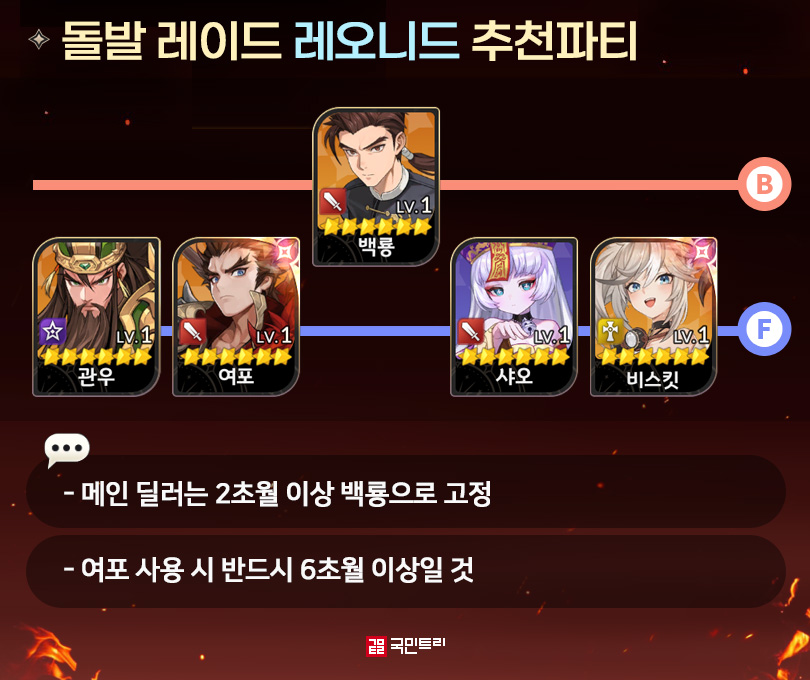
The current meta for Leonid high scores requires 'Lu Bu'. Unlike Guan Yu and Baek Ryong, who function at 2-transcendence, Lu Bu is only viable at 6-transcendence or higher. It comes down to his 6-transcendence skill upgrade, which boosts backline Defense Ignore efficiency by 10%. At 2-transcendence, Baek Ryong sits at 40% (skill) + 10% (passive) Defense Ignore. Adding Lu Bu’s buff and the 15% from the 4-set 'Assassin' gear is crucial. If your Baek Ryong is 6-transcendence, his skill gains an extra 25% Defense Ignore, resulting in massive damage. If you don't have a 6-transcendence Lu Bu, swap in 'Lina' and focus on survival.
Callistra: A Sprint to the Finish
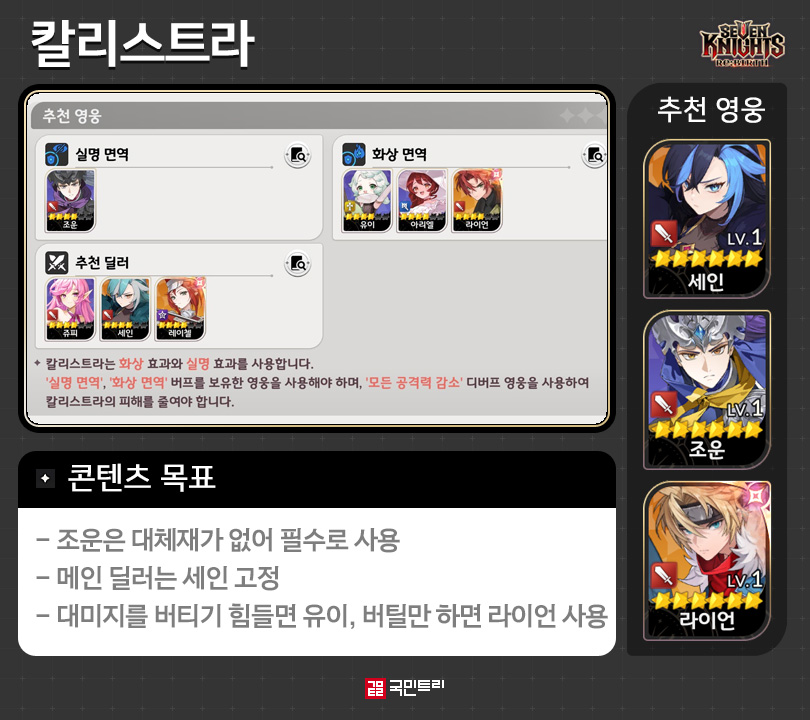
Finally, we have 'Callistra', who appeared on March 31. To tackle her, you absolutely need 'Zhao Yun', 'Yui', and 'Ryan'. The former provides 'Blind immunity', while the latter pair handles 'Burn immunity'. Callistra deals significantly more damage than other bosses, so you must use 'All ATK Decrease' debuffs to survive. In short: minimize damage taken and hit hard, fast.
The high-score party currently is 'Zhao Yun - Ryan - Shane - Rachel - Biscuit'. It has no dedicated healer, making it a glass cannon setup; most top-tier players are using the 'Ring of Power' legendary accessory to survive. Focus your skills on Biscuit, Rachel, and Shane. Zhao Yun should never use skills, and Ryan should only use 'Black Wind Slash'. If you lack the Ring of Power or your hero stats are low, survival will be tough. In that case, swap Ryan for Yui to gain healing and a physical damage buff.

Q. Do I really need to pull for all these heroes?
A. Some heroes are guaranteed through event rewards.
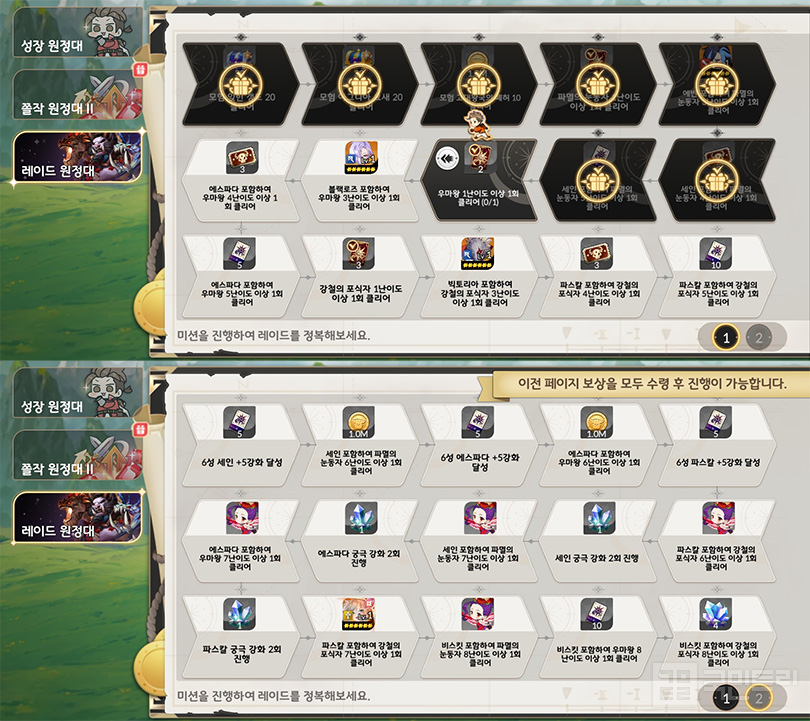
Looking at these compositions, you might be thinking, 'That's way too many legendary heroes to pull!' As of March 31, all legendary heroes except Lu Bu and Daisy can be obtained for free.
The 'Raid Expedition' event grants Espada, Shane, and Biscuit, while the 1st and 3rd Hero Expeditions give you Baek Gak and Guan Yu. Both Baek Gak and Guan Yu can be pushed to 2-transcendence by completing their missions. Lu Bu and Daisy are harder to guarantee, but you can boost your odds via the hero summon Wish List. Don't forget the special coupons providing 300 summon tickets—make sure to claim all rewards and dive into the Sudden Raid!
'세븐나이츠 리버스(이하 세나 리버스)'에 신규 레이드 콘텐츠 '돌발 레이드'가 등장했다. 전 서버 유저들이 힘을 모아 토벌 중인데, 기존 레이드와 비슷하면서도 다른 기믹으로 나와 영웅 조합에 살짝 차이가 있다. 컬래버레이션을 맞아 세나 리버스를 시작한 신규 모험가 입장에선 갑자기 나타난 레이드를 어떻게 해야 할지 막막할 것이다. 이에 국민트리가 돌발 레이드 관련 정보를 정리했다.
돌발 레이드란?
우선 돌발 레이드의 기본적인 정보를 알아보자. 돌발 레이드는 레이드 '파멸의 눈동자 - 우마왕 - 강철의 포식자' 11~15단계를 클리어했을 때 확률적으로 발생한다. 이 확률은 모든 모험가의 레이드 클리어 횟수가 누적될수록 증가하며, 돌발 레이드 발생 시 초기화한다. 확률은 레이드 메인 메뉴의 '공략' 버튼 왼쪽과 메인 화면 레이드 화면의 빛나는 이펙트로 파악 가능하다.
돌발 레이드 보스로는 '레오니드 - 아스트레아 - 칼리스트라' 가운데 하나가 무작위로 등장한다. 이후 10시간 동안 모든 세나 리버스 모험가들이 보스에 도전할 수 있다. 별도의 체력바가 존재하나, 체력이 전부 사라진 상태더라도 10시간 동안은 계속해서 공략에 참여 가능하다. 이를 이용해 6성 레이드 장비를 파밍하는 게 주 목표다. 돌발 레이드는 별도의 입장권이 필요한데, 콘텐츠 상점과 루비로 추가 구매할 수 있다. 그밖에 11~15단계 레이드에서 일정 확률로 획득한다.
아울러 보상으로 드롭하는 장비와 메인 옵션을 모험가가 직접 고를 수 있다. 무기와 방어구의 옵션을 각 4개씩 선택해야 한다. 추천 무기 옵션은 '치명타 확률 - 치명타 피해량 - 모든 공격력(%)', 방어구 옵션은 '받는 피해량 감소 - 막기 확률 - 모든 공격력(%)'이다. 나머지 하나는 세트에 맞춰 고르면 끝이다.
목표는 완주, 돌발 레이드 보스 뜯어보기
우마왕 상위호환 '아스트레아'
이제 돌발 레이드의 보스 기믹과 추천 영웅을 살펴보자. 먼저 알아볼 보스는 돌발 레이드 추가 이후 처음 상대한 '아스트레아'다. 핵심 기믹은 쫄 '디케'를 빠르게 처치하고, 아스트레아에게 '최대 생명력 비례 추가 피해'를 가하는 것이다. 기존 레이드 보스 '우마왕'과 같은 기믹이다.
아스트레아가 부여하는 디버프는 '출혈'과 '석화'다. 두 효과는 '출혈 면역'과 '석화 면역' 영웅 편성으로 미연에 방지할 수 있다. 석화 면역 추천 영웅은 '데이지', 출혈 면역은 '카론'과 컬래버레이션 영웅 '이주희'다. 데이지는 석화 면역 뿐만 아니라 디케의 '감쇄' 버프를 삭제하는 '버프 해제'와 광역 공격, 아군 전체 마법 공격력 증가 능력이 있다. 메인 딜러 '에스파다'를 강화하는 데 안성맞춤이다. 데이지가 없다면, 희귀 영웅 '블랙 로즈'를 사용하자.
에스파다는 대상의 최대 생명력 비례 추가 피해를 가한다. 현재 세나 리버스에서 가장 강력한 영웅으로, 같은 기믹인 우마왕 레이드에서도 메인 딜러로 사랑받고 있다. 스킬 순서는 데이지 '불나비' - 에스파다로 기억하면 된다. 데이지의 불나비로 디케를 한방에 잡아야 원활하게 공략할 수 있으니 스펙을 점검하자.
돌발 레이드는 개인 점수를 기반으로 보상이 다르다. 최고 등급 SS를 받기 위해선, 50턴 미만으로 공략해야 한다. 1라운드마다 10만 점의 추가 점수를 제공해 49턴에 공략해야 가장 높은 등급을 받는다. 이외엔 별도의 턴 제한이 없어 보스를 쓰러트리기만 하면, 200만 점을 획득한다.
랭킹 싸움에 도전하는 모험가를 제외한 일반 모험가들은 완주를 목표로 하는 게 좋다. 이를 위한 추천 파티는 '백각 - 카론 or 이주희 - 에스파다 - 데이지 or 블랙로즈 - 비스킷'이다. '백각'은 '1차 영웅 원정대' 이벤트로 모든 모험가가 2초월까지 획득할 수 있다. 백각은 후열 아군의 디버프 해제와 전체 회복이 있어 서브 힐러 겸 디버프 해제 요원으로 쓸 수 있다.
고점을 노리는 모험가는 백각 대신 2초월 이상 '오를리'를 사용해 보자. 이주희는 '나 혼자만 레벨업' 컬래버레이션 이벤트로 고초월 성장이 가능하다. 회복 범위가 카론보다 적은 3인이지만, 당장 초월이 힘든 카론보다 바로 투입할 수 있는 이주희가 신규 모험가에겐 딱이다.
관우, 백룡이 없으면 도전이 힘든 '레오니드'
이어 최근 토벌된 레오니드다. 방어력이 굉장히 높아 '방어력 무시 피해' 딜러가 필요한 보스다. 아울러 수시로 자신에게 '보호막'을 부여하는 까다로운 개체다. 보호막에 입히는 피해는 점수를 얻을 수 없어 반드시 해제해야 한다.
원활한 레오니드 공략을 위해 '관우'와 '백룡'은 반드시 있어야 한다. 관우는 '3차 영웅 원정대' 보상으로 2초월, 백룡은 결투장 상점 및 위시 리스트에서 획득한다. 백룡을 제대로 쓰기 위해선 최소 2초월을 달성해야 하니 참고하자. 레오니드가 부여하는 '즉사'를 막기 위해 '레오' 혹은 '샤오' 편성이 필수다. 고점 조합엔 6초월 이상 샤오를 추천한다.
현재 레오니드 최고점에 필요한 영웅은 '여포'다. 2초월이면 충분한 관우, 백룡과 다르게 여포는 반드시 6초월 이상일 때만 활용 가능하다. 이유는 여포의 6초월 스킬 강화 효과에 있다. 여포의 스킬 '혈풍벽파'와 '적토질풍격'은 후열 아군의 방어 무시 효율을 10% 높인다. 2초월 기준 백룡의 방어 무시 수치는 '스킬 40% + 패시브 10%'다. 여포의 버프와 '암살자' 장비 4세트 효과 15%를 더해 방어 무시 수치를 높이는 것이 중요하다. 백룡이 6초월 이상이라면, 백룡 스킬의 방어 무시 수치가 추가로 25% 올라 강력한 대미지를 줄 수 있다. 6초월 여포가 없는 유저는 서포터 '리나'를 채용해 생존에 집중하자.
단기 결전 '칼리스트라'
마지막은 3월 31일 등장한 '칼리스트라'다. 칼리스트라 공략에 반드시 필요한 영웅은 '조운'과 '유이', '라이언'이다. 전자는 '실명 면역', 후자는 '화상 면역'을 탑재했다. 칼리스트라의 피해량이 다른 보스에 비해 높아 '모든 공격력 감소' 디버프를 이용해 받는 피해를 줄여야 한다. 쉽게 말해 '최대한 받는 대미지를 줄이고, 빠르게 잡기'가 핵심 공략인 셈이다.
칼리스트라 공략에 쓰인 고점 조합은 '조운 - 라이언 - 세인 - 레이첼 - 비스킷'이다. 힐러가 없는 조합이라 생존이 어려운 편이다. 따라서 전설 반지 중 권능 반지를 사용한 랭커들이 많다. 스킬은 비스킷, 레이첼, 세인 중심으로 사용해 공략하자. 조운은 스킬을 전혀 사용하지 않고, 라이언은 '흑풍참'만 사용하면 된다. 칼리스트라의 피해량이 워낙 높아 권능 반지가 없고, 영웅 스펙이 낮은 유저는 생존이 힘들 수 있다. 이런 경우 라이언 대신 유이를 편성해 회복 및 물리 피해량 증가 버프를 활용하자.
Q. 필요한 영웅이 많은데 전부 뽑아야 하나요?
A. 일부 영웅은 이벤트 보상으로 확정 획득합니다.
앞서 소개한 파티 조합을 살펴보면 희귀 영웅 외에 전설 영웅이 많이 필요한 걸 알 수 있다. 이제 막 세나 리버스를 시작한 모험가 입장에선 '필요한 게 너무 많은데'라는 생각이 들 것이다. 3월 31일 기준 여포와 데이지를 제외한 전설 영웅들은 모두 무료로 얻을 수 있다.
'레이드 원정대' 이벤트로 에스파다, 세인, 비스킷을 얻고, 1차 영웅 원정대로 백각, 3차 영웅 원정대로 관우를 지급한다. 백각과 관우는 해당 미션을 모두 클리어하면, 2초월까지 가능하다. 당장 실전 투입할 수 있는 셈이다. 여포와 데이지는 확정 획득이 어려우나, 영웅 소환 위시 리스트를 이용해 확률을 높일 수 있다. 최근 특별 쿠폰으로 영웅 소환 이용권 300장을 제공해 신규 모험가도 뽑을 기회가 생겼다. 쿠폰 및 보상을 전부 받아 돌발 레이드에 참여하자.




- Animo Prepares to Open Special No Brand Burger Store Ahead of Launch
- Popup events to be held in Dongdaemun and Yongsan to celebrate the release of Liftbound
- GTA 6 Online to support up to 32 players, confirmed through lawsuit documents
- Deepening Crisis in Snezhnaya, Genshin Impact Version 7.1 Starts on the 23rd
- [Today's steam] Animorphs officially released, recording 100,000 Concurrent Players
- [Today's steam] Normalized new FPS Wardogs surpasses 420,000 Concurrent Players
- An Ensemble Drama with Four Heroes, Fire Emblem Mazachanhong
- Gathering Cheonhwi and Slowly Falling for the Charm of 'Animo'
- A Magnificent Two-Consecutive-Championship Feat, The Protagonist of 2026 LCK is Gen.G
- [Photo] How does Riftbound captured in cards look?





