

[Sol: enchant Tips] Healer Recommendation 'Skills, Equipment, and Bonus Stats' Guide
[솔: 인챈트 꿀팁] 힐러 추천 ‘스킬·장비·보너스 스탯’ 공략
Look, let's be honest, the new Healer class has just dropped in Sol: enchant. The Healer is basically your go-to support archetype for keeping allies alive, and plenty of players are already leveling them up as squad characters. Naturally, everyone is scratching their heads over which skills, gear, and bonus stats to run. So KookminTree did some digging to bring you the ultimate Healer guide.
※ Note: Recommended skill MP costs are rough estimates.
※ Skill books listed are strictly limited to those purchasable via Nine.
※ Gear recommendations may vary depending on individual character stats.

Q. What skills should a Healer use?
A. That entirely depends on your leveling goals.
Your reasons for raising a Healer dictate which skill books you ought to buy. If you are just building them as a squad character, rare-grade Icicle III and Divine Sword I are solid choices. If you can push your MP recovery up to 95, heroic-grade Divine Ray and Divine Orb II also enter the conversation.
If your jam is supporting allies in massive PvP modes like Sky Island or Tower of Gods, well, you basically want every single skill on the table. Grab Divine Stance I, Bless Heal, Holy Recovery, Holy Barrier I, Divine Stance II, and Heal Boost at rare grade. At that point, you are investing roughly as much as you would on a main character.
The Healer's offensive arsenal consists solely of Icicle I, II, III, Freezing Fall, and Divine Ray. It sounds sparse, but the bread-and-butter skills Icicle and Divine Ray boast blistering cooldowns of just 8 and 6 seconds respectively. Plus, aside from Icicle I, all of them are AoE skills hitting multiple targets. Thanks to that, your farming speed is surprisingly decent despite the limited toolkit.
Comparing them to existing jobs, Icicle feels a lot like the Mage's Flame Casting, while Divine Ray channels the Ranger's Storm Breaker. The main catch is that their cooldowns are significantly shorter, though the damage numbers are a bit lower to compensate. That snappy cooldown makes up for having fewer offensive tricks in the book.
That said, because most Healer skills are AoE, you are going to pull aggro from packs of mobs. If your stats are on the lower side, staying alive can be a proper struggle. Healing and Bless Heal will help keep you ticking, but solo farming is undeniably rough. We'd suggest dropping down to an easier hunting ground or tagging along where other players are gathered.
The rare skill Freezing Fall has a 60% chance to freeze targets, but frozen targets will dodge literally every attack thrown their way. It is the exact same annoying mechanic we suffered through in the watermelon dungeon event. Unless you are heavily into PvP, you can safely skip learning Freezing Fall, or at least keep it off your bar during regular farming.
As a heroic skill, Divine Ray comes with a chunky MP cost of 50 per 20 seconds to match its short cooldown. Your MP consumption jumps straight from 45 (just running Icicle I, II, and III) up to 95 the moment you pick up Divine Ray. Make sure your MP recovery can actually handle the drain before investing in it.
Healing and Bless Heal have a handy auto-cast feature that kicks in when a party member's HP drops low. Setting this up properly guarantees you survive the tight spots. Just calculate the percentages against your max HP—usually around 90% for Heal and 60% for Bless Heal works nicely if your max HP sits at 3,000.
Similarly, buff skills like Divine Sword, Divine Shield, and Holy Barrier can auto-cast when a party member within 10 meters lacks the buff. Toggle these settings to ON, and they will trigger automatically whenever conditions are met.
Q. What armor, accessories, and weapons do you recommend for a Healer?
A. It depends on your stats and whether you plan to use Divine Ray.
For standard players raising a squad character, the undisputed rare weapon choice is the Silver Staff thanks to its bonus damage against undead. Armed with that, you'll want to farm locations like the Dungeon of Despair, Undead Ruins, Undead Forest, or Cursed Mountains depending on your current level and stats.
If you are already rocking high early-game stats thanks to Heroic God Armor, spirit gear, extensive codex collections, and research, the Guardian's Staff is a better recommendation. From there, head over to areas like the Cultist Assembly Point for efficient AoE farming or Calteon Forest to hunt down rare skill books. Keep in mind this route assumes you've got the stats to back it up.
When you hit level 50 and claim your heroic weapon selection box, go with the Reaper's Staff for its superior overall stats. To break down the comparison, the Devil Wand grants +1 INT, but the Reaper's Staff gives you +1 damage, +1 accuracy, and an extra +20 damage against undead. However, since a Healer's healing output scales with INT, grab the Devil Wand if bolstering your heals is your absolute priority.
When it comes to rare armor sets, the roadmap points straight to Shaman's Robe > Shaman's Headdress > Lamia's Scaled Gloves > Wisdom Boots. Since level-up rewards hook you up with up to three pieces of rare armor, take the robe, headdress, and gloves, then craft and equip the Inquisitor's Boots for that sweet accuracy stat.
Your accessory choices depend heavily on your endgame targets. As mentioned earlier, keeping Divine Ray rolling demands a total MP recovery of 95. If your current setup falls a bit short of that threshold, you'll need to patch the gap with proper accessories. Prime candidates include the Despair Necklace > Scale Belt > Crystal Earrings.
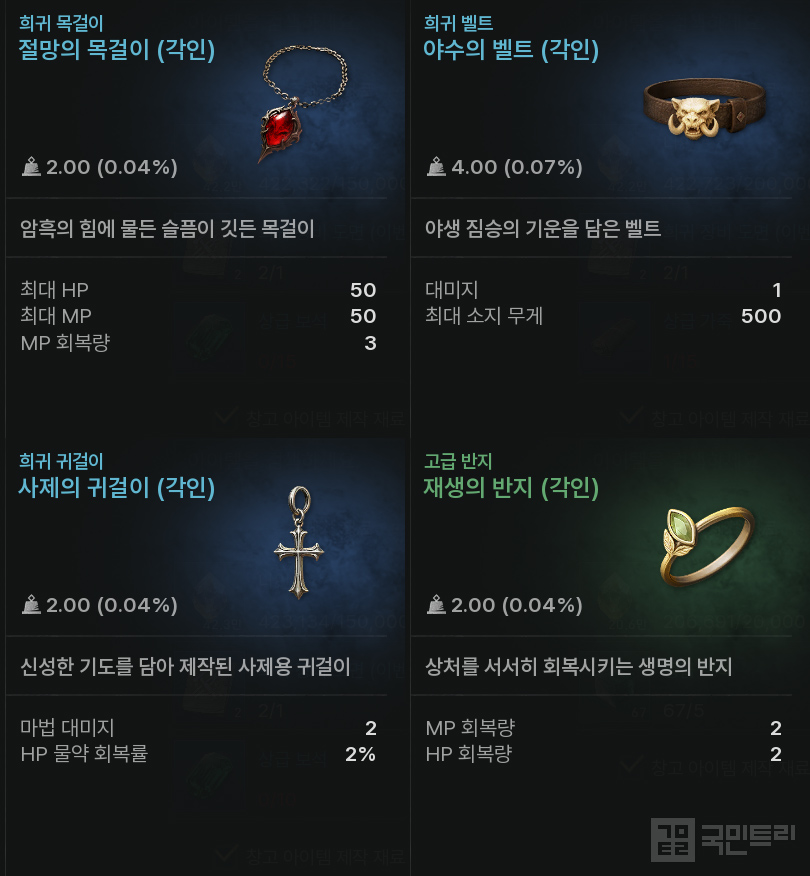
If you have zero intentions of buying the Divine Ray skill book, the shopping list changes. Running just Icicle only requires around 46 MP recovery, meaning you can swap out the Crystal Earrings for Priest's Earrings and the Scale Belt for Beast's Belt to pump up your damage instead. Stick with the cheap, cost-effective Advanced-grade Ring of Regeneration for your rings; there literally isn't a rare ring out there that beats its MP recovery or offensive punch.
Q. What bonus stats should a Healer prioritize?
A. INT is priority number one, followed by WIS.
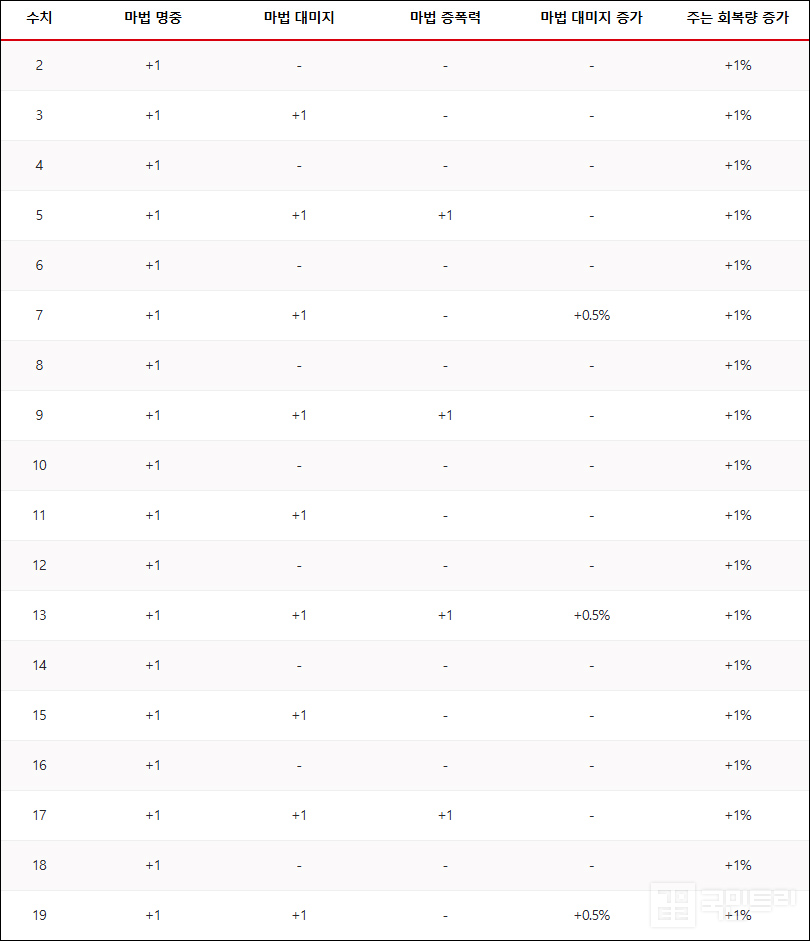
Sink your Healer bonus stats straight into INT first. Every single level puts +1 to Magic Accuracy and +1% to Healing Output. Plus, every 2 levels grants +1 Magic Damage, every 4 levels gives +1 Magic Amplification, and every 6 levels boosts Magic Damage Increase by +0.5%. Once you've maxed out your INT, pivot over to WIS for that precious MP recovery. The exact stat gains per bonus stat level can be found via the [KookminTree Bonus Stat DB Page] link.
‘솔: 인챈트’ 신규 클래스 힐러가 등장했다. 힐러는 아군을 보호하는데 탁월한 능력을 발휘하는 서포터 직업군으로, 벌써 많은 유저가 스쿼드 캐릭터로 육성하고 있다. 그런데 육성할 때 어떤 스킬, 장비를 써야 하고, 보너스 스탯은 무얼 찍어야 할지 궁금해하는 유저가 많다. 이에 국민트리에서 힐러 공략 정보를 조사했다.
※ 추천 스킬 조합 MP 소모량은 대략적 수치입니다.
※ 스킬북은 나인으로 구매할 수 있는 종류만 추천했습니다.
※ 개인 능력치에 따라 장비 추천은 달라질 수 있습니다.
Q. 힐러 스킬은 무엇을 써야 하나요?
A. 어떤 목적으로 육성하는지에 따라 달라집니다.
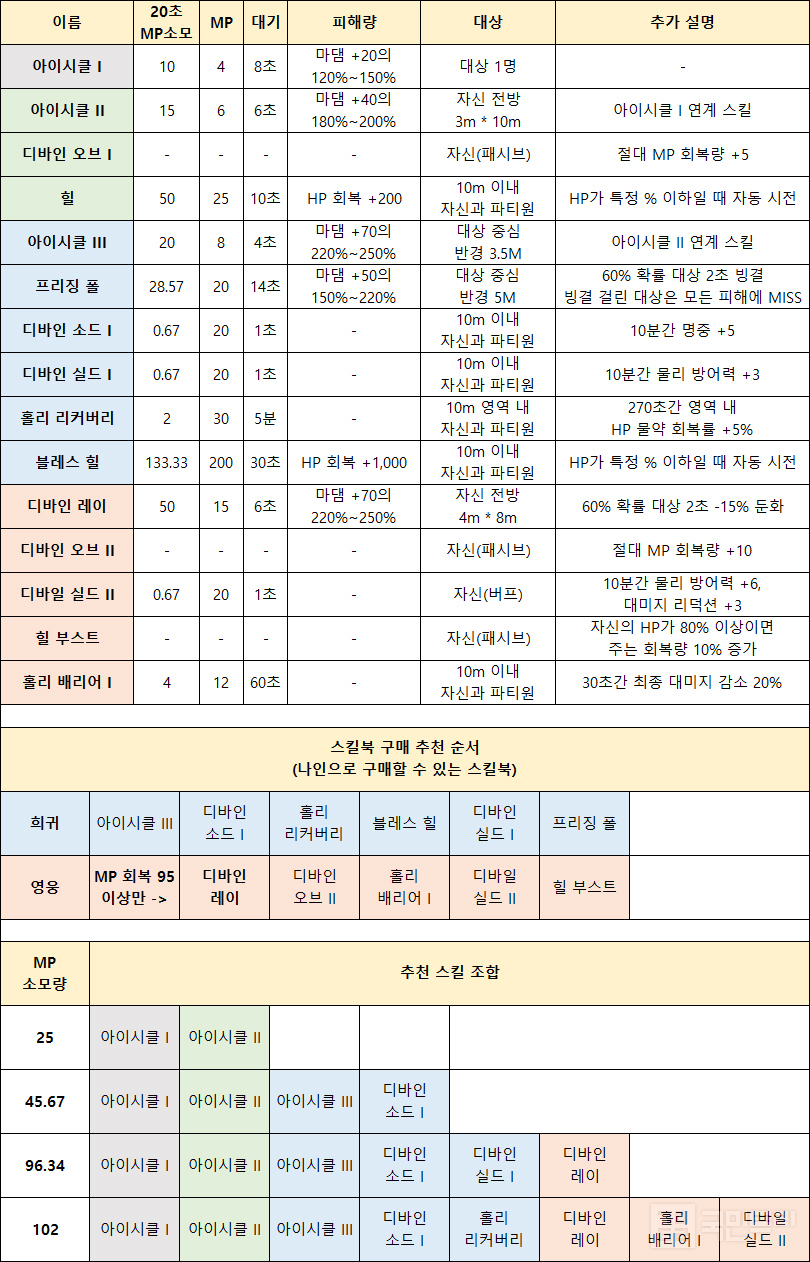
본인이 어떤 목적으로 힐러를 육성하는지에 따라 스킬북 구매 추천이 달라진다. 보통 스쿼드 캐릭터로 육성이 목적이면, 희귀 등급으로 아이시클 III과 디바인 소드 I을 추천한다. 여기에 MP 회복량을 95까지 맞출 수 있다면 영웅으로 디바인 레이와 디바인 오브 II까지가 고려 대상이다.
하늘섬, 신의 탑처럼 대규모 PvP에서 아군을 보조하는 것이 목적이라면 모든 스킬이 추천 대상이다. 희귀 등급으로 디바인 실드 I, 블레스 힐, 홀리 리커버리, 홀리 배리어 I, 디바인 실드 II, 힐 부스트까지 전부 배우자. 사실상 이쯤 되면 본 캐릭터와 비슷한 수준의 투자가 필요하다.
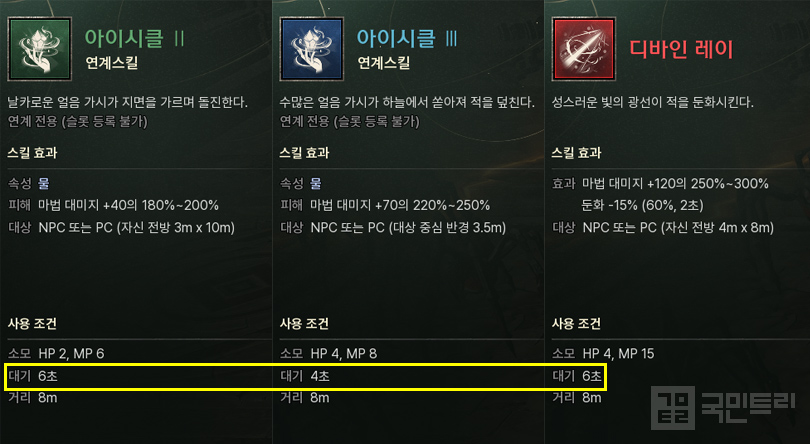
힐러의 공격 스킬은 아이시클 I, II, III, 프리징 폴, 디바인 레이가 전부다. 종류가 매우 적어 보이지만, 대신 주력 스킬인 아이시클과 디바인 레이 재사용 대기시간이 각 8초, 6초로 매우 짧다. 게다가 아이시클 I 외에 나머지가 모두 다수의 적을 공격하는 범위 스킬이다. 덕분에 사용하는 스킬이 적어도 제법 괜찮은 사냥 속도를 보유했다.
기존 직업과 비교하자면, 아이시클은 메이지의 플레임 캐스팅과 유사하고, 디바인 레이는 레인저의 스톰 브레이커와 비슷하다. 차이점은 모두 재사용 대기시간이 월등히 짧고, 대신 피해량이 조금 더 낮다는 것이다. 짧은 재사용 대기시간은 다른 직업보다 공격 스킬이 적다는 단점을 어느 정도 보완한다.
단, 힐러는 공격 스킬이 대부분 광역이라 다수의 몬스터 위협 수준을 끌어온다. 집중 공격을 받으면, 능력치가 낮은 유저 기준에서 생존이 힘들 수 있다. 힐과 블레스 힐로 어느 정도 유지력을 높일 순 있지만, 아무래도 홀로 사냥이 버거운 편이다. 한 단계 낮은 사냥터를 노리거나 혹은 다른 유저가 모인 곳에서 함께 사냥하는 걸 권한다.
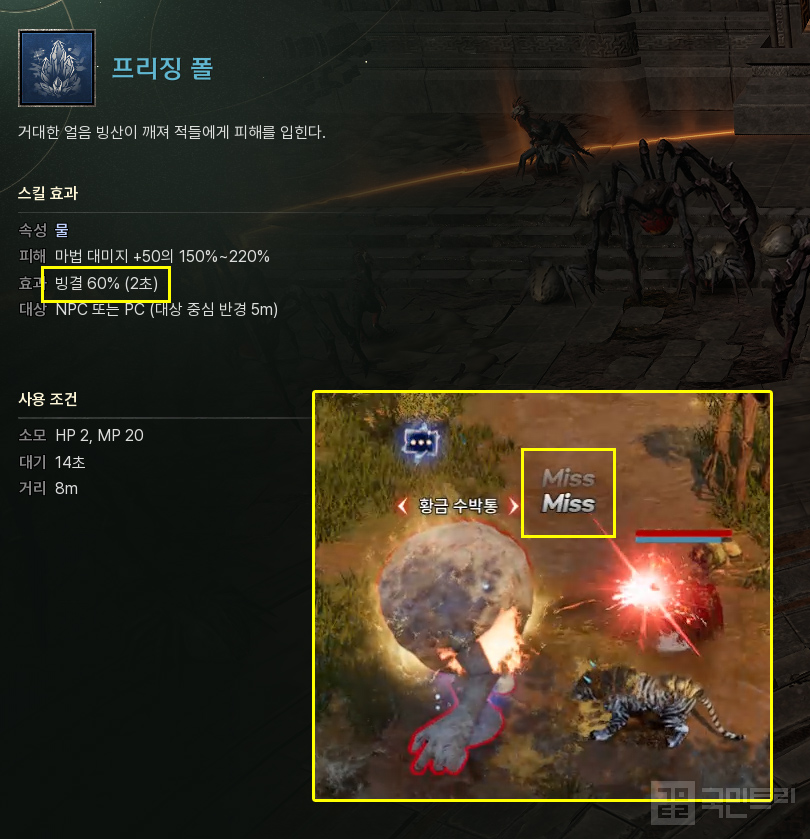
희귀 스킬 프리징 폴은 60% 확률로 대상에게 빙결을 거는데, 빙결에 걸린 대상은 모든 공격을 회피한다. 이전 이벤트 수박 던전에서 겪었던 빙결 효과와 같다. 이 때문에 도리어 빙결에 걸린 대상에게 스킬을 낭비해 사냥 속도가 저하되는 문제가 발생한다. 그러니 PvP가 목적이 아니라면 굳이 프리징 폴을 배우지 않아도 되며, 배웠더라도 사냥에서 쓰지 않는 걸 권한다.
영웅 스킬 디바인 레이는 짧은 재사용 대기시간만큼 20초당 50이라는 엄청난 MP를 소모한다. 아이시클 I, II, III만 사용할 땐 45이던 MP 소모량이 디바인 레이를 배우는 순간 95까지 치솟는다. 그러니 충분한 MP 회복량을 갖췄을 때만 디바인 레이를 배워 활용하자.
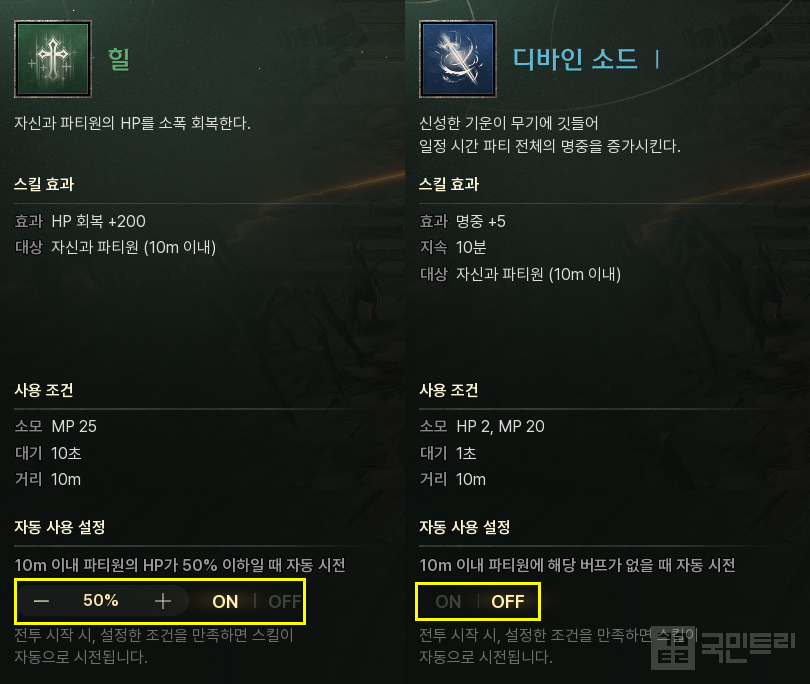
치유 스킬인 힐과 블레스 힐은 파티원의 HP가 낮을 때 자동으로 사용하는 기능이 있다. 이를 활용하면 필요한 순간에 치유해 유지력을 높일 수 있다. 본인 최대 HP와 비교 계산해 퍼센트를 설정하자. 보통 최대 HP 3,000 기준이면 힐은 90%, 블레스 힐은 60% 정도가 적당하다.
마찬가지로 디바인 소드, 디바인 쉴드, 홀리 배리어 버프 스킬은 10m 이내 파티원에 해당 버프가 없을 때 자동으로 시전하는 기능을 제공한다. 해당 설정을 ON으로 지정하면, 설정한 조건을 만족 시 스킬을 자동으로 시전한다.
Q. 힐러 방어구, 장신구, 무기는 어떤 걸 추천하나요?
A. 본인 능력치와 디바인 레이 사용 여부에 따라 달라집니다.
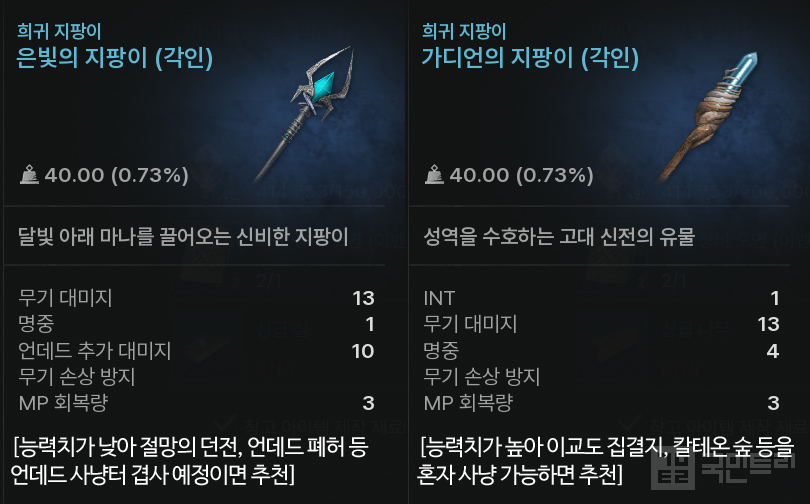
희귀 무기는 스쿼드 캐릭터를 육성하는 일반적인 유저 기준에서 단연 언데드 추가 대미지를 보유한 은빛의 지팡이다. 이를 착용하고 본인 능력치와 레벨에 따라 절망의 던전, 언데드 폐허, 언데드 숲, 저주받은 산맥 등에서 사냥하는 게 좋다.
영웅 갓아머와 영체, 그리고 충분한 수집과 연구로 초반부터 높은 능력치를 보유했다면 이보다 가디언의 지팡이를 추천한다. 그리고 광역 사냥 클래스에게 효율적인 이교도 집결지나 희귀 스킬북을 얻기 위해 칼테온 숲 등을 사냥하면 좋다. 물론 이는 충분한 능력치가 뒷받침되는 유저 기준 추천이니 주의하자.
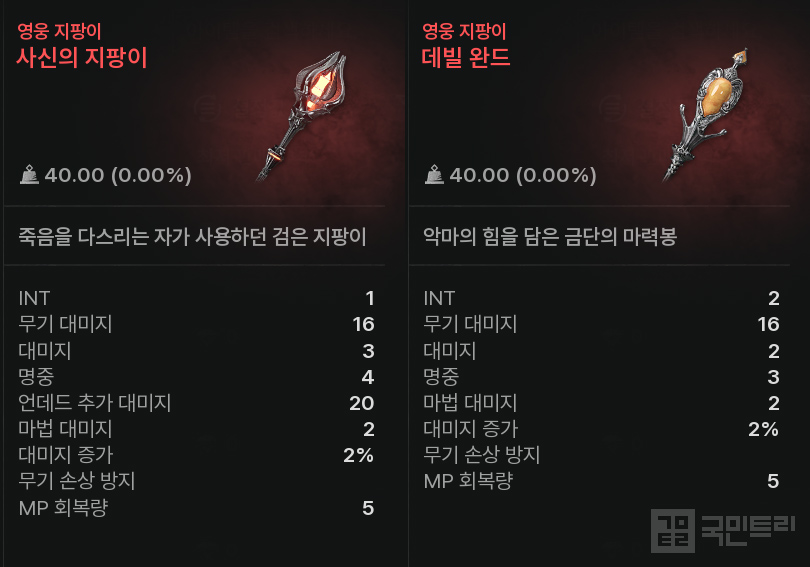
50레벨 달성 보상인 영웅 무기 선택 상자에서는 전체적으로 더 높은 능력치를 보유한 사신의 지팡이를 추천한다. 둘을 정확히 비교하자면, 데빌 완드가 INT 1이 더 높은 대신 사신의 지팡이는 대미지 1, 명중 1, 언데드 추가 대미지 20이 높다. 단, 힐러는 INT를 높일 때마다 회복량이 증가하기에 회복량 증가가 주목적이라면 데빌 완드를 받자.
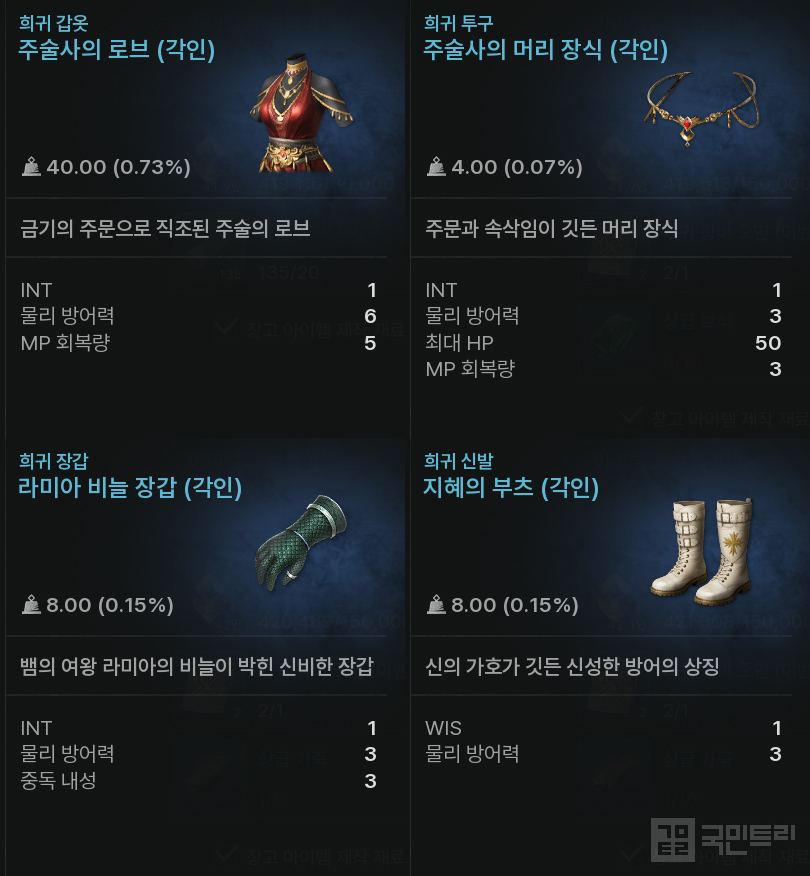
힐러 희귀 등급 방어구 추천은 주술사의 로브 > 주술사의 머리 장식 > 라미아의 비늘 장갑 > 지혜의 부츠로 귀결된다. 레벨업 혜택으로 희귀 등급 방어구를 3개까지 받을 수 있으니 로브, 머리 장식, 비늘 장갑을 받고, 부츠는 명중 능력치가 붙은 심판관의 부츠를 제작해 착용하자.
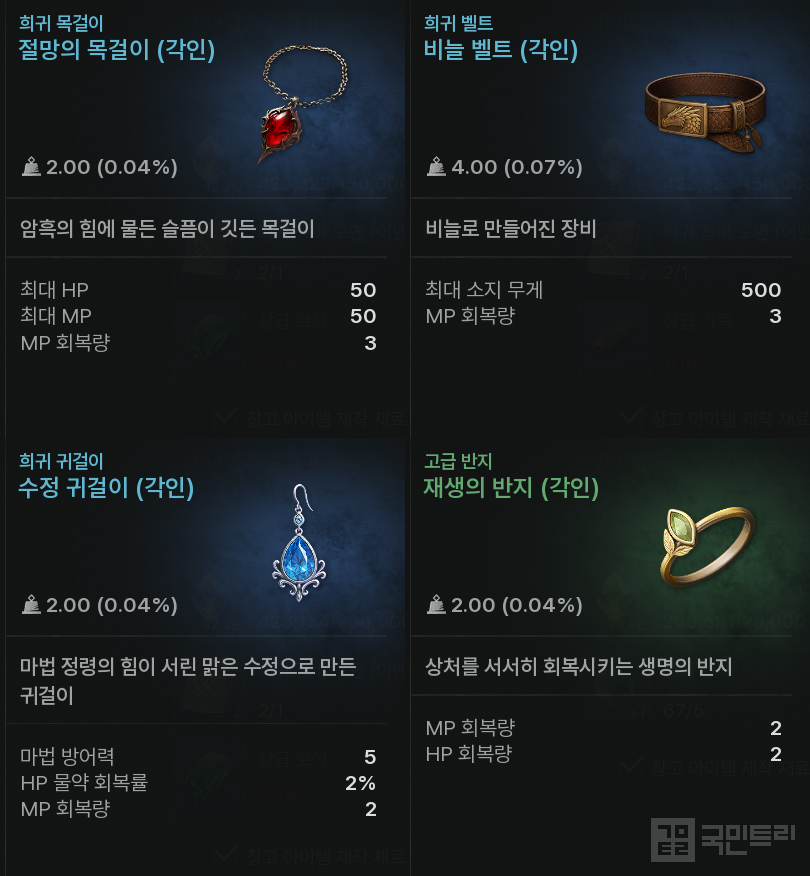
장신구는 이후 목표에 따라 달라진다. 앞서 스킬 부분에서도 설명했지만, 영웅 등급 스킬인 디바인 레이를 사용하려면, MP 회복이 총 95가 필요하다. 해당 스킬 사용을 위한 MP 회복이 조금 부족한 상태라면, 이를 보충하는 장신구를 갖춰야 한다. 대표적으로 절망의 목걸이 > 비늘 벨트 > 수정 귀걸이가 있다.
단, 디바인 레이 스킬북을 구매할 생각이 없다면, 추천 장신구가 달라진다. 아이시클만 사용 시 MP 회복이 46 정도면 충분하기에 수정 귀걸이 대신 사제의 귀걸이, 비늘 벨트 대신 야수의 벨트를 착용해 피해량을 높이자. 그리고 반지는 값싸고 효율적인 고급 등급 재생의 반지를 계속 쓰자. 희귀 등급 반지 가운데 이보다 MP 회복이 높거나 공격적인 능력치 붙은 종류가 없다.
Q. 힐러 보너스 스탯은 어떤 걸 추천하나요?
A. INT가 최우선, 이후 WIS에 투자하세요.
힐러 보너스 스탯은 INT를 최우선으로 투자하자. 1레벨을 높일 때마다 마법 명중 +1, 주는 회복량 증가 +1%가 추가된다. 아울러 2레벨을 높일 때마다 마법 대미지 +1, 4레벨을 높일 때마다 마법 증폭력 +1, 6레벨을 높일 때마다 마법 대미지 증가 +0.5%가 상승한다. INT를 모두 투자했다면, 다음은 MP 회복에 관련된 WIS를 높이자. 보너스 스탯 레벨당 상승하는 능력치 수치는 [국민트리 보너스 스탯 DB 페이지] 링크를 통해 확인하자.

-
 [Weekly Forum Highlight] Make sure to check out the big news for Vampir at the end of August!
-
 Vampir Big Event 'VCC S1' Participating Clan 128 Team Roster Revealed!
-
 Viper and Carnage Are the Stars of Vampir 1st Anniversary Record
-
 [Meca Ranking] Sol: enchant healers reaching level 50 appear in large numbers

- New DLC and Level Cap Increase, Borderlands 4 Content Revealed
- 2026 LCK to Determine Playoff Teams Starting on the 26th
- [gamescom 26] Project Zeta, the Core is "High-Density and Sustained Combat"
- GTA 6 Leaker Ignores Rockstar's Legal Action and Spreads Additional Footage
- [gamescom 26] Krafton Captures Visitors' Attention with 5 New Games
- Hanwha Life Esports, All LCK Team 2026 Selection of All Starting Players
- [gamescom 26] The World's Largest Gaming Exhibition, Gamescom in Germany Opens
- [gamescom 26] NC B2B booth features Guild Wars 3
- VCT Pacific Stage 2: DRX, Nongshim, T1, and T1 Advance to Playoffs
- CK Development Company Paradox's New Game 'Afterworld' Leaked Before Gamescom





