

[Sol: enchant Tips] Summary of Main Items Acquired by Sky Island Area
[솔: 인챈트 꿀팁] 하늘섬 구역별 주요 획득 아이템 정리

Look, let us be honest for a moment. The Skyland in Sol: enchant is a world battleground dungeon where players from servers 1 to 5 within the same world gather to cooperate and compete. It is split into a total of 6 zones, each featuring different monster types and loot pools. So, what are the primary items you can secure in each zone, and what kind of tips should you keep in mind? KookminTree has dug up the details for you.
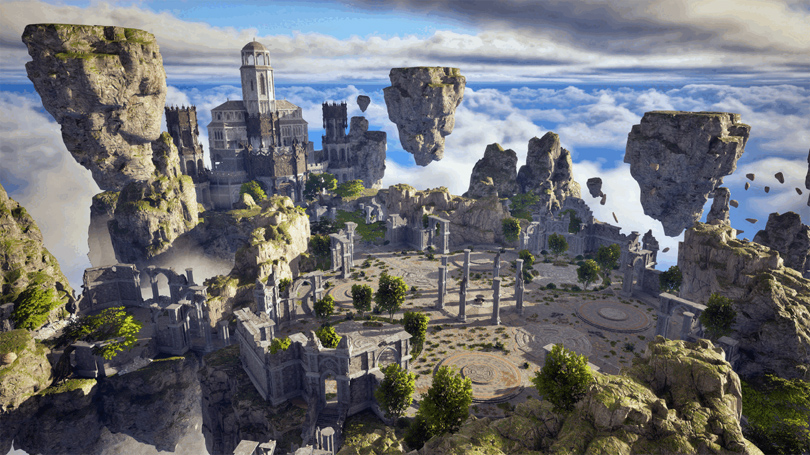
Q. What is the layout of the Skyland?
A. It is divided into a total of 6 zones.
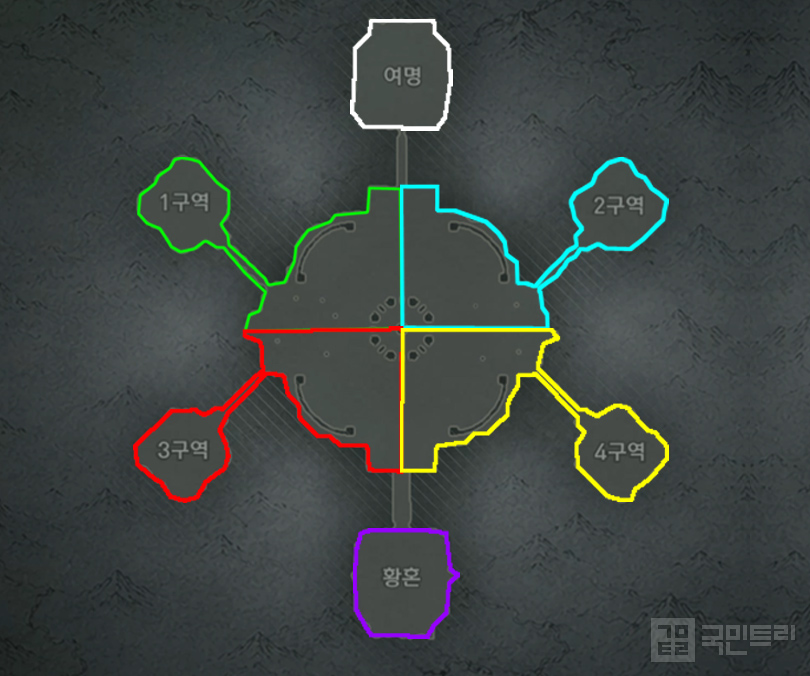
The Skyland spans 6 zones in total, consisting of zones 1 through 4, Dawn, and Twilight. Lower-numbered zones house weaker monsters, while Dawn and Twilight boast the most ferocious beasts. Naturally, the difficulty varies, meaning the experience points, Naein, and items dropped differ as well. For instance, dark monsters in the Twilight zone dish out roughly 30% more XP than the gentler wind monsters in Zone 1. Of course, that kind of payoff demands higher stats and hit ratings if you want to grind smoothly.
Crucially, Dawn and Twilight pack the highest difficulty across all zones. You will find plenty of aggressive and ranged monsters lurking about. On top of that, the dark succubus in the Twilight zone even casts a fear debuff on characters for a set duration, making survival a pipe dream unless you are packing top-tier stats. So, do yourself a favour and stick to the zone that matches your gear score. As a rule of thumb, zones 1 and 2 suit players currently grinding in the Hide Swamp and Shadow Altar, zones 3 and 4 are ideal for those tackling the Beast Pass and Naein Mine, while Dawn and Twilight are strictly recommended for endgame powerhouses.
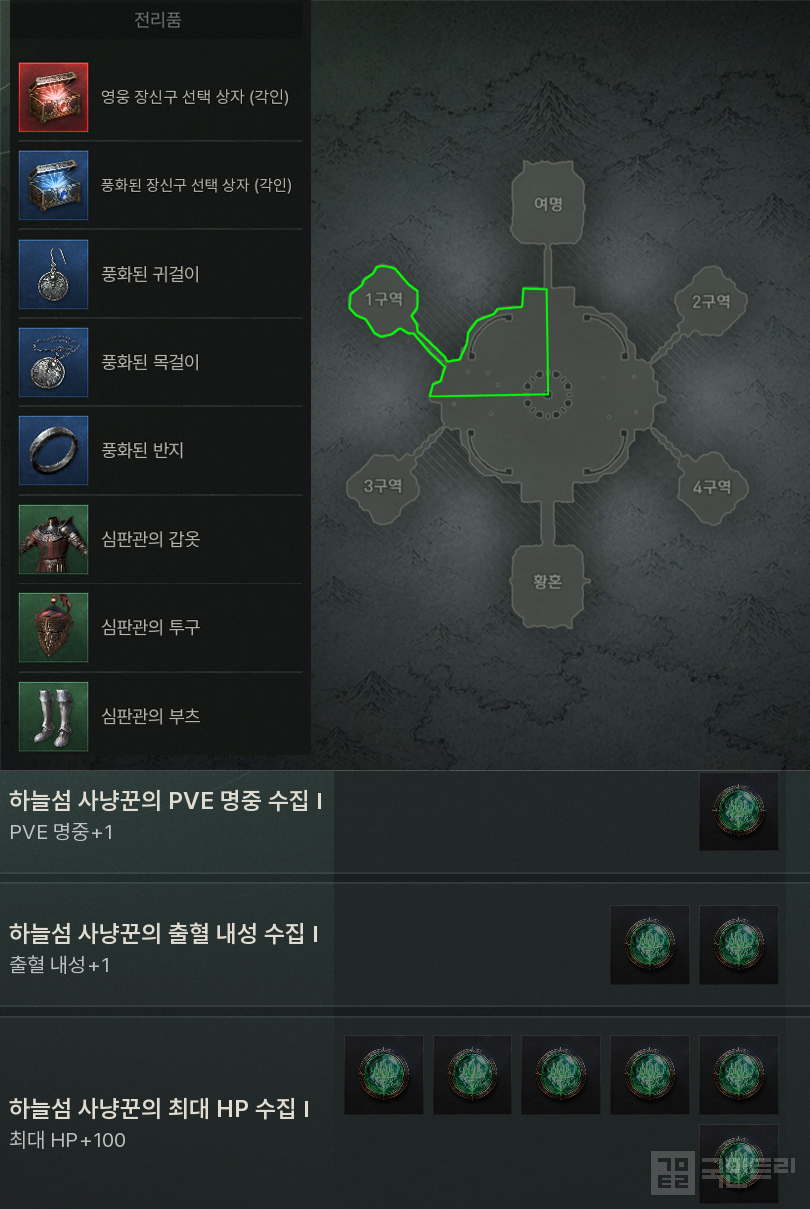
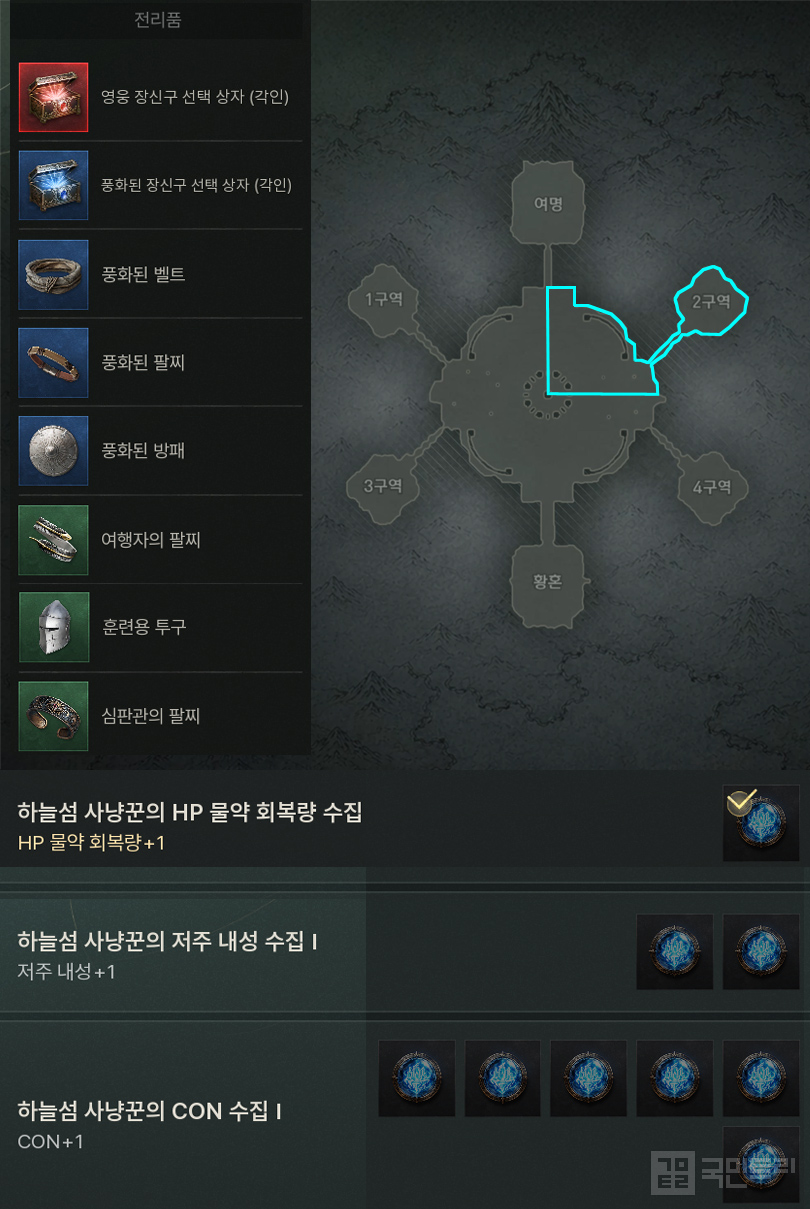
On top of that, the collection items tied to monster subjugation achievements vary by zone. You will want to hop between zones to fill out those stat collection requirements. For those of you with beefy stats, teaming up with squad characters or forming a party with guildmates is solid advice. Below is the list of primary drops and collection stats for each zone.
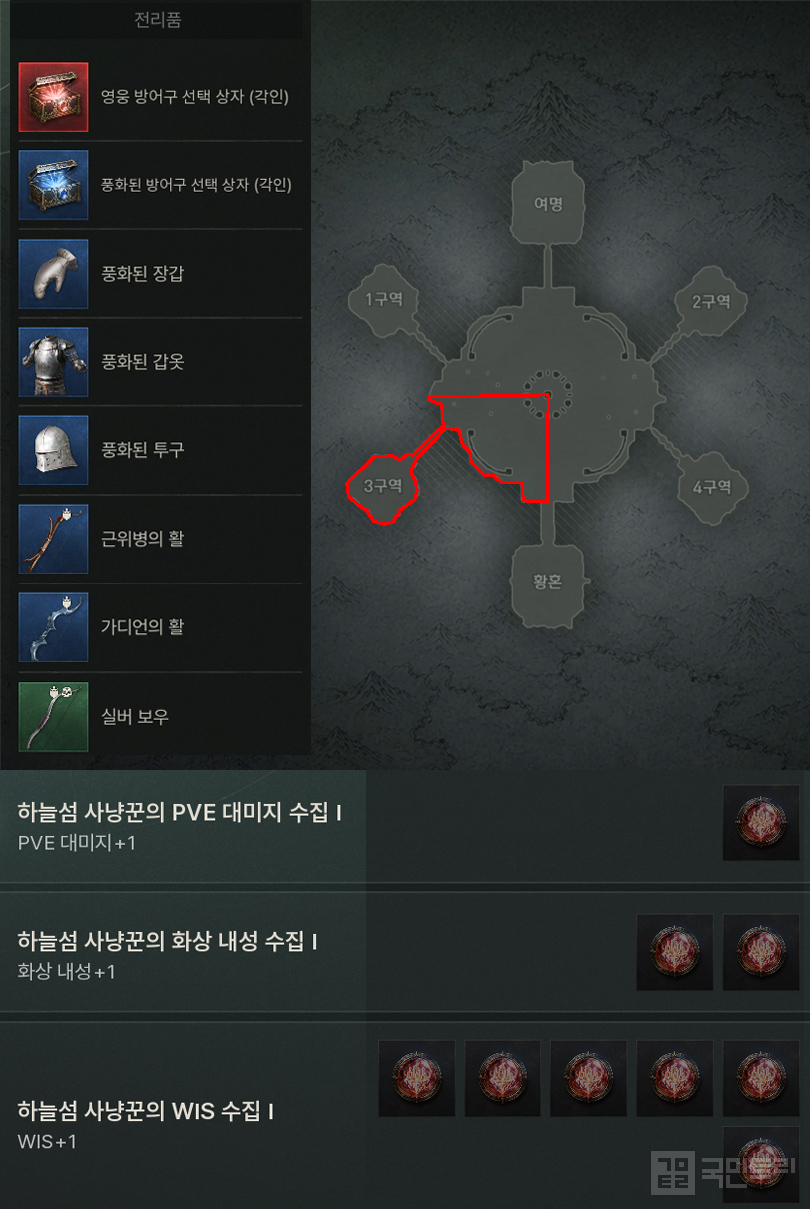
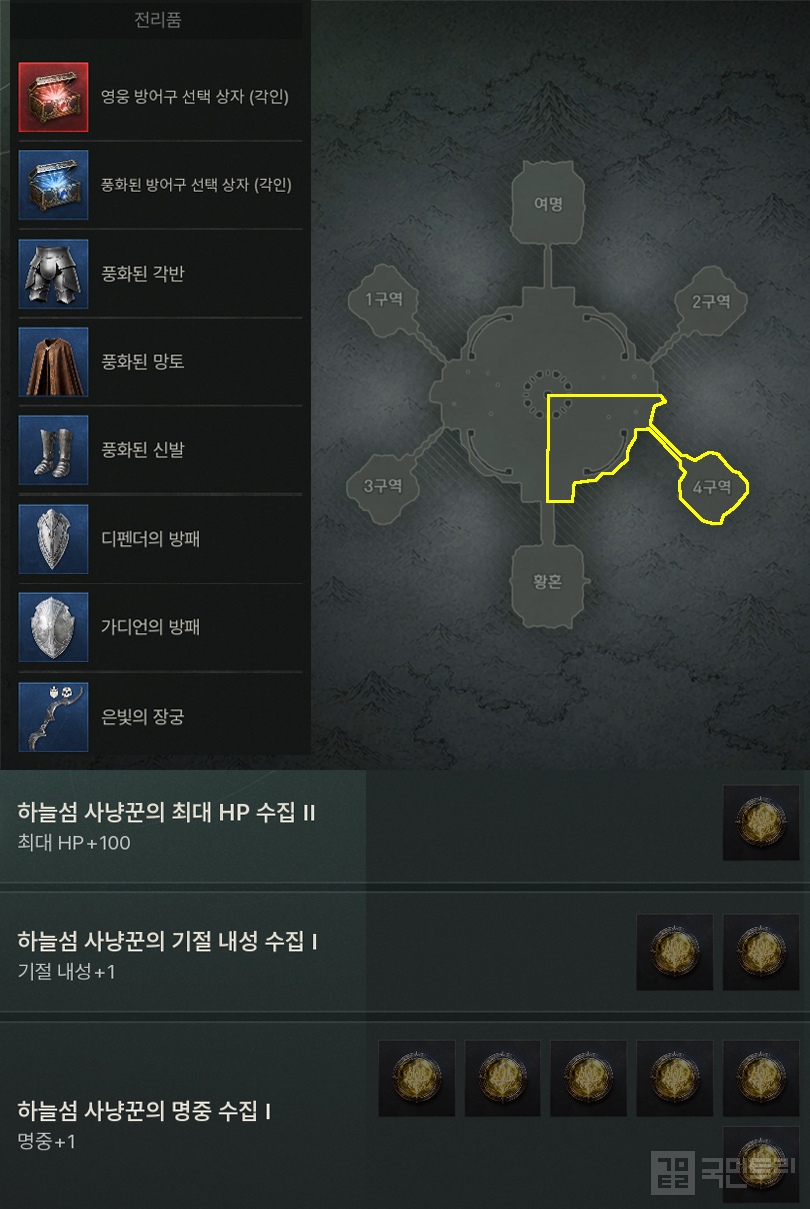
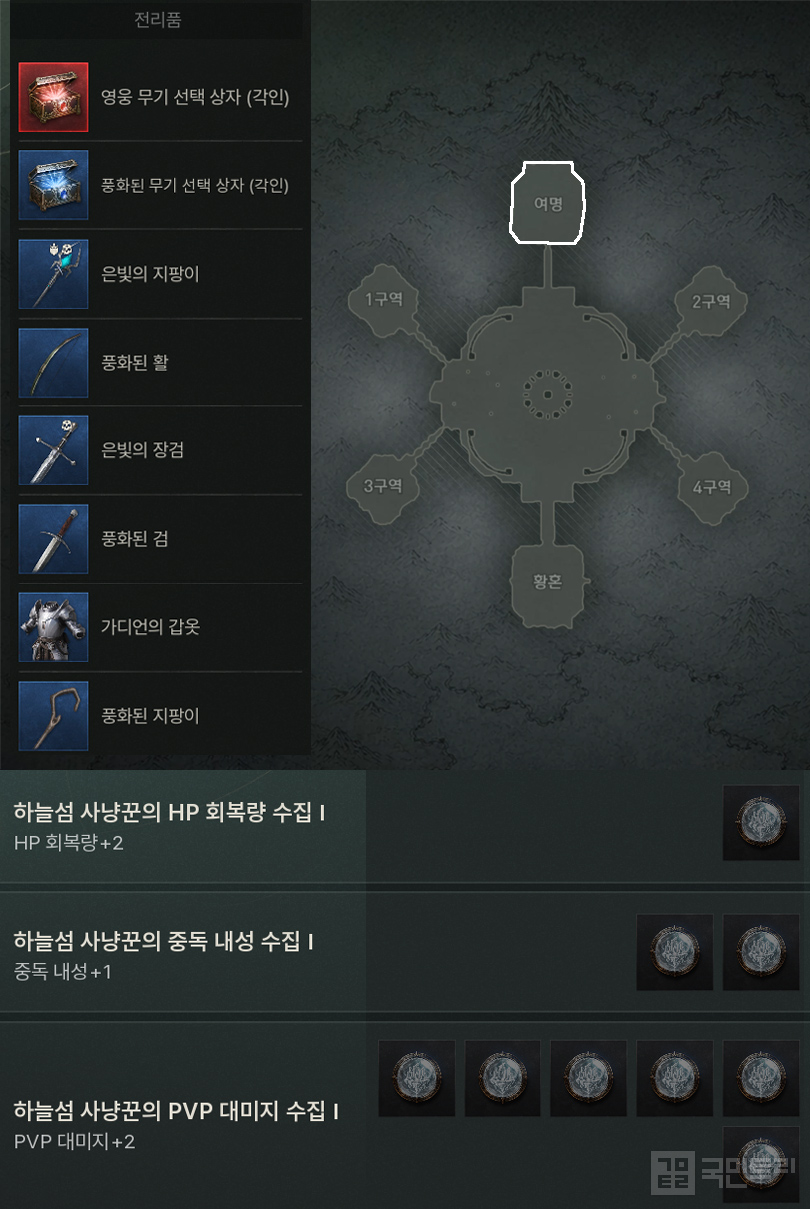
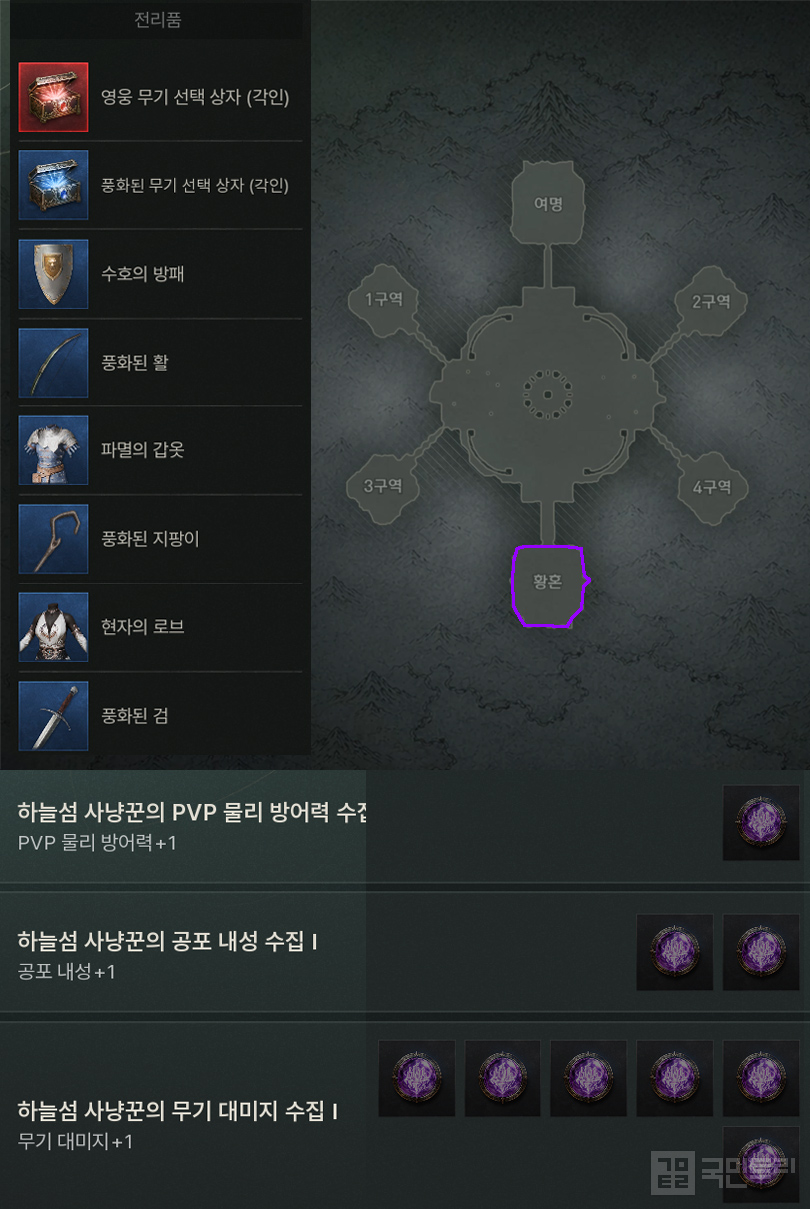
'솔: 인챈트' 하늘섬은 같은 월드의 1~5서버 유저들이 한곳에 모여 협력하고 경쟁하는 월드 전장 던전 콘텐츠다. 총 6구역으로 나뉘며, 구역별 몬스터 종류와 획득 아이템이 다르다. 그러면 구역마다 획득하는 주요 아이템은 무엇이고, 관련 팁은 무엇이 있을까? 국민트리에서 정보를 조사했다.
Q. 하늘섬은 어떤 구조로 이뤄져 있나요?
A. 총 6개의 구역으로 나뉩니다.
하늘섬은 1~4구역, 여명, 황혼으로 총 6구역으로 나뉜다. 낮은 숫자의 구역일수록 몬스터가 더 약하고, 여명과 황혼이 가장 강력한 몬스터가 분포해 있다. 난도가 다르기에 획득하는 경험치와 나인, 그리고 아이템이 다르다. 예시를 들자면, 가장 쉬운 1구역 질풍보다 황혼 구역 암흑 몬스터가 경험치를 약 30% 더 준다. 물론, 그만큼 원활한 사냥을 위해 더 높은 능력치와 명중 수치를 요구한다.
특히, 모든 구역 가운데 여명과 황혼이 가장 몬스터 난도가 높다. 각 구역에 선공형과 원거리 몬스터가 다수 분포해 있다. 게다가 황혼 구역 암흑 서큐버스는 캐릭터에게 일정 시간 공포까지 걸어 높은 능력치를 보유한 유저가 아니라면 생존이 힘들다. 그러니 본인 스펙에 맞는 구역을 찾아 사냥하자. 보통 하이드 늪지, 그림자 제단에서 사냥하는 유저 기준에서 1~2구역, 야수 고개, 나인 광산을 사냥하는 유저 기준에서 3~4구역, 그리고 상위 유저 기준에서 여명과 황혼을 추천한다.
아울러 구역별로 획득할 수 있는 몬스터 처치 업적 수집품이 다르다. 그러니 필요한 수집 능력치를 채우기 위해 각 구역을 사냥할 필요가 있다. 보통 능력치가 높은 유저는 스쿼드 캐릭터와 함께 사냥하거나 혹은 길드원과 파티 사냥하는 걸 권한다. 아래는 구역별 주요 획득 아이템과 수집 능력치 목록이다.

-
 [Arthdal Chronicles: Three Factions Season 1 Magnifying Glass] Rankers who changed to Assassins and Holy Knights
-
 Raven 2 balancing Warlord along with Halloween event
-
 Seal M2 Launch D-1: Highlighting Quirky Sensibility and Combat Fun
-
 Vampir Distributes 4 Types of Recovery Tickets and Introduces Halloween Event Dungeon!

- SOOP Opens Event Page for 2026 League of Legends World Championship
- [Today's steam] Fool the AI, Co-op New Title 'Scam With Your Friends'
- New First-Person Soulslike Title 'Valor Mortis' Receives 'Mostly Positive' Reviews
- New Modes, Maps, and Modern Warfare 4 Season 1 Roadmap Revealed
- K/DA Returns After 6 Years, League of Legends Releases 'Firestarter' Music Video
- PUBG Mobile PMPS 2026 Season 2 Finals Announced
- [Today's steam] Seriously why? 'Planet Zoo 2' rejecting RTX 5070
- Cyberpunk: Edgerunners 2, not a cinematic medium, but I will give it 110 points
- Running AI Agents Locally: NVIDIA RTX Spark Laptop Released
- 100-Player Tactical FPS Wardogs Deploys First Major Update 'Season 2'





 GAMEMECA GLOBAL SITE