

[Nikke Tips] Analysis of the new water-type totem 'Summer Elegg: Boom & Shock'
[승리의 여신: 니케 꿀팁] NEW 수냉 토템 '일레그: 붐 앤 쇼크' 분석

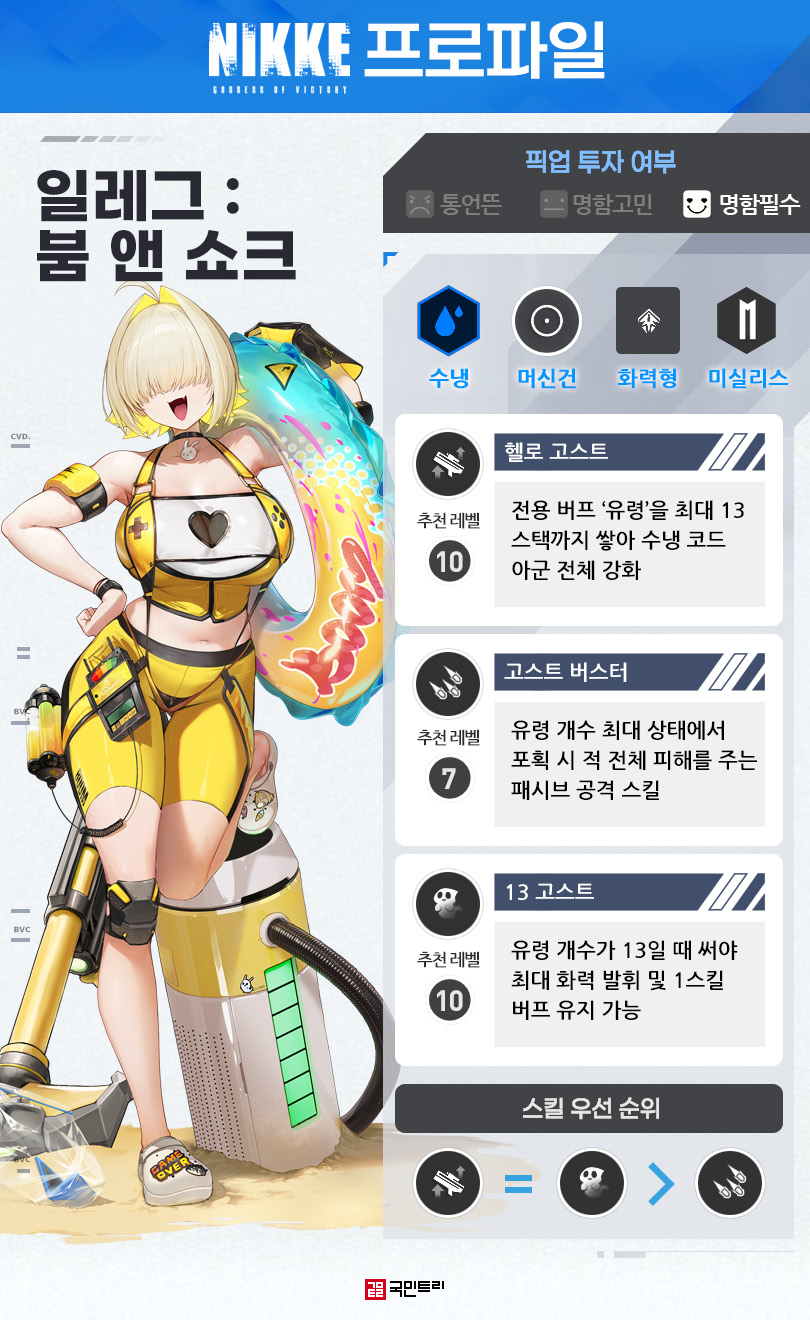
On July 24th, Goddess of Victory: NIKKE kicked off the recruitment for its second summer unit: Summer Elegg: Boom & Shock (hereinafter Summer Elegg). Joining Summer Dorothy as a headliner for the summer event, this character serves as a buffer for all Water Code allies. Beyond the rather striking swimsuit design, the limited-time support effects have become the talk of the town. To borrow a phrase from the character, it’s fair to say the situation is quite 'BOOM'. Here, KookminTree breaks down the skills and recommended team compositions currently making waves among players.
A Totem Supporter for Water Code
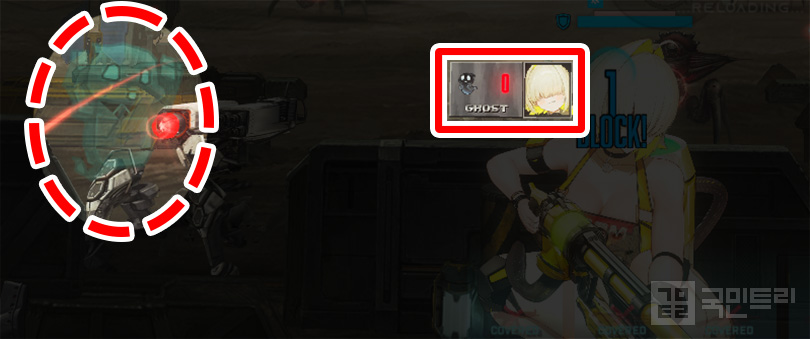
Let’s dive into the skills. Skill 1, 'Hello Ghost', is the cornerstone of Summer Elegg. At the start of battle, it assigns a 'possession' status to a random enemy and begins trapping ghosts. You can spot the possessed enemy by the little ghosts circling them. These ghosts stack up to 13 times, with each stack requiring 100 hits from the entire team. Since the hit count is cumulative across all allies, squads packed with high-capacity machine gun users will find it much easier to ramp up these stacks quickly.
The number of gathered ghosts dictates the buffs provided to all Water Code allies. With at least one ghost, the caster increases the team's attack power; at four or more, it adds a boost to elemental code damage. At level 10, these bonuses sit at 16.2% for attack and 35% for elemental damage. This is a core skill, so make sure to push it to level 10.
Skill 2, 'Ghost Buster', splits its utility between Burst usage and the current Ghost stack count. When using the Burst skill, it grants a 10-second attack buff. If the ghost count is at its maximum, it deals additional damage to all enemies. The coefficients are quite solid, reaching 40% of max attack and 1,100% of final attack at level 10. However, compared to the primary skill and the Burst, this takes a lower priority; level 7 should suffice.
The Burst skill, '13 Ghosts', changes the number of sequential attacks based on whether you have reached 13 stacks. If you are under 13, it performs 6 sequential attacks and consumes 6 ghosts. At 13 stacks, it ramps up to 13 sequential attacks and consumes 9, ensuring at least one ghost remains. Aim for level 10 to maximize the Burst coefficients, just as with Skill 1.
Summer Elegg is essentially a Water Code-locked specialist. Since the buffs apply exclusively to Water Code allies, using the character in other parties leads to a significant loss in efficiency. However, within a proper Water Code setup, the performance is flawless. Furthermore, the character functions as a 'totem' NIKKE, meaning you don't even strictly need to trigger the Burst; the Skill 1 effect remains active regardless, making the character a viable sub-DPS for basic attacks.
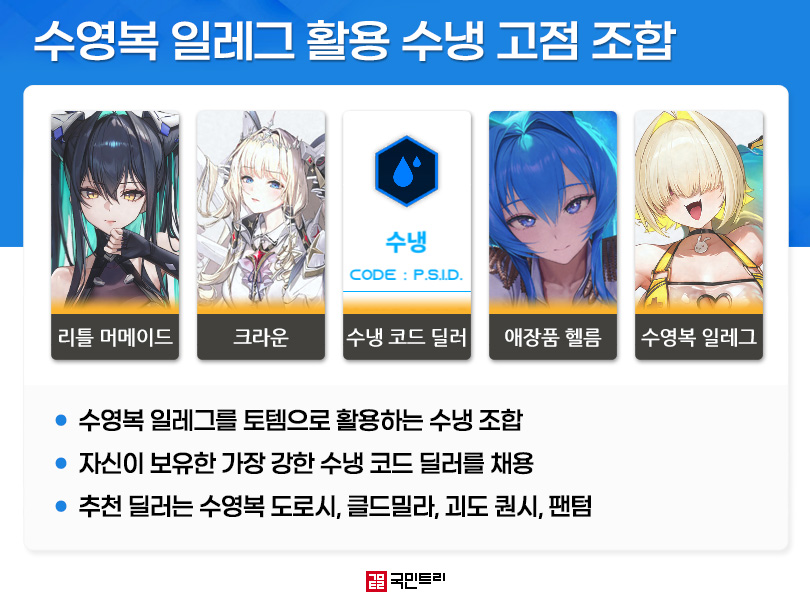
The recommended setup is, naturally, a Water Code party. Core members like Little Mermaid, Crown, and the Keepsake Helm are staples, with the final slot reserved for a Water Code DPS. Top picks include Dorothy: Serendipity (Summer Dorothy), Quincy: Escape Queen (Phantom Thief Quincy), Ludmilla: Winter Owner (Winter Ludmilla), and Phantom.
A Key Component for Water Code Raids & Harvester
Let's look at the field test results. The testing grounds were the Union Shooting Range (3-minute boss battle, Water weakness) and the Harvester from the Interception (Special Individual). Summer Elegg was tested at base level with an R-grade level 1 collection item and 7/7/7 skill levels. For the Shooting Range, Summer Dorothy was the benchmark, featuring 1-star ascension, Overload options (69.27% elemental damage, 27.68% attack), R-grade level 10 collection item, and 8/8/9 skill levels.
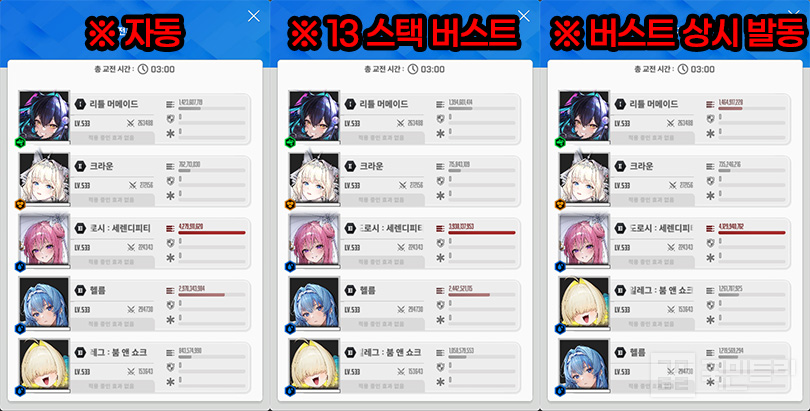
To test the skill effectiveness, we ran three scenarios: Auto, 13-stack Burst only, and constant Burst activation. Total damage output ranked as follows: 13-stack Burst (10.2 billion) > Auto (9.5 billion) > Constant Burst (8.8 billion).
However, if you look at Summer Elegg’s individual damage, the order shifts: Constant Burst (1.2 billion) > 13-stack Burst (1 billion) > Auto (0.8 billion). For Solo Raid content where total squad damage is king, sticking to either Auto or the 13-stack Burst strategy is the way to go.
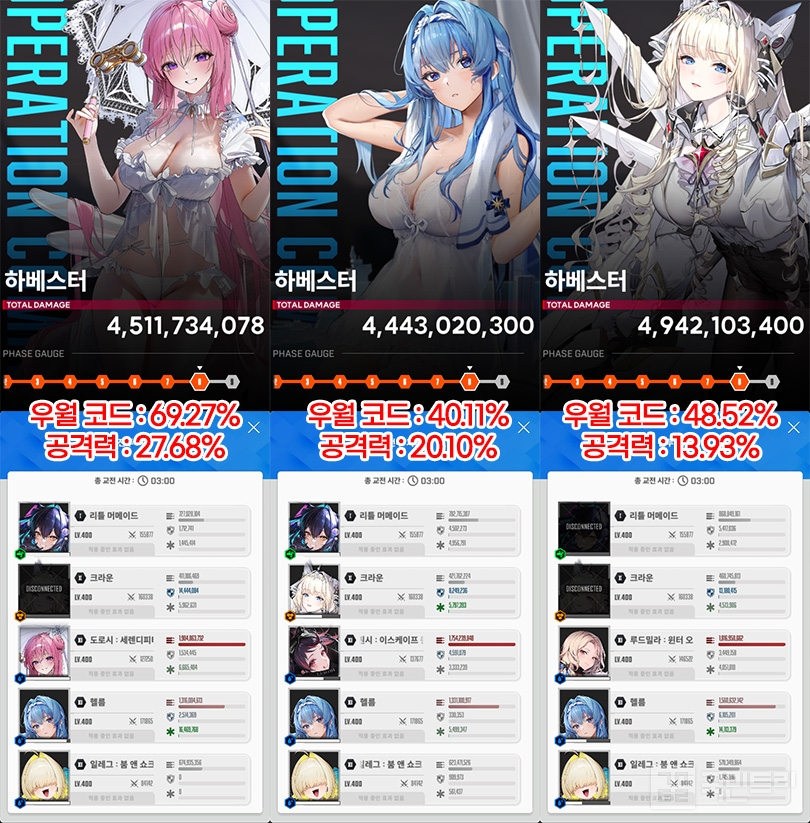
For the Harvester test, all actions were set to Auto, excluding Summer Elegg’s Burst activation and cancel patterns. Summer Elegg’s Burst was exclusively used at 13 stacks. The squad stats: Phantom Thief Quincy (1-core, 40.11% elemental damage, 20.1% attack, SR level 5 collection, 7/7/10 skills), Winter Ludmilla (3-star, 48.52% elemental damage, 13.93% attack, SR level 5 collection, 10/10/10 skills), and the previously mentioned Summer Dorothy.
Total damage peaked when using Winter Ludmilla, likely due to the high base stats of the machine gun unit. Summer Dorothy and Phantom Thief Quincy followed closely. Keep these results in mind if you're planning to tackle the Harvester in the Interception.
Summer Dorothy vs. Summer Elegg: What's the priority?
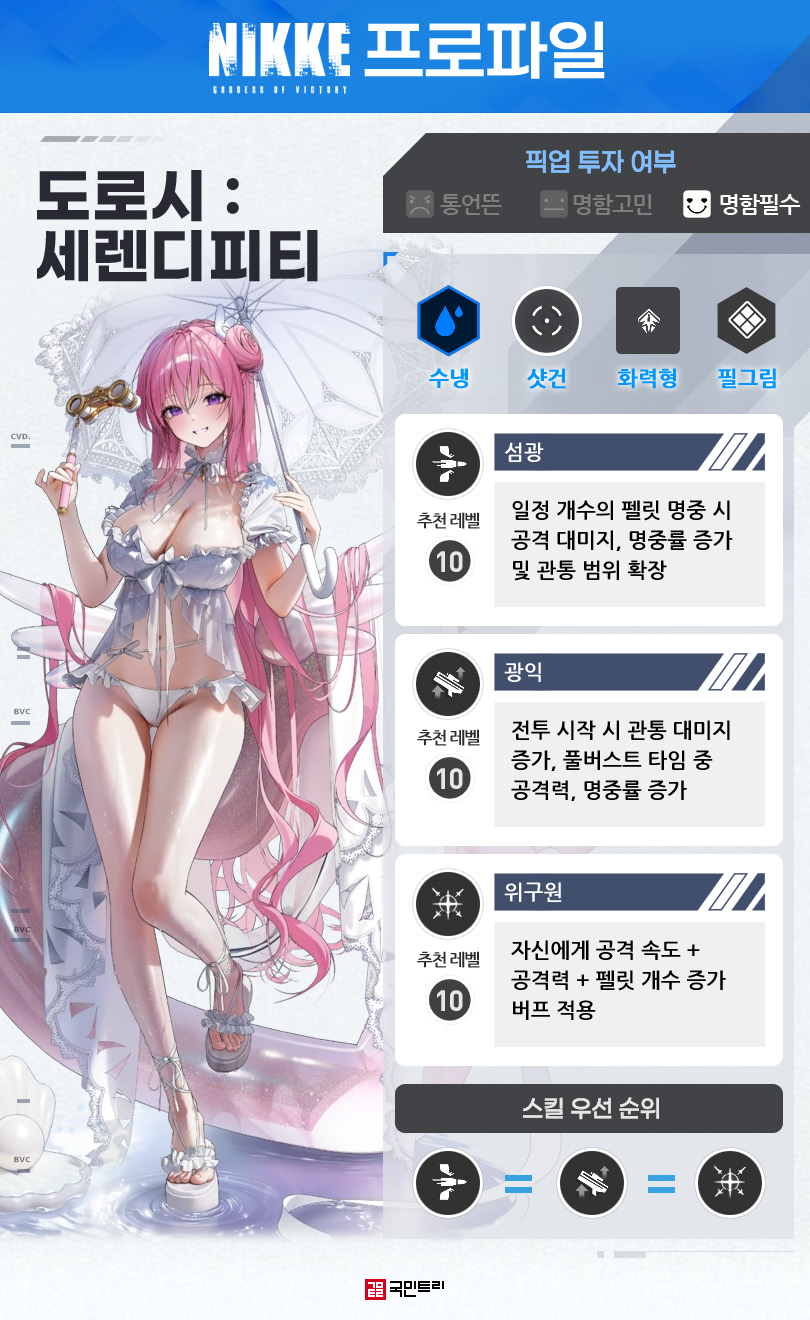
Just like Summer Dorothy, you should at least aim to secure a base copy of Summer Elegg. Beyond the limited-time availability, the character is essential for the current 'Welcome to Kraken' Solo Raid and shows great promise for future Water-weakness raids. Definitely invest in the recruitment.
If you are asking, 'Should I pull for Summer Dorothy or Summer Elegg first?' the answer is Summer Dorothy. As the first limited-time Pilgrim, the character offers more versatility, including utility in Shotgun decks, whereas Summer Elegg is strictly tied to Water Code squads. Once you've secured Summer Dorothy, feel free to spend your remaining resources on Summer Elegg. Best of luck!
7월 24일, '승리의 여신: 니케' 두 번째 수영복 니케 일레그: 붐 앤 쇼크(이하 수영복 일레그) 픽업을 시작했다. 수영복 도로시와 함께 이번 여름 이벤트 주역인 니케로, 수냉 코드 아군 전체를 강화한다. 파격적인 수영복 디자인 외에도 기간 한정에 어울리는 서포트 효과가 화제다. 일레그의 말버릇을 빌리자면, 심히 'BOOM'하다고 할 수 있다. 유저 사이에서 화제인 일레그의 스킬 및 추천 조합을 국민트리가 분석했다.
수냉 코드 토템 서포터
먼저 수영복 일레그의 스킬을 알아보자. 1스킬 '헬로 고스트'는 수영복 일레그의 핵심이다. 전투 시작 시 무작위 적 1기에게 '빙의' 상태를 부여한 후 유령을 포획하는 구조다. 빙의된 적은 몸 주위에 조그만 유령이 붙어 여부를 파악할 수 있다. 유령은 최대 13스택까지 쌓이며, 1스택 당 아군 전체 공격 기준 100회 명중을 요구한다. 모든 아군의 공격 명중 수를 합쳐 100회에 도달하면 된다. 따라서 머신건처럼 최대 장탄이 많은 니케가 스쿼드에 많을수록 스택을 더 빨리, 쉽게 쌓을 수 있다.
이렇게 쌓인 유령 숫자에 따라 '수냉 코드' 아군 전체에게 버프를 제공한다. 1개 이상일 때 시전자 기준 공격력 증가, 4개 이상이면 우월 코드 공격 대미지 증가가 적용된다. 수치는 10레벨 기준 공격력 16.2%, 우월 코드 공격 대미지는 35%다. 핵심 스킬이니 꼭 10레벨까지 올리자.
2스킬 '고스트 버스터'는 버스트 스킬 사용 시와 1스킬의 유령 스택에 따라 발동되는 효과로 나뉜다. 먼저 버스트 스킬 사용 시 10초간 공격력 증가, 유령 개수가 최대 상태에서 포획 시 적 전체에게 피해를 준다. 계수는 10레벨 기준 최대 공격력 40%, 최종 공격력 비례 1,100%로 꽤 높다. 다만, 1스킬과 후술할 버스트에 비해 스킬 레벨업 우선순위는 낮아 7레벨까지만 올려도 충분하다.
버스트 '13 고스트'는 유령 스택이 13이냐 아니냐로 순차 공격 횟수가 변경되는 스킬이다. 우선 13이 아닐 땐 6회 순차 공격을 가한 뒤 유령이 6개 감소한다. 13일 경우 순차 공격이 13회로 늘어나며, 9개가 줄어든다. 이때 유령 개수는 최소 1개가 유지된다. 버스트 계수 증가를 위해 1스킬과 마찬가지로 10레벨을 목표로 육성하자.
수영복 일레그는 수냉 코드 한정 조합에서 사용할 수 있다. 관련 효과가 수냉 코드 아군에게만 적용되기 때문이다. 다른 파티에 사용하면 스킬 효과를 제대로 발휘할 수 없어 범용성이 떨어진다. 물론, 수냉 코드 조합에서 쓰면 전혀 문제없다. 또한, 버스트를 쓰지 않아도 되는 '토템' 니케다. 핵심인 1스킬 효과가 버스트 유무에 상관없는 조건이라 평타 서브 딜러로 세워도 1인분은 하는 셈이다.
수영복 일레그의 추천 조합은 수냉 코드 파티다. 리틀 머메이드, 크라운, 애장품 헬름은 고정이며, 이 외 한자리를 수냉 코드 딜러를 쓰면 된다. 추천 딜러는 도로시: 세렌디피티(이하 수영복 도로시), 퀀시: 이스케이프 퀸(이하 괴도 퀀시), 루드밀라: 윈터 오너(이하 클드밀라), 팬텀이다.
수냉 코드 레이드&하베스터 고점 도달을 위한 파츠
이제 실전 실험 결과를 확인해 보자. 실험장은 유니온 사격장 3분 보스전 수냉 약점과 이상 개체 요격전 하베스터로 정했다. 수영복 일레그 스펙은 명함, R등급 1단계 소장품, 스킬 레벨은 7/7/7이다. 유니온 사격장에서의 비교 대상은 수영복 도로시다. 수영복 도로시의 스펙은 1돌파, 오버로드 옵션 우월 코드 69.27%, 공격력 27.68%, R등급 10단계 소장품, 스킬 레벨 8/8/9다.
수영복 일레그의 스킬 효과 적용을 위해 자동, 13스택 버스트만 발동, 버스트 상시 발동 3가지 방법으로 실험을 진행했다. 실험 결과 총피해량 기준 '13스택 버스트 > 자동 > 버스트 상시 발동' 순서로 피해량이 높았다. 피해량은 각 102억, 95억, 88억이다.
수영복 일레그 단독 피해량이 가장 높았던 실험군은 '버스트 상시 발동> 13스택 버스트 > 자동' 순이다. 12억, 10억, 8억의 피해량을 달성했다. 총 피해량이 중요한 솔로 레이드 콘텐츠에선 버스트를 쓰지 않는 자동 혹은 13스택 버스트만 사용하는 게 좋을 듯싶다.
하베스터에서의 실험은 수영복 일레그 버스트 발동과 캔슬링 패턴을 제외하곤 모두 자동 전투로 진행했다. 수영복 일레그의 버스트는 13스택으로만 사용했다. 실험에 사용한 니케 스펙은 다음과 같다. 괴도 퀀시 1코어 강화, 오버로드 옵션 우월 코드 40.11%, 공격력 20.1%, SR 5단계 소장품, 스킬 7/7/10, 클드밀라 3돌파, 오버로드 옵션 우월 코드 48.52%, 공격력 13.93%, SR 5단계 소장품, 스킬 10/10/10, 수영복 도로시는 앞서 소개한 스펙이다.
총 피해량이 가장 높았던 건 클드밀라를 사용했을 때다. 클드밀라가 기본 체급이 높은 머신건 니케라 그런지 가장 높은 피해량을 달성했다. 다음으로 높았던 건 수영복 도로시, 괴도 퀀시다. 이상 개체 요격전 하베스트에 도전하고자 하는 유저는 참고하자.
수영복 도로시 vs 수영복 일레그 우선순위는?
수영복 일레그는 먼저 모집을 연 수영복 도로시와 마찬가지로 최소 명함은 챙겨야 한다. 기간 한정인 것도 있지만, 현재 열린 '환영 크라켄' 솔로 레이드의 필수 요원이다. 이후 열릴 수냉 코드 약점 솔로 레이드에서 활약할 여지가 많으니 꼭 픽업에 투자하자.
혹 이렇게 물어볼 유저가 있을 수 있다. '수영복 도로시랑 수영복 일레그 중 누굴 먼저 데려가야 하나?'다. 우선순위를 정하자면, 수영복 도로시를 먼저 뽑는 걸 추천한다. 첫 기간 한정 필그림이고, 샷건 덱에서도 사용할 수 있다. 수냉 코드에서만 활약 가능한 수영복 일레그보다 범용성이 조금 더 높다. 그러니 수영복 도로시 획득에 성공했다면, 남은 재화로 수영복 일레그에 도전하는 걸 추천한다.


- [Today's steam] Animorphs officially released, recording 100,000 Concurrent Players
- An Ensemble Drama with Four Heroes, Fire Emblem Mazachanhong
- What is the recently popular indie game genre 'DB Thriller'?
- [TGS 26] A world breathing with the Nexon Games style, Pareidolia
- [Photo] How does Riftbound captured in cards look?
- [TGS 26] Hyung-tae Kim "AI video was an experiment, I apologize"
- [TGS 26] Tokyo Game Show decided to close one day early due to typhoon
- Duolingo's 'Duo' Appears as a Boss in Brawl Stars
- [TGS 26] Leaping into a global event, Tokyo Game Show 2026 opens
- Shape of Dreams Console Launch Alongside 1st Anniversary





 GAMEMECA GLOBAL SITE