

[Nikke Tips] Priority Guide for Crafting 13 Types of Treasures
[니케 꿀팁] 애장품 13종 제작 우선 순위 정리

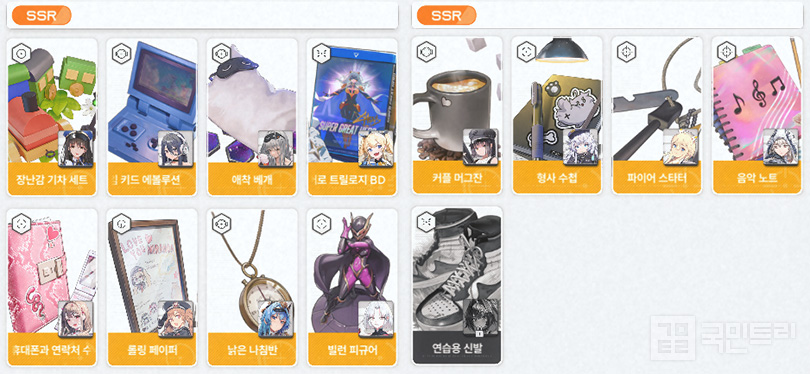
Goddess of Victory: NIKKE features 'Treasures,' a high-end exclusive equipment tier that can be upgraded via the Collection system. These items grant additional skill effects or significantly boost scaling for the equipped Nikke. While we have seen 13 Nikkes receive these upgrades, effectively turning 'rags into riches' for some, the sheer volume of choices can be overwhelming for new or returning players who joined during the summer events. To clear the air, KookminTree has ranked these Treasure production priorities as of Season 4.
Helm, Drake, and Tove - The essential treasures for a smoother ride
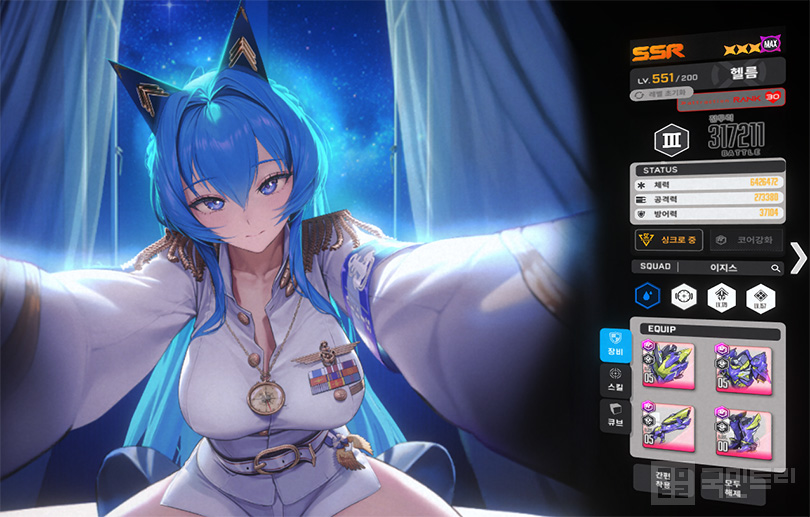
If you are looking for the absolute top-tier priorities in Goddess of Victory: NIKKE, look no further than Helm, Drake, and Tove—in that exact order. The difference these items make is staggering; they are often the deciding factor in clearing end-game content like Solo Raid.
Helm, for one, vaulted into S-tier status solely because of this item. Before the treasure, Helm was a bit of a 'jack of all trades, master of none.' Post-upgrade, however, Helm has cemented a spot as a staple in both PvE and PvP. The biggest shift is the addition of an all-ally heal and instant burst gauge charge to the 'Commanding Presence' Skill 1. The former helps meet the passive activation criteria for the top-tier Nikke Crown, while the latter smooths out the Full Burst cycle. It’s no surprise that every ranker is running this setup in Solo Raid and the Arena.
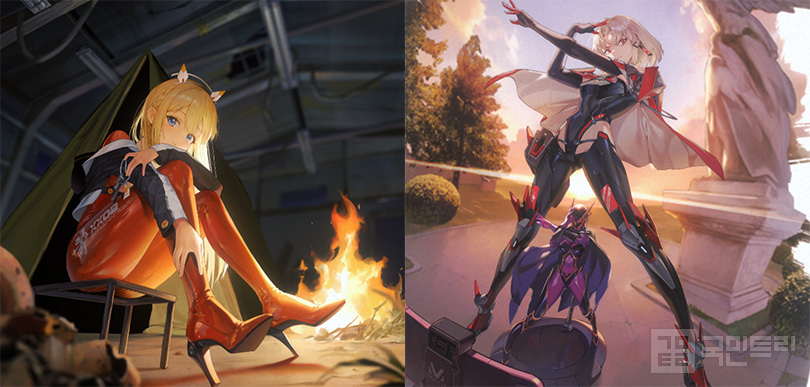
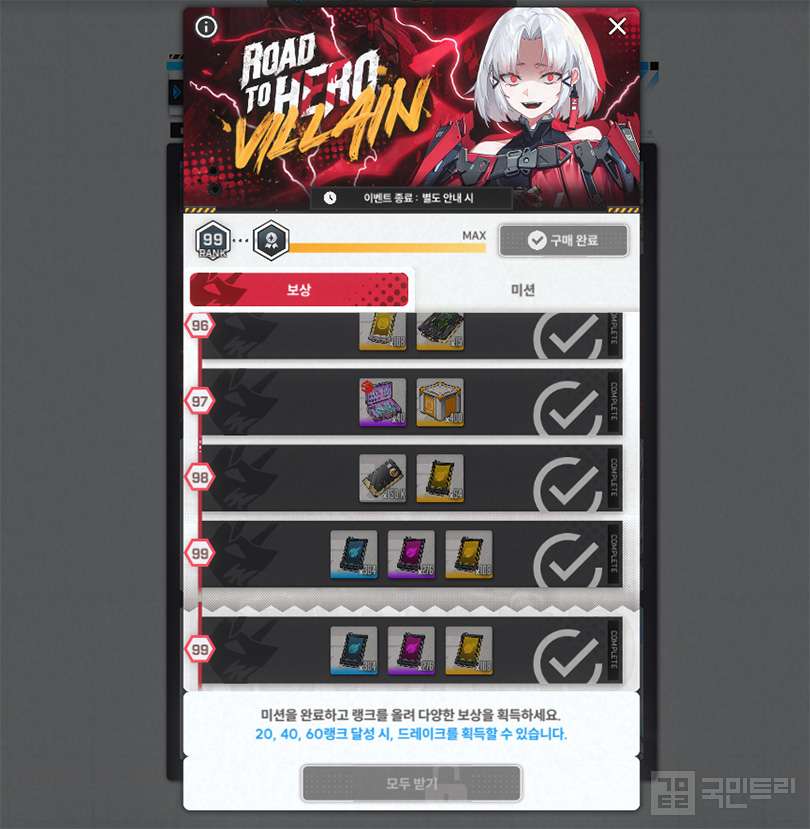
Drake and Tove are the backbone of the current shotgun meta. Drake serves as a hybrid buffer and primary dealer, while Tove acts as the main support. Thanks to the 'ROAD TO VILLAIN' event, Drake is arguably the easiest to deck out right now. Through ongoing daily, weekly, and achievement missions, you can snag enough materials to max out the treasure. Reaching rank 60 out of 99 provides Drake with two limit breaks and all the necessary materials for a level 3 treasure.
Drake buffs fellow shotgun Nikkes and deals additional damage based on the number of attacks. This allows Drake to function as a 'totem' buffer without even needing to trigger a burst. Since shotgun decks are currently mandatory for pushing high scores in Solo Raid, if you are chasing the leaderboard, this is non-negotiable.
Tove, also receiving a Treasure in Season 4, follows a similar path. While Tove has always been a dedicated shotgun buffer, the notoriously low activation rate for buffs previously made Tove a bit of a liability. The new Treasure changes the trigger condition from a random chance to 'after 10 normal attacks.' That major headache is finally gone. Just remember, since Tove lacks a burst cooldown reduction, you will need to pair Tove with another Nikke who handles that duty.
Furthermore, you really only need to push Tove to level 2. The core skill enhancement concludes there. At level 3, the Skill 2 'Modification Success' increases crit rate from 3.32% to 10.08% at level 10—a 10% buff isn't exactly game-changing. For the sake of your resources, stop at level 2 and save the materials for someone else.
Laplace, Miranda, and Viper - A choice based on your roster and main squad
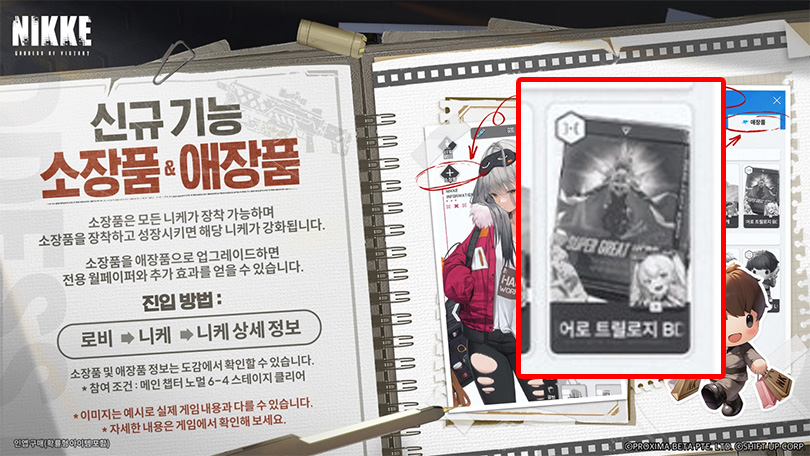
Next, let's look at situational picks based on your main squad. If you have already finished the aforementioned treasures, turn your attention to Laplace, Miranda, and Viper. Laplace, an early-game veteran, suffers from a clunky buff trigger condition—requiring the 'last bullet' to hit—and a mismatch between burst duration and the Skill 1 'Hero Vision' uptime.
The Treasure fixes this entirely. Once equipped, the condition changes to hitting with a full-charge attack. The Skill 1 duration extends from 5 to 15 seconds, and the burst duration from 5 to 10 seconds. It makes Laplace a dominant force in the Missilis Tower. For those lacking Red Hood or Rapunzel: Red Hood, Laplace can serve as a substitute in the Ultra Special Interception, though keep in mind, it is still a substitution.
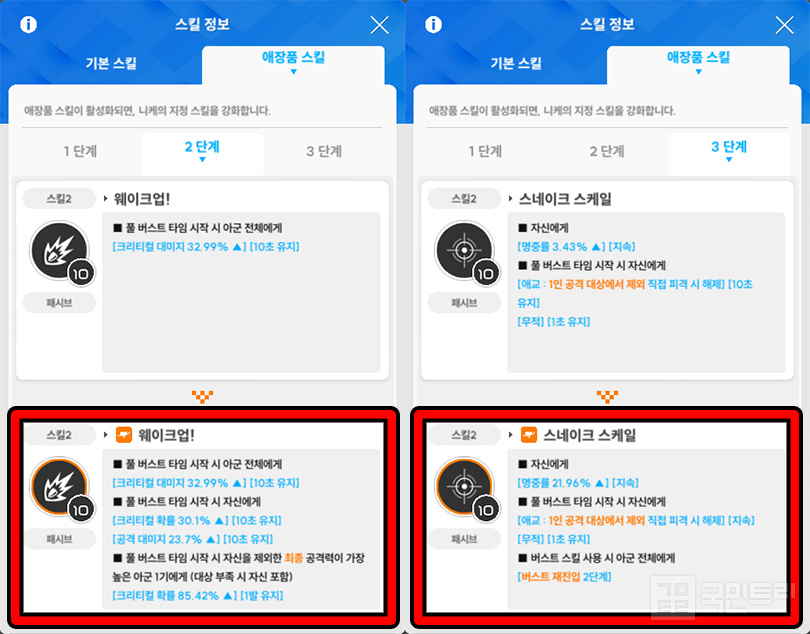
Miranda becomes significantly stronger as a dedicated buffer for Snow White. To put it bluntly, this is only useful for players who have heavily invested in Snow White. Miranda’s buff significantly boosts crit rate for only 'one hit' on the Nikke with the highest attack power. Snow White and Maxwell are the primary candidates here. Snow White, in particular, is a hallmark of veteran players who have pushed the unit to its absolute limit.
The situation shifted slightly with the arrival of Mihara: Bonding Chain. Since the crit buff only applies to a single hit and does not apply to damage-over-time effects, players discovered that Mihara: Bonding Chain could be optimized to ensure that all DoT ticks crit after receiving the buff.
As a result, Miranda now supports Mihara: Bonding Chain in addition to Snow White. However, because the buff targets the character with the highest attack, you need both to be heavily invested. If you lack these two or haven't built them, there is no need to rush for Miranda's treasure.
Viper serves as a sub-dealer. The Treasure grants a '2-burst re-entry,' making Viper useful in water-code weak shotgun decks or niche teams. Keep this one on the back burner until you have finished the priority list.
Bay and Poli - So you want to be an Arena master!
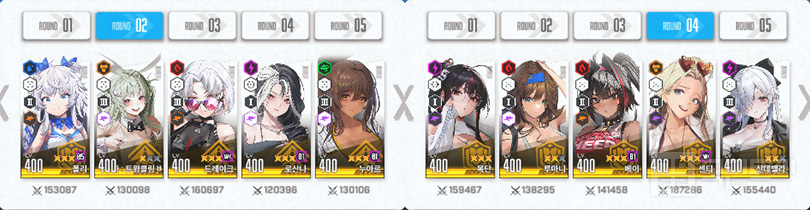
Next are the Arena-only specialists. Since the core of the game is PvE, these have the lowest priority. Bay and Poli are frequently seen in the Champion Arena, though the meta is still evolving. Among top rankers, Bay sees the most use. The treasure adds an all-ally heal and a cover revival effect, which can be a game-changer in an environment where the first Full Burst cycle decides the outcome.
Poli is seen less frequently than Bay. While the treasure adds an 'Indomitable' effect and a shared shield, it has yet to make a significant dent in the established meta. This may change as the game evolves.
Julia - A high-investment project
Finally, we have Julia. As a Season 4 recipient and a Burst 3 Iron-code dealer, Julia has recently gained renewed attention. There are 11 Burst 3 Iron-code dealers currently, including collaborations. Excluding limited characters like Eve and Raven, we are down to six. Julia is among them.
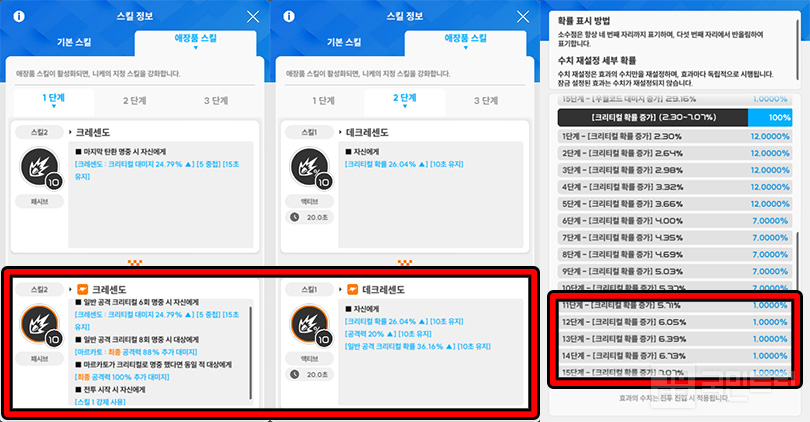
However, obtaining the Treasure is just the beginning. Julia requires heavy investment to perform effectively. Much like Eve, Julia is heavily dependent on crit rate and damage stats. Every Nikke starts with a base 15% crit rate. With the Treasure at level 10, Julia gains 26.04% crit rate and 36.16% normal attack crit rate, bringing the total for normal attacks to 77.2%.
The remaining 22.8% must come from Overload gear options. Since each crit rate option ranges from 2.3% to 7.07%, you need to roll high on at least four slots to hit 100%. Factor in the need for elemental damage, attack, and max ammo capacity, and the difficulty spikes sharply. Naturally, this will drain your supply of Custom Modules.
The good news is that no Iron-code weak Solo Raid has been announced yet. While investing in the future is fine, over-investing can be a trap. Don't neglect your other units. Build your top-priority treasures first, and only consider Julia once you have the spare resources and the performance has been fully validated.
'승리의 여신: 니케'엔 추가 장비 '애장품'이 있다. 소장품에서 강화하는 엔드급 전용 장비다. 착용 니케 스킬에 추가 효과가 붙거나, 계수가 크게 증가한다. 지금까지 총 13명의 니케가 애장품을 받았고, '개천에서 용난다'라는 속담처럼 평가가 반전된 바 있다. 다만, 선택지가 많아 여름 이벤트를 기점으로 시작한 신규·복귀 유저는 어떤 애장품이 좋은지 고민이 될 수밖에 없다. 이에 국민트리가 애장품 시즌 4 기준 애장품 제작 순위를 정리했다.
헬름·드레이크·토브 - 원활한 플레이를 위한 필수 애장품
승리의 여신: 니케에서 반드시 애장품을 만들어야 하는 0순위 니케는 헬름, 드레이크, 토브다. 이 가운데 제작 순서를 굳이 나눈다면, '헬름 - 드레이크 - 토브'로 정리할 수 있다. 이들은 애장품 유무에 따른 차이가 극명하게 갈린다. 엔드 콘텐츠 솔로 레이드에서 성적이 좌우될 정도다.
먼저 헬름은 애장품 하나로 단숨에 0티어로 뛰어오른 니케다. 애장품을 받기 전에는 이도 저도 아닌 성능을 지녔었다. 그러나 받은 후에는 PvE, PvP 양쪽에서 사랑받는 니케로 자리를 잡았다. 1스킬 '진두지휘'에 아군 전체 회복과 버스트 게이지 즉시 충전이 붙은 게 가장 크다. 전자는 0티어 니케 크라운의 패시브 발동 조건을 충족한다. 후자는 빠른 풀 버스트 사이클을 돕는다. 덕분에 솔로 레이드와 아레나 양쪽에서 모든 랭커가 쓰고 있다.
드레이크와 토브는 샷건 덱의 메인 파츠다. 드레이크는 버퍼 겸 메인 딜러, 토브는 메인 서포터다. 드레이크는 이벤트 'ROAD TO VILLAIN' 덕분에 현시점 가장 애장품을 만들기 쉬운 니케다. 상시 진행 중인 미션으로, 일일과 주간, 업적을 달성해 드레이크와 애장품 재료를 모두 얻을 수 있다. 전체 99랭크 가운데 60랭크 도달 시 드레이크 2돌파, 애장품 3단계 재료를 모두 제공한다.
드레이크는 아군 샷건 니케를 강화하고, 공격 횟수에 따라 추가 대미지를 준다. 덕분에 굳이 버스트를 사용하지 않아도 되는 토템 버퍼로도 활약한다. 샷건 덱은 현재 솔로 레이드에서 반드시 사용되는 조합이다. 따라서 솔로 레이드 고점을 노리는 유저라면, 꼭 애장품을 만들어 줘야 한다.
이번 시즌 4로 애장품을 받은 토브도 마찬가지다. 샷건 전용 버퍼로 등장해 줄곧 사용됐지만, 버프 발동 확률이 굉장히 낮아 계륵이란 평가를 받았다. 그러나 이번 애장품으로 버프 발동 조건이 확률에서 '일반 공격 10회 시'로 바뀌었다. 가장 큰 단점이 사라진 셈이다. 물론, 버스트 쿨타임 감소 효과가 없기에 관련 스킬을 지닌 니케를 함께 편성해야 한다.
아울러 토브는 애장품 2단계까지만 강화해도 상관없다. 핵심 스킬 강화가 2단계에서 끝나기 때문이다. 3단계 시 2스킬 '개조 성공'이 10레벨 기준 크리티컬 확률 증가 3.32%에서 10.08%로 증가한다. 크리티컬 확률 증가 효과는 10% 정도론 전투에 큰 영향을 주지 않는다. 가성비를 생각한다면 2단계에서 멈추고, 다른 니케의 애장품 재료를 수급하는 게 좋다.
라플라스·미란다·바이퍼 - 니케 풀과 주력 스쿼드에 따른 선택
다음은 주력 스쿼드에 따른 추천 니케다. 앞서 소개한 니케의 애장품을 모두 제작했을 경우 라플라스와 미란다, 바이퍼로 시선을 돌리자. 라플라스는 초창기 니케 중 하나로 버프 발동 조건이 '마지막 탄환 명중 시'으로 까다롭다. 또한, 버스트 사용 시간과 1스킬 '히어로 비전'의 버프 유지 시간이 맞물리지 않는 것도 단점이다.
이는 애장품으로 완벽하게 해결 가능하다. 장비 시 마지막 탄환 조건이 풀 차지 공격 명중으로 바뀐다. 1스킬 유지 시간은 5초에서 15초, 버스트 유지 시간은 5초에서 10초로 증가한다. 덕분에 버프와 버스트 유지시간이 어우러졌고, 현재 미실리스 타워에서 메인 딜러로 활약 중이다. 레드 후드, 라피: 레드 후드가 없는 유저에겐 이상 개체 요격전 울트라의 대체 파츠로도 쓸 수 있다. 하지만, 어디까지나 대체 요원이라는 점은 감안하자.
미란다는 스노우 화이트 전용 버퍼에서 한층 더 강력해진다. 달리 말해 스노우 화이트를 극한으로 육성한 유저에게만 유용한 니케다. 이는 미란다의 버프가 가장 공격력이 높은 니케의 '1발'에 한해서만 크리티컬 확률을 대폭 증가시키기 때문이다. 니케 가운데 강력한 한 발을 발사하는 딜러는 스노우 화이트와 맥스웰이다. 특히, 스노우 화이트는 게임 초기부터 지금까지 올드 유저의 상징으로 여겨질 만큼 유명하다. 미란다의 버프를 받기 위해 극한까지 강화한 유저가 대부분이라는 게 이유다.
그러던 중 오버스펙 미하라: 본딩 체인의 등장으로 조금 상황이 달라졌다. 크리티컬 확률 증가 효과는 1발에 한해서만 유지된다. 이 버프는 공격 '1발'에 해당되고, 지속 피해엔 1발이 해당하지 않다는 사실이 발견됐다. 이를 이용해 미하라: 본딩 체인이 버프를 받은 후 지속 피해가 크리티컬로만 들어가는 환경을 만들었다.
덕분에 미란다는 스노우 화이트에 이어 미하라: 본딩 체인까지 보조하는 니케가 됐다. 다만, 버프 조건이 스쿼드에서 '가장 공격력이 높은 니케'라 스노우 화이트와 미하라: 본딩 체인의 고점 육성이 필요하다. 그러니 두 니케가 없거나 육성이 덜 된 유저는 무리해서 미란다 애장품을 당장 만들 필요는 없다.
바이퍼는 서브 딜러로 활약한다. 애장품을 받아 '2버스트 재진입'이 생겼는데, 이를 이용해 수냉 코드 약점 샷건 덱이나 짜투리 파티에 기용 중이다. 우선순위는 앞서 소개한 미란다 이후로 생각하는 게 좋다. 0순위 니케의 애장품을 모두 만들고 여유가 되는 유저라면, 바이퍼 애장품에 제작을 시작하자.
베이·폴리 - 아레나 고수가 될 거야!
다음은 아레나에서만 활약하는 니케다. 승리의 여신: 니케 환경의 주력 콘텐츠는 PvE라서 제작 우선순위는 가장 낮다. 해당하는 니케는 베이와 폴리다. 두 니케는 챔피언 아레나에서 자주 얼굴을 비추는 중인데, 아직 연구가 필요한 단계다. 현재 상위 랭커 가운데 가장 애장품 빈도가 높은 건 베이다. 애장품을 통해 아군 전체 회복과 엄폐물 부활 효과가 추가됐다. 첫 풀 버스트로 승패가 갈리는 아레나에서 변수를 주는 역할로 쓰인다.
폴리는 베이에 비해 애장품을 만든 수가 적다. 애장품을 통해 자신에게 불굴과 공용 보호막을 부여하는 효과가 추가됐지만, 현재 자리 잡은 아레나 조합에 큰 영향을 끼치지 못하는 추세다. 이는 시간과 메타 변화에 따라 갈릴 것으로 보인다.
율리아 - 고투자가 필요한 니케
마지막으로 소개할 니케는 율리아다. 시즌4 애장품 니케 가운데 한 명이며, 철갑 코드 버스트 3 딜러란 점에 최근 다시 주목을 받고 있다. 현재 컬래버레이션을 포함한 철갑 코드 버스트 3 딜러는 총 11명이다. 이 가운데 실제 사용 니케는 라플라스와 레드 후드, 스노우 화이트, 맥스웰, 소다: 트윙클링 바니, 슈가, 이브, 레이븐이다. 현재 얻을 수 없는 컬래버레이션 캐릭터 이브와 레이븐을 뺄 경우 단 6명이다.
다만, 율리아의 성장은 애장품 제작으로 끝나는 게 아니다. 제대로 된 성능 발휘를 위해 고투자가 필요하다. 이브와 마찬가지로 크리티컬 확률과 대미지 옵션에 영향을 많이 받아서다. 모든 니케의 크리티컬 확률은 15%다. 여기에 애장품 율리아는 10레벨 기준 크리티컬 확률 26.04%에 일반 공격 크리티컬 확률 36.16%가 오른다. 기본 수치까지 더할 시 일반 공격의 크리티컬 확률이 77.2%가 된다.
남은 22.8%는 오버로드 장비 옵션으로 충당해야 한다. 크리티컬 확률 옵션은 최소 2.3%~최대 7.07%로 결정된다. 네 부위에 최소 5.7% 이상을 붙여야 100%를 달성할 수 있다. 여기에 우월 코드 대미지 증가, 공격력 증가, 최대 장탄 수 증가까지 고려해야 하니 자연스럽게 난도가 급상승한다. 이를 위해 커스텀 모듈이 대량으로 들어가는 건 덤이다.
다행인 건 아직 철갑 코드 약점 솔로 레이드가 예고되지 않았다는 점이다. 미래에 투자하는 것이 좋긴 하나, 과투자는 오히려 독이 된다. 다른 니케의 강화에 투자할 수 없다는 걸 무시할 수 없다. 0순위 니케들의 애장품을 최우선으로 만들고, 여유와 성능 검증이 완전히 끝난 걸 확인한 이후 율리아 애장품에 도전하는 걸 추천한다.


- [Today's steam] Animorphs officially released, recording 100,000 Concurrent Players
- An Ensemble Drama with Four Heroes, Fire Emblem Mazachanhong
- [Today's steam] PC version of The War of Genesis Raising achieves 30,000 Concurrent Players
- What is the recently popular indie game genre 'DB Thriller'?
- [TGS 26] A world breathing with the Nexon Games style, Pareidolia
- [Photo] How does Riftbound captured in cards look?
- [TGS 26] Tokyo Game Show decided to close one day early due to typhoon
- Duolingo's 'Duo' Appears as a Boss in Brawl Stars
- [TGS 26] Hyung-tae Kim "AI video was an experiment, I apologize"
- [TGS 26] Leaping into a global event, Tokyo Game Show 2026 opens





 GAMEMECA GLOBAL SITE