

[Weekly Forum Highlight] How should I use Orly and Daisy in Seven Knights Re:BIRTH?
[공커 위클리] 세나 리버스 '오를리·데이지' 어떻게 써야 할까요?

Welcome back to another Weekly Forum Highlight for Seven Knights Re:BIRTH. Following Taka, the second Night Crow hero, Orly, has finally arrived. She is accompanied by the new legendary hero Daisy, with pick-up summons for both currently live. Naturally, the official lounge is in a frenzy over these two additions, and everyone is debating how to best utilise them. Let’s dive into the week's community chatter and see what the buzz is about.

Orly and Daisy Simultaneous Pick-up Summon Launched
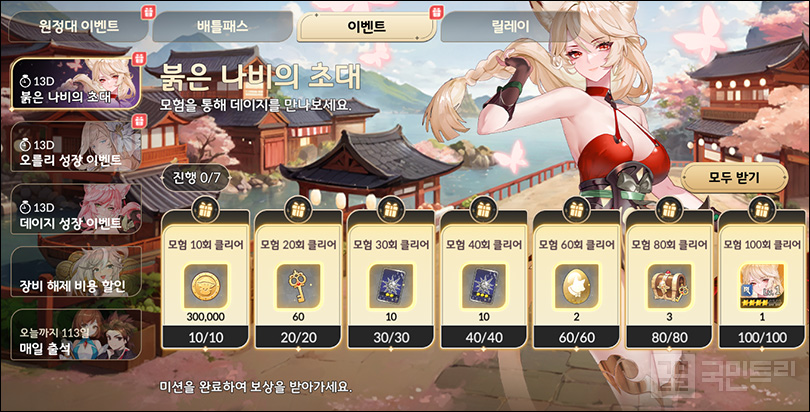
The first update of September has brought legendary heroes Orly and Daisy to the game at the same time. Since both have arrived together, you can participate in their pick-up summons and hero growth events concurrently. For those interested, you can secure one free copy of Daisy via the 'Invitation of the Red Butterfly' event. The conditions are simple: clear adventure mode 100 times to receive various resources, including gold and a 4-star Daisy.
The simultaneous release of these new heroes has kept the adventurers in the official lounge quite busy. Since the update details dropped, the community has been locked in a heated debate with no clear consensus yet. The current takeaway seems to be that Orly shows potential in Total War and Guild War, while Daisy is considered quite useful in the Uma-Wang raid.
To be fair, the developers were quite clear about the intended performance design of Daisy in their developer notes, and we are currently in the phase of testing those claims in real-time. The main point of contention is exactly what stat threshold is required to make Daisy viable for the Uma-Wang raid. While there is little disagreement regarding Daisy’s utility, the community remains divided over Orly.
Adventurers initially looked at the Arena, but the focus has since shifted toward Total War and Guild War. The initial assessment in the Arena focused on whether Orly could serve as a counter to the current meta-king, Platon, or perhaps even replace the unit entirely. Having found no definitive answer, the community has turned its gaze elsewhere. As we are currently in a preparation period for new seasons and upcoming rounds of content, we will have to wait a little longer for a final verdict on Orly's research.

Q. Biscuit's buff is targeting the wrong hero
The new hero Biscuit, released in the previous update, is making waves across various PvE content. Given the hero's versatility, there have been plenty of questions regarding the mechanics. A frequent topic—raised by adventurer 'Ganandanaara1'—involves the 'Equipment Reinforcement' skill targeting unintended units.
Equipment Reinforcement is a skill that grants a buff to the ally with the highest attack power. At 6-transcendence, the target count increases to two, significantly boosting the damage output of sub-dealers. The problem arises before reaching 6-transcendence, when the buff lands on a sub-dealer instead of the main dealer. This is particularly problematic in the Death Castle Siege, where the 'Taka - Jin' combination is popular. Despite Taka having higher attack power on paper, the buff often lands on Jin.
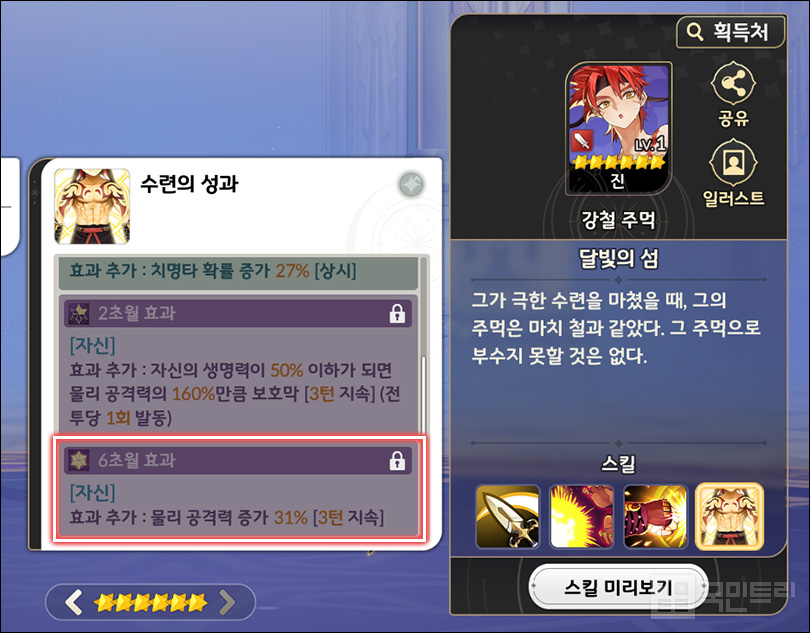
This phenomenon is caused by Jin's passive skill. Once in combat, Jin grants self a 31% physical attack boost, which often pushes Jin's attack power ahead of Taka’s for the first three turns. To fix this, you must adjust your equipment to increase Taka's attack or decrease Jin’s. In short, you need to ensure that Jin's base attack multiplied by 1.31 does not exceed Taka's attack power.
After running the numbers, you will find that Jin's attack is often much higher. This is a common issue stemming from the fact that Jin's base stats are quite high despite being easier to transcend. Alternatively, you could transcend Taka to catch up with Jin’s stats, or aim for 6-transcendence on Biscuit to increase the buff target count. However, both methods are quite costly in terms of rubies, so I would suggest simply letting Jin take the buff. Even if it is not the intended target, you can still hit a new high score in the siege. I recommend making the most of Jin rather than forcing extra transcendence.

20 Summon Tickets! '100-Day Anniversary Surprise Push'
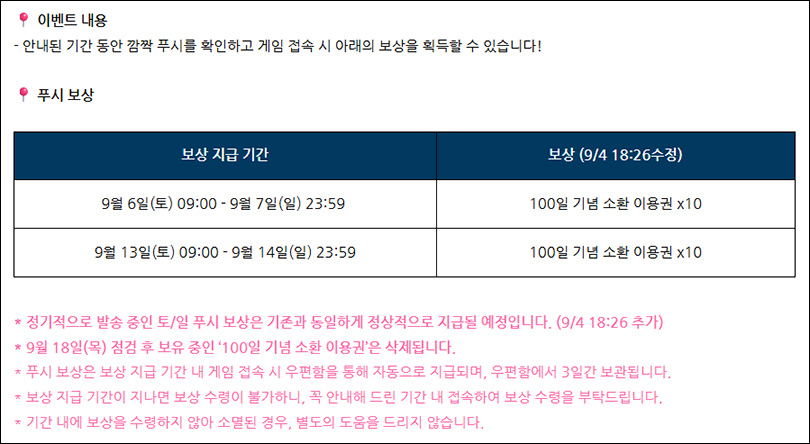
The 100-day celebration for Seven Knights Re:BIRTH is slowly winding down, but there are still about 12 days left for the 100-day anniversary summons. To mark the occasion, 'CM May' has prepared a surprise push reward.
A total of 10 '100-Day Anniversary Summon Tickets' will be distributed twice over the coming weekends. The first distribution window is from September 6 to September 7, and the second is from September 13 to September 14. Rewards can be claimed via the in-game mailbox. Don’t forget these dates and make sure to log in to Seven Knights Re:BIRTH.

Easy for everyone to get stronger! 'Gandan'
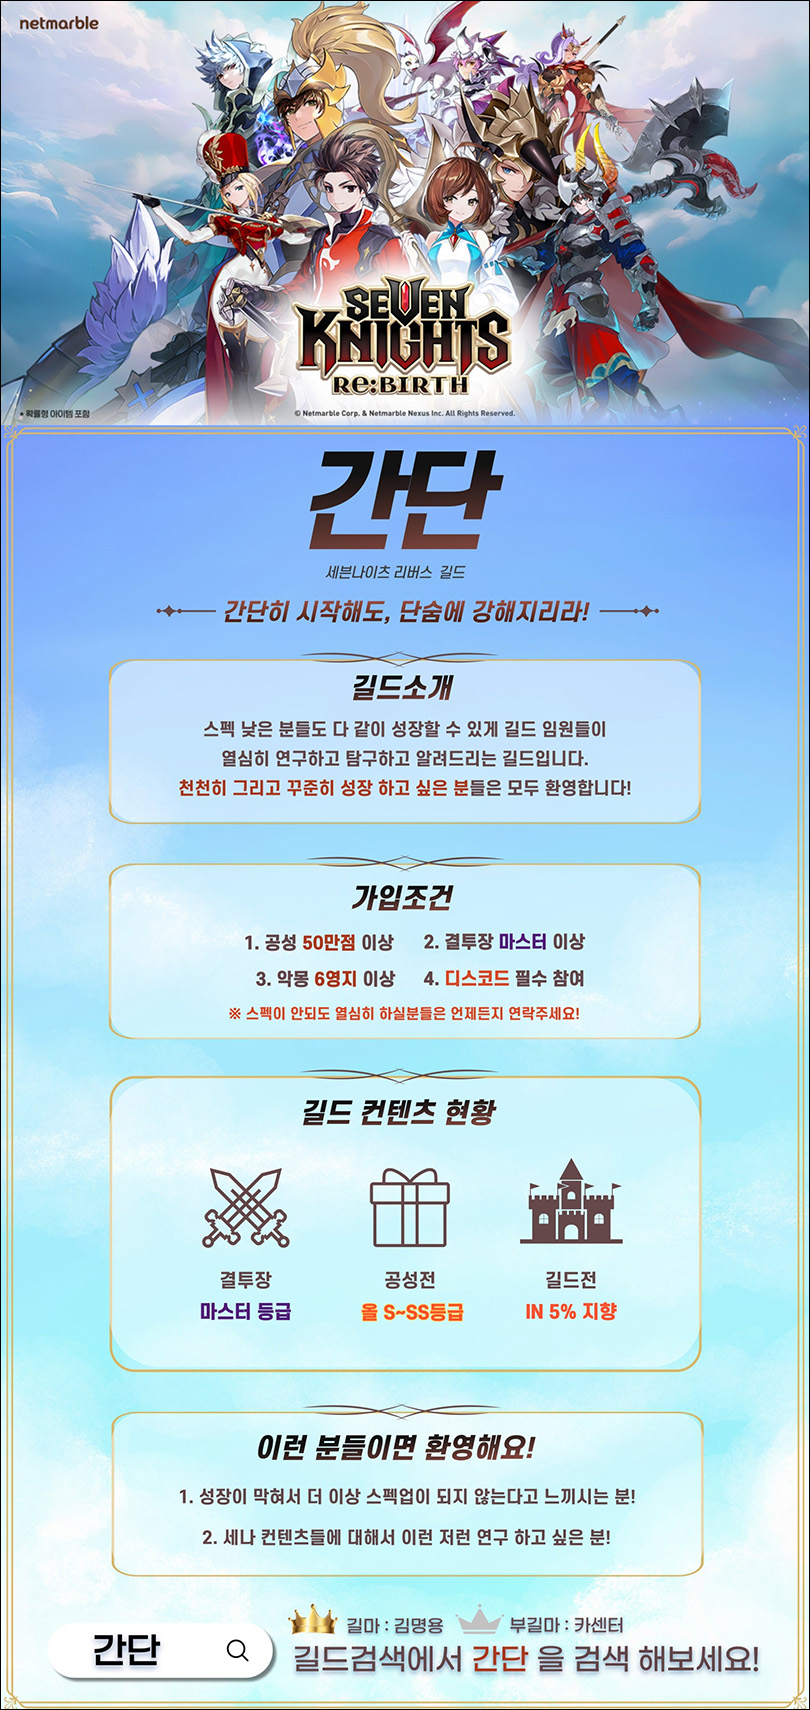
After finishing the first season of Guild Wars, adventurers seem to be aligning based on their playstyles. Those who want to take Guild Wars seriously are heading toward top-tier guilds, while others are opting for more casual environments. Today, I am introducing the 'Gandan' guild, which leans toward the former. However, even those in the latter group can grow together if they have the right mindset.
Operating under the slogan 'Start simply, become strong in a flash!', the Gandan guild is recruiting members who are committed to steady growth. As the name implies, they focus on research to ensure results even with simple participation. Current requirements for entry are 500,000 points in Siege, Master rank in the Arena, and reaching Chapter 6 of Nightmare. Even if your current stats fall short, they value passion and potential, so the doors are open to anyone willing to grow. If you are interested, search for 'Gandan' in the Seven Knights Re:BIRTH official lounge and check out their recruitment post.

Guild Guardian 'Rachel'
Following the 'Beach Festival' theme, more Rachel costumes have been released in quick succession. This time, a Guild Guardian costume has been added to commemorate Season 2 of the Guild Wars. As a reward for those who achieved excellent results in the Guild Wars, the costume features ornate decorations that stand out. The red color, iconic to Rachel, blends perfectly and seems to elevate the prestige of the guild.
The outfit is inspired by the original Guild War-exclusive costumes from the classic Seven Knights. The developers noted that they focused on inheriting the original design while adding the distinct flair of Seven Knights Re:BIRTH. It is not sold for cash but can be purchased with 'Pendants of Glory' earned in Guild Wars, maintaining the tradition of the original reward system. Thanks to this, there are so many great outfits for Rachel that it’s becoming quite hard to choose which one to equip.
![Guild War costume 'Guild Guardian Rachel' [For Android] (Image courtesy: KookminTree)](https://cdn.gamemeca.com/trees/0001/765/772/gm728049_250905-senare-weekly-51.jpg)
![Rachel's signature red is the highlight [For iOS] (Image courtesy: KookminTree)](https://cdn.gamemeca.com/trees/0001/765/772/gm602560_250905-senare-weekly-52.jpg)
안녕하세요. '세븐나이츠 리버스(이하 세나 리버스)' 공커 위클리 시간입니다. 타카에 이어 두 번째 나이트크로우 소속 영웅 오를리가 등장했죠. 아울러 신규 전설 영웅 데이지가 함께 추가되어 두 영웅의 픽업 소환이 동시 진행 중입니다. 신규 영웅이 둘이나 나왔으니 공식 라운지가 떠들썩한 건 당연한 수순이었죠. 두 영웅의 활용 방법에 대해 다양한 의견이 나오는 중입니다. 관련 이슈와 함께 한 주간의 공식 커뮤니티 소식을 공커 위클리를 통해 살펴보시죠.
'오를리·데이지' 동시 소환 픽업 개최
9월 첫 업데이트로 전설 등급 영웅 오를리와 데이지가 동시에 나왔습니다. 두 영웅이 함께 등장했으니 소환 픽업과 '영웅 성장 이벤트' 역시 동시 참여가 가능하죠. 참고로 데이지는 '붉은 나비의 초대' 행사를 통해 무료로 한 장을 바로 챙길 수 있습니다. 조건도 간단한데요, 모험 100회 클리어 시 골드를 비롯한 각종 재화와 함께 4성 데이지를 한 장 손에 넣을 수 있습니다.
이렇게 신규 영웅이 한꺼번에 나오면서 공식 라운지 모험가들이 바빠졌죠. 해당 영웅들을 어떻게 활용할지에 대한 많은 이야기가 오갔습니다. 업데이트 상세 내역이 올라온 저녁부터 지금까지 뚜렷한 결론이 없을 정도로 열띤 토론이 이어지는 중이죠. 현재 나온 결론을 종합하면 오를리는 총력전과 길드전 활약 가능성이 엿보이고, 데이지는 우마왕 레이드에서 유용하다는 의견입니다.
사실 데이지는 개발자 노트 공개 당시 성능 디자인에 대한 의도를 명확히 밝힌 바 있는데요, 실제 업데이트 이후 성능을 증명하는 과정입니다. 포인트는 어느 정도 스펙이어야 우마왕 실전 투입이 가능한지를 보고 있죠. 이렇게 데이지의 활약처는 이견이 없었으나, 문제는 여전히 의견이 분분한 오를리입니다.
처음 모험가들이 살핀 곳은 결투장이었고, 현재는 총력전과 길드전에서 쓰임새를 찾는 중입니다. 먼저 살핀 결투장은 현재 메타로 군림한 플라튼에 대항마 가능성에 무게를 뒀죠. 아울러 그를 대신할 수 있는지도 살폈습니다. 하지만 뚜렷한 해답을 찾지 못했고, 시선은 총력전과 길드전으로 옮겨졌죠. 공교롭게도 각각 신규 시즌과 다음 라운드 오픈 준비 기간이라 오를리 연구 결과는 좀 더 기다려봐야 할 것 같습니다.
Q. 비스킷 버프가 엉뚱한 영웅에게 들어가요
지난 업데이트에 나온 신규 영웅 비스킷이 PvE 콘텐츠 곳곳에서 활약 중이죠. 사용처가 많은 영웅인 만큼 관련 질문이 많았습니다. 특히, 핵심 스킬인 '장비 강화' 타깃에 대한 내용이 다수였죠. 질문을 남긴 '가난다나아라1' 모험가처럼 의도하지 않은 영웅에게 버프를 거는 경우가 대부분이었습니다.
장비 강화 버프는 '공격력이 가장 높은 아군' 1인에게 강화 효과를 거는 기술이죠. 6초월시 타깃이 2인으로 늘어나 서브 딜러의 피해량도 대폭 높입니다. 문제는 6초월이 아닐 때, 메인 딜러가 아닌 서브 딜러 영웅에게 버프를 거는 경우죠. 가장 많이 말썽을 일으키는 곳은 '타카 - 진' 조합이 활약하는 죽음의 성 공성전입니다. 분명히 타카의 공격력이 더 높은데, 버프는 진에게 들어가는 케이스죠.
해당 현상은 진의 패시브 효과 때문입니다. 전투에 들어가면 자신에게 물리 공격력 31% 증가 버프를 걸어 3턴간 타카보다 공격력이 앞서는 경우가 많죠. 이럴 땐 장비를 조정해서 타카의 공격력을 더 높이거나 진의 공격력을 낮춰야 합니다. 정리하면 영웅 편성창 기준으로 진의 공격력에 1.31을 곱했을 때 타카의 공격력을 넘어서지 않는 세팅이 필요합니다.
이렇게 계산했을 때, 대부분의 경우 진의 공격력이 훨씬 더 높죠. 비교적 초월 난도가 낮은 진의 체급이 압도적으로 높아 생기는 현상입니다. 다른 방법으로는 타카의 초월로 진의 체급을 따라잡거나, 비스킷 6초월로 버프 대상을 한 명 더 늘리는 것도 가능하죠. 대신 두 방법은 루비 부담이 크니 그냥 진에게 버프를 주는 것을 권합니다. 의도대로 타카에게 버프를 주진 못해도 어쨌든 공성 점수 고점 경신은 가능하거든요. 추가 초월보다는 진 활용을 권장합니다.
소환권 20장! ‘100일 기념 깜짝 푸시’
세나 리버스 론칭 100일 기념 행사가 슬슬 마무리되는 분위기죠. 그래도 아직 100일 기념 소환은 약 12일 기간이 더 남았습니다. 이에 'CM메이'가 깜짝 푸시 보상을 준비했죠.
다가오는 주말과 차주 주말에 총 2회 '100일 기념 소환 이용권' 10장을 지급합니다. 기간은 1회차 9월 6일부터 9월 7일, 2회차는 9월 13일부터 9월 14일까지로 나눠 지급하죠. 보상은 우편함을 통해 수령 가능합니다. 해당 기간을 잊지 말고 세나 리버스에 꼭 접속하세요.
누구나 손쉽게 강해질 수 있다! '간단'
길드전 첫 시즌을 치른 뒤 모험가들의 성향이 나뉘는 분위기입니다. 길드전을 더 깊게 즐기고 싶은 분들은 상위권 지향으로, 그 반대의 경우는 콘텐츠 참여가 더 자유로운 곳으로 향하는 중이죠. 오늘 소개할 '간단' 길드는 전자에 가깝습니다. 대신 후자의 인원들 중 의지만 있다면 함께 성장하는 것도 가능한 곳이죠.
'간단히 시작해도, 단숨에 강해지리라!'라는 슬로건으로 활동하는 간단은 시간이 걸려도 꾸준히 성장할 길드원을 모집 중입니다. 이름처럼 간단히 참여만 해도 성적이 나올 수 있도록 연구하는 곳이죠. 현재 가입 조건은 공성전 50만 점, 결투장 마스터 등급, 악몽 6챕터 이상 도달입니다. 스펙이 요구치보다 모자라더라도 열정을 더 높게 높게 쳐서 성장 의향만 있다면 누구에게나 문이 열려있죠. 가입을 원하는 분은 세나 리버스 공식 라운지에서 '간단'을 검색해 길드 홍보 게시글을 살펴보세요.
길드 수호자 '레이첼'
'해변의 축제'에 이어 레이첼의 코스튬이 연달아 나왔습니다. 이번에는 길드전 시즌 2에 맞춰 길드 수호자 코스튬이 추가됐죠. 길드전에서 우수한 성적을 거둔 용사들에게만 주어지는 보상답게 화려한 장식이 돋보이는 코스튬이죠. 레이첼을 상징하는 붉은 색상이 잘 어우러져서 길드 명예를 보다 더 드높이는 것 같습니다.
해당 의상은 기존 세븐나이츠 원작에 있던 길드전 전용 코스튬을 모티프로 삼았죠. 개발자 노트에서는 세나 리버스만의 감성을 더 살리기 위해 디자인을 계승하는 것에 초점을 맞췄다고 설명했습니다. 유료 판매가 아니라 길드전 보상 '영광의 펜던트'로 구매 가능한 점도 기존 보상 방식을 계승한 것이죠. 덕분에 레이첼과 잘 어울리는 의상이 많아져서 어떤 옷을 입힐지 고민되네요.

- [Today's steam] Animorphs officially released, recording 100,000 Concurrent Players
- An Ensemble Drama with Four Heroes, Fire Emblem Mazachanhong
- [Today's steam] PC version of The War of Genesis Raising achieves 30,000 Concurrent Players
- What is the recently popular indie game genre 'DB Thriller'?
- [TGS 26] A world breathing with the Nexon Games style, Pareidolia
- [Photo] How does Riftbound captured in cards look?
- [TGS 26] Tokyo Game Show decided to close one day early due to typhoon
- Duolingo's 'Duo' Appears as a Boss in Brawl Stars
- [TGS 26] Hyung-tae Kim "AI video was an experiment, I apologize"
- [TGS 26] Leaping into a global event, Tokyo Game Show 2026 opens





 GAMEMECA GLOBAL SITE