

[SKRB Tips] Essential Hero 'Bidam' for Karma Strategy in Descent Expedition
[세나 리버스 꿀팁] 강림 원정대 카르마 공략 필수 영웅 '비담'

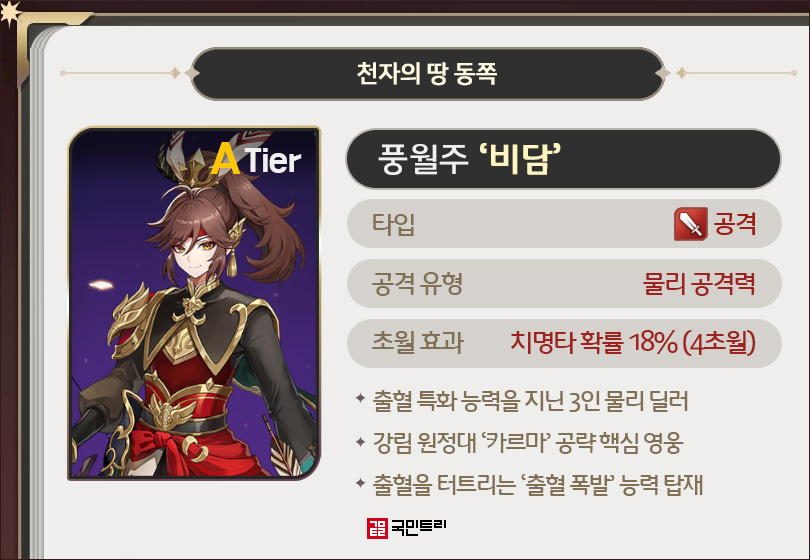
In 'Seven Knights Re:BIRTH' (hereinafter SKRB), the PvE endgame content known as the Descent Expedition is all about squeezing out maximum damage within a strictly limited number of turns. Think of it as the 'hard mode' of your standard Castle Rush. Karma, in particular, is a bit of a nuisance, boasting a 90% damage reduction against magic attacks and any skills targeting 1-2 or 4-5 enemies. Naturally, you'll need to pivot to a hero packing physical damage and 3-target skills.
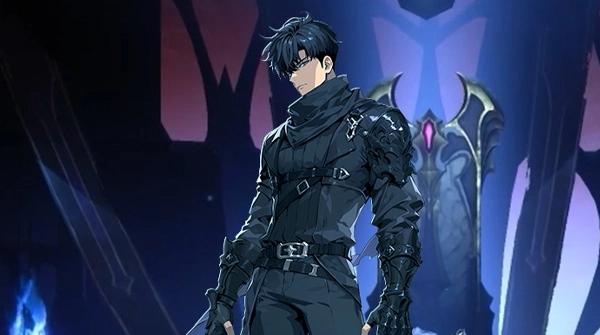
Enter Bidam, the perfect fit for the job. As luck would have it, he received a timely skill buff right when the Descent Expedition first launched. This turned him into an absolute staple for any serious Karma run. KookminTree has broken down why Bidam is the lynchpin for your success.
Q. So, what kind of hero is Bidam?
A. He is a pure damage dealer who thrives on stacking and detonating 'Bleed' debuffs.
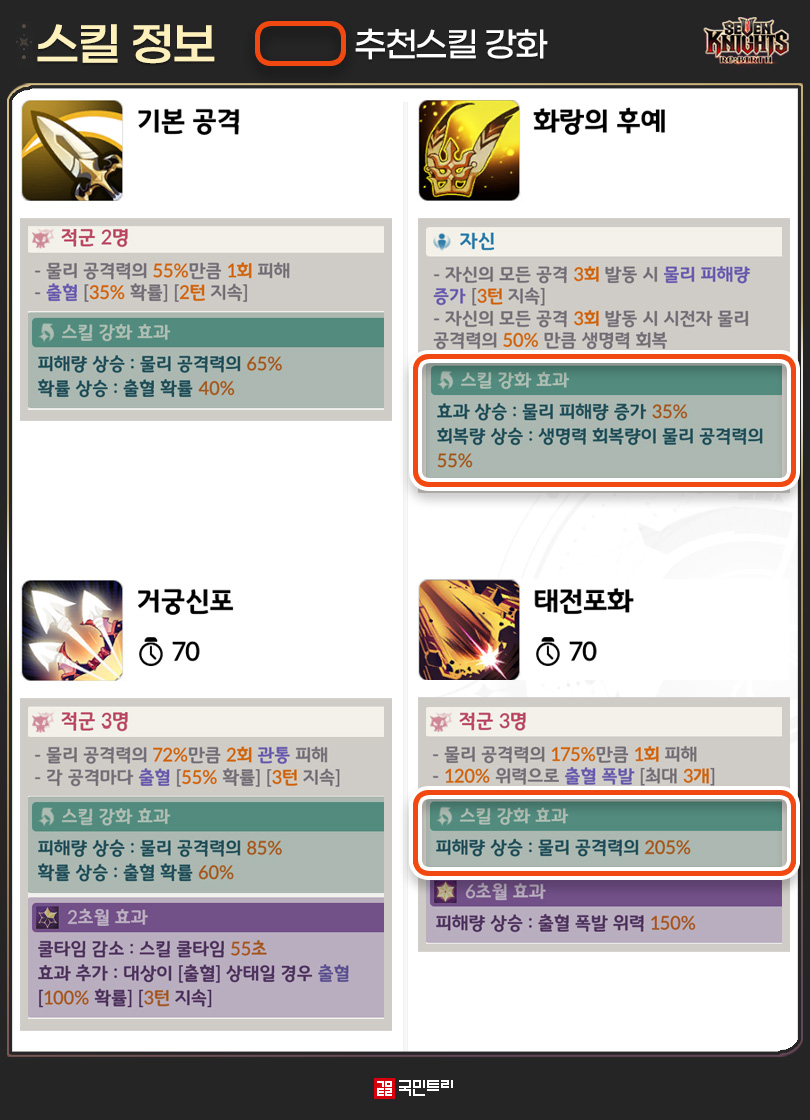
Bidam is, at his heart, a pure DPS unit focused on the Bleed mechanic. Outside of his passive and the 'Taejeon Pohwa' skill, he keeps the pressure on with basic attacks and 'Geogung Sinpo.' His passive, 'Descendant of the Hwarang,' grants a physical damage boost for 3 turns and heals him for 50% of his physical attack power every three attacks. Note that this applies to both skills and basic strikes. Once fully upgraded, the damage boost jumps from 29% to 35%, and the healing efficiency increases from 50% to 55%.
'Geogung Sinpo' was significantly improved alongside the addition of the Descent Expedition. It deals piercing damage to three enemies twice, with a 55% chance to apply a 3-turn Bleed debuff per hit. Upgrading it raises the damage coefficient and bumps that Bleed chance to 60%. Reach level 2 transcendence, and the cooldown drops to 55 seconds, with a 100% chance to re-apply Bleed if the target is already suffering from it. Before this patch, the skill lacked any Bleed effect entirely—a welcome change for stability.
'Taejeon Pohwa' strikes three enemies with 120% power, triggering a Bleed explosion. It consumes up to three stacks of Bleed, with damage calculated based on the number of stacks and their remaining duration. Skill upgrades push the physical damage coefficient from 175% to 205%, and at 6th transcendence, the explosion power climbs to 150%. His basic attacks also have a 35% chance to apply a 2-turn Bleed, which increases to 40% with upgrades.
Q. What are Bidam's core buffs and debuffs?
A. Simply put: Bleed and Bleed Explosion.
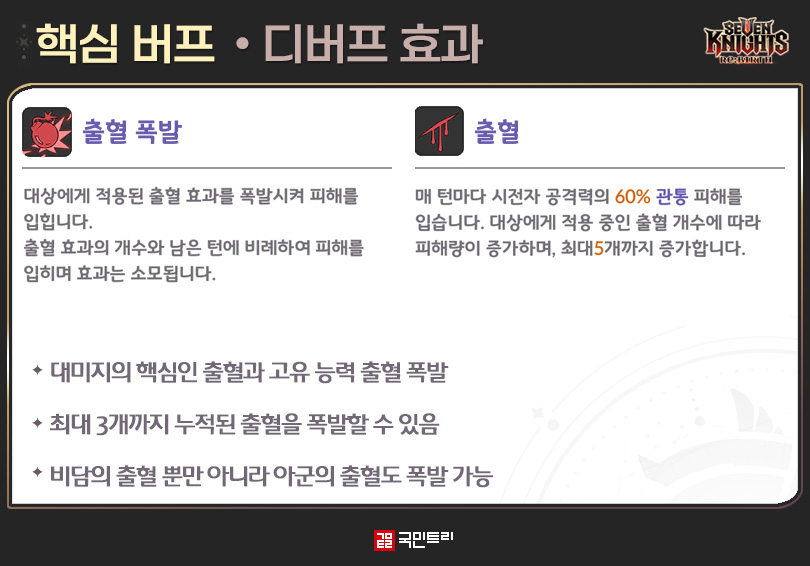
The core of Bidam's kit is the aforementioned Bleed. This status effect deals piercing damage equal to 60% of his attack power every turn, effectively ignoring the target's damage immunity. It stacks up to five times, and the damage scales with the number of stacks. While the 3-turn duration from Geogung Sinpo and the 2-turn duration from basic attacks differ, they stack seamlessly.
Bleed Explosion is Bidam's signature move. It detonates existing stacks for instant damage, consuming up to three at a time. The damage scales with the number of stacks and the time remaining on them, so for maximum impact, you really want to trigger this when you have three stacks ready. If you're wondering whether you should hold off when there's no Bleed active, don't sweat it—Taejeon Pohwa has a solid base coefficient anyway. Most seasoned players suggest firing it on cooldown.
Q. How should I kit him out?
A. We recommend the Avenger set with a focus on Critical Hit stats.
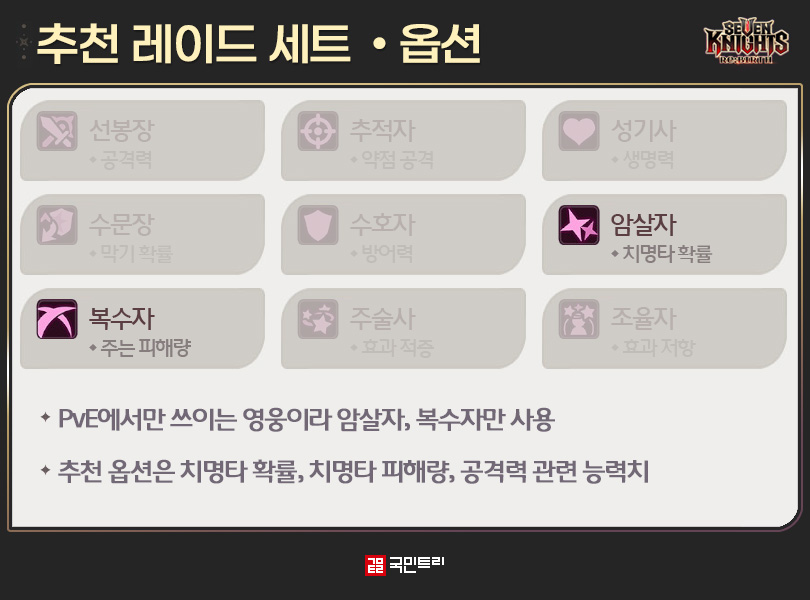
When it comes to gear, the Avenger set is the only real choice for Bidam. Since you’re using him in the endgame Descent Expedition, that 4-piece Avenger set bonus is non-negotiable for boss encounters. Aim for Critical Damage, Critical Rate, and Attack Power. For your weapon, stick to Critical Damage and Critical Rate to hit your damage ceiling. Fill in the sub-stats with similar offensive bonuses and you're good to go. If your Avenger set pieces are lacking, you can use an Assassin set as a temporary stopgap, but remember: as a DPS, your Crit Rate is everything.
'세븐나이츠 리버스(이하 세나 리버스)' PvE 엔드 콘텐츠 강림 원정대는 제한된 턴 안에 최대한 높은 대미지를 넣어야 한다. 공성전의 하드 버전으로 생각하면 편하다. 이 중 카르마는 마법 피해와 1~2인, 4~5인기 스킬 피해를 90% 감쇄한다. 따라서, '물리 피해 + 3인기 스킬'을 가진 영웅으로 공략해야 한다.
여기서 딱 들어맞는 영웅이 비담이다. 마침 비담은 강림 원정대가 처음 등장했을 때 스킬 상향을 받았다. 그 결과 카르마를 상대로 무조건 쓰이는 영웅으로 탈바꿈했다. 강림 원정대 카르마 공략의 핵심 영웅 비담을 국민트리가 분석했다.
Q. 비담은 어떤 영웅인가요?
A. 출혈 디버프를 쌓으며 폭발시키는 딜러입니다.
비담은 출혈을 걸고, 폭발시키는 퓨어 딜러다. 패시브와 '태전포화' 스킬을 제외한 기본 공격과 '거궁신포'에 출혈을 부여하는 효과를 탑재했다. 패시브 '화랑의 후예'는 비담의 모든 공격 3회 발동 시 '3턴 간 물리 피해량 증가 + 시전자 물리 공격력의 50%만큼 생명력을 회복'한다. 모든 공격의 기준은 스킬과 기본 공격을 포함한다. 스킬 강화에 성공하면 물리 피해량 증가는 29%에서 35%, 생명력 회복량이 50%에서 55%로 소폭 상승한다.
거궁신포는 강림 원정대 추가와 함께 상향된 스킬이다. 적 3명에게 2회 관통 피해를 가하고, 각 공격마다 55% 확률로 3턴 출혈 디버프를 부여한다. 스킬 강화 시 피해 계수 증가와 함께 출혈 확률이 60%로 올라간다. 2초월 도달하면 스킬 쿨타임이 55초로 줄어들고, 대상이 출혈 상태일 경우 100% 확률로 다시 출혈을 부여한다. 스킬 상향 이전에는 쿨타임 감소만 존재했을 뿐 출혈 효과가 없었다. 패치 덕분에 비담은 이전보다 안정적인 출혈 부여가 가능해졌다.
태전포화는 적군 3명을 공격하며 120% 위력으로 출혈 폭발을 일으킨다. 이때 소모하는 출혈은 3개까지다. 피해량은 출혈 숫자와 남은 턴에 비례해 계산한다. 스킬 강화 시 물리 피해 계수가 175%에서 205%로 증가하고, 6초월에는 출혈 폭발 위력이 120%에서 150%로 상승한다. 기본 공격은 35% 확률로 2턴 출혈을 부여하며, 스킬 강화 시 확률이 40%가 된다.
Q. 비담의 핵심 버프, 디버프는?
A. 출혈과 출혈 폭발입니다.
비담의 핵심 디버프는 앞서 소개한 출혈이다. 매 턴마다 시전자 공격력의 60% 관통 피해를 가하는 상태 이상이다. 관통이라 적의 피해 면역을 무시하는 특징이 있다. 대상에게 적용 중인 출혈 개수에 따라 피해량이 증가하며, 최대 5개까지 중첩된다. 거궁신포의 3턴과 일반 공격의 2턴으로 유지 시간이 다르나 중첩에는 문제가 없다.
출혈 폭발은 비담만 지닌 특수 능력이다. 대상에게 적용된 출혈 효과를 폭발시켜 피해를 주며, 소모되는 출혈은 최대 3개다. 이때 출혈 개수와 남은 턴에 비례해 피해량이 발생한다. 따라서, 출혈 폭발의 최대 대미지를 노린다면, 출혈 3중첩에 맞춰 스킬을 사용해야 한다. '그럼 출혈이 없으면, 사용하면 안 되냐?'라고 물을 수 있는데, 다행히 태전포화는 기본 계수가 포함된 스킬이다. 현재 유저들은 쿨타임마다 사용해도 무관하다는 의견이 많으니 비담 사용 시 참고하자.
Q. 비담 세팅은 어떻게 하면 될까요?
A. 복수자 세트를 기반으로 치명타 세팅을 추천합니다.
비담이 사용할 장비 세트는 복수자 하나다. 활약하는 콘텐츠가 PvE 엔드 콘텐츠인 강림 원정대다. 보스를 상대하는 콘텐츠라 복수자 세트 4세트 효과를 세팅해야 한다. 추천 옵션은 치명타 피해, 치명타 확률, 공격력 증가다. 무기 주옵션은 치명타 피해와 확률만 세팅해야 고점을 달성할 수 있으니 참고하자. 부옵션들도 관련 능력치로 세팅하면 끝이다. 만약 복수자 세트의 옵션이 부실할 경우, 암살자 세트를 잠시 사용하자. 딜러라 치명타 확률이 중요하다.





- [Today's steam] Animorphs officially released, recording 100,000 Concurrent Players
- GTA 6 Online to support up to 32 players, confirmed through lawsuit documents
- An Ensemble Drama with Four Heroes, Fire Emblem Mazachanhong
- Gathering Cheonhwi and Slowly Falling for the Charm of 'Animo'
- [Today's steam] PC version of The War of Genesis Raising achieves 30,000 Concurrent Players
- What is the recently popular indie game genre 'DB Thriller'?
- [TGS 26] A world breathing with the Nexon Games style, Pareidolia
- [Photo] How does Riftbound captured in cards look?
- Shape of Dreams Console Launch Alongside 1st Anniversary
- [TGS 26] Leaping into a global event, Tokyo Game Show 2026 opens





