

[Vampir Tips] Continue to invest in Accuracy even after balance adjustments
[뱀피르 꿀팁] 밸런스 조정 후에도 명중은 꾸준히 투자하자

Vampir received its first post-launch update on September 3rd. Following player feedback, the developers have tweaked accuracy balance, meaning you might feel you can ease off the grind a little. However, don't stop investing just yet. Keeping your accuracy high and focusing on your character's foundation is still key. The most effective way to solidify your base is through Collections, and players have recently been busy theorycrafting the best ways to complete them. Here is a breakdown of everything you need to know about accuracy and collections.
Accuracy balance has been improved, so is it okay to slow down on investment?
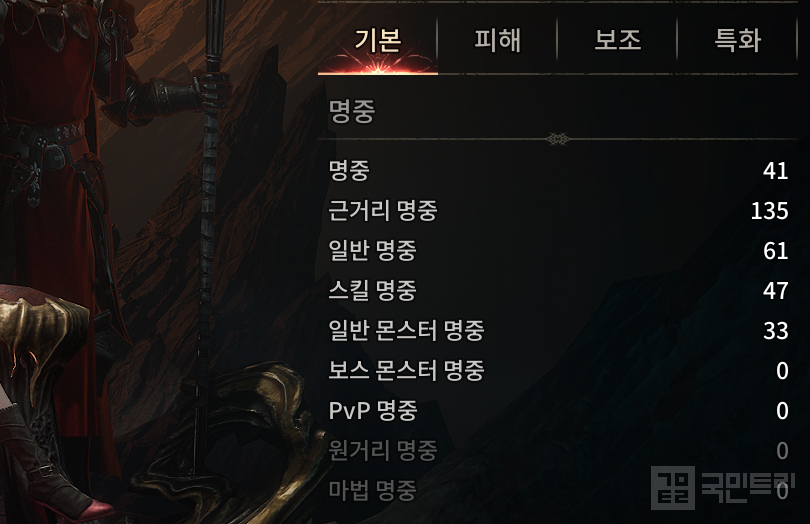
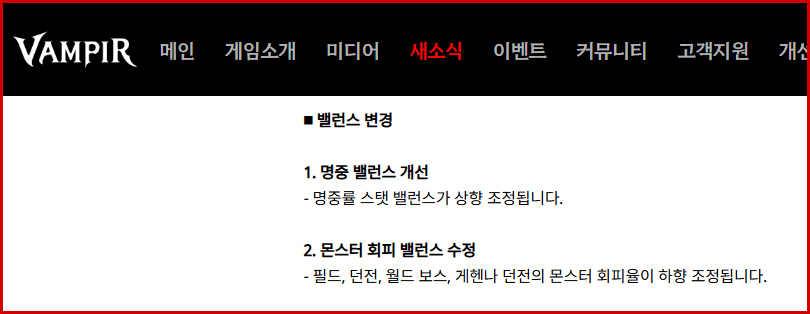
Vampir recently boosted the performance of the accuracy stat while lowering the evasion rates of monsters in fields, dungeons, world bosses, and Gehenna dungeons. While the impact will vary depending on where you hunt, it is clearly a move to reduce the burden on accuracy. Naturally, you might think, 'I can spend less effort on accuracy now,' but I suggest you keep investing.
There are two reasons for this. First, Vampir is still in its early launch phase. You are currently in the stage of enjoying base content, so there is room to focus on growth and foundation. Second, accuracy is a stat where the baseline is constantly rising. It might be sufficient now, but the requirements will spike as you enter higher-level zones, face new content, and engage in player competition. It is better to keep an upward curve for future growth; trying to catch up once new content drops will be too late.
If you want to know the current accuracy requirements, look to your peers. You can ask about accuracy thresholds for specific hunting grounds, quests, or bosses, or perform a simple experiment. The method is easy: hit an opponent a few times in a friendly duel, then compare your respective accuracy and evasion stats against the frequency of missed attacks. While the exact formula remains a mystery, you can estimate roughly how much accuracy is needed for a certain level of evasion. Just remember that Vampir has stiff penalties for field PVP, so be careful not to commit accidental manslaughter.
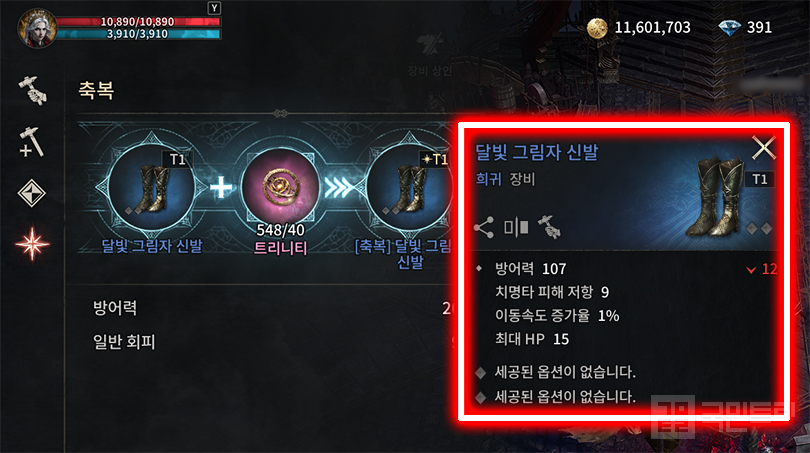
Some equipment in Vampir gains accuracy through blessings or enhancements, but there is no rush on blessings. The supply of 'Trinity' materials simply cannot keep up with demand. Besides, you should be aiming for higher-tier equipment anyway. Unless you are in a desperate rush, it is safer to invest in high-spec gear you are satisfied with.
Tradeable rare equipment is the exception. It has recently been discovered that blessing a rare item increases the amount of 'Trinity' obtained upon dismantling it by tenfold. Consequently, many users are buying or selling these items on the exchange to farm diamonds. Use these diamonds to complete collections or buy materials to boost your progress.
T1 rare equipment is also worth collecting.
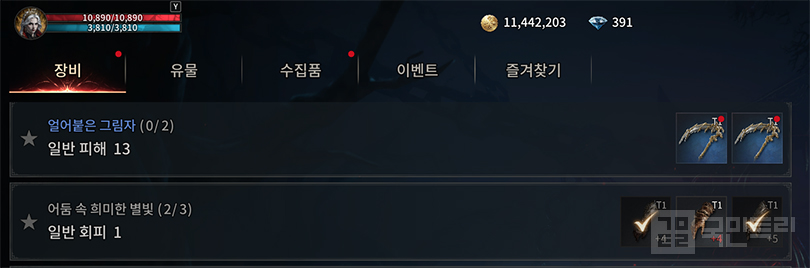
Vampir categorizes gear as T1, T2, or T3, with higher tiers being superior. Most players currently wear rare gear, and the debate centers on T1 versus T2 due to the clear gap in collection difficulty and stats. Many believe the demand and value for T1 rare gear will continue to dwindle.
While that makes sense if you are just looking for something to wear, you still need to collect T1 gear for the item collection. These drop in level 40 hunting grounds, so keep farming them. I cannot stress enough that collections, magic infusion, and portraits are the building blocks of your character. Plus, collection rewards are shared across all characters on the same server. Since players are currently finding ways to profit through sub-characters, the synergy is promising.
Crafting T1 rare gear yourself is also a viable option. It saves you the time and effort of farming, and if you get a 'Great Success' on the craft, you can sell it on the exchange for diamonds. The goal is to craft items that are hard to find in hunting grounds or have low supply on the exchange and sell them at a premium. Use the diamonds earned to fill your collections or purchase high-tier equipment.
Vampir added new collection items on September 3rd, including 32 pieces of equipment, 12 relics, and 16 collectibles. It is highly likely more will be added. Approach this like the accuracy issue; clearing the backlog early will make your life much easier later.
Check the sources of lower-tier items carefully!
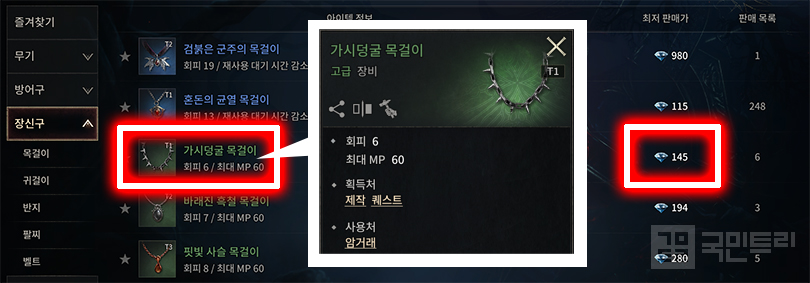
The strategy of crafting and selling rare gear for diamonds also applies to normal and high-grade items. Some equipment in Vampir cannot be farmed in the field. You won't know this unless you click on each item to check its acquisition source. You must investigate, craft, and register these to complete your collections.
Check the information by holding down on an item in the exchange. Verify if 'Field - Dungeon - Ancient Workshop - Gehenna' is missing. If 'Field' is not listed, you cannot loot it in normal hunting grounds. Dungeons and Ancient Workshops are similar. Dropping in Gehenna is slightly better, but Gehenna is a PVP-enabled zone, which adds a layer of risk.
Craft items that are impossible to farm or only drop in Gehenna yourself. Once crafted, register them in your collection to strengthen your foundation or sell them on the exchange for diamonds. When selling, aim to target items with low supply for a higher profit.
'뱀피르'는 지난 9월 3일에 출시 후 첫 업데이트를 했다. 유저 피드백을 받아들여 명중 밸런스를 개선했고, 이제 명중에 쏟을 노력을 전보다 줄여도 좋을 듯싶다. 그러나 투자를 아예 멈추는 건 시기상조다. 여전히 명중을 올리고, 내실 다지기에 힘써야 한다. 내실을 다지는 대표적인 방법은 컬렉션인데, 최근 컬렉션 달성을 위한 다양한 유저 연구가 등장했다. 이번 시간은 명중과 컬렉션에 관련한 정보를 정리했다.
명중 밸런스 개선했으니 투자를 늦춰도 괜찮나요?
뱀피르는 최근 명중률 스탯의 성능을 높이고, 필드와 던전, 월드 보스, 게헨나 던전의 몬스터 회피율은 하향했다. 유저마다 사냥터가 다르니 체감 정도는 다르겠지만, 전반적으로 명중 부담을 줄이기 위한 노력으로 풀이된다. 이에 자연스럽게'이제 명중 투자에 쓰던 노력을 조금 덜어도 되겠지'라는 생각이 드는데, 일단 계속 투자하는 걸 추천한다.
이유는 두 가지다. 먼저 현재 뱀피르는 오픈 초반이다. 아직 기본 콘텐츠를 즐기는 시기라 육성과 내실 다지기에 집중할 여유가 있다. 두 번째로 명중은 꾸준히 기준선이 오르는 스탯이다. 지금은 충분할지 몰라도 상위 지역 진입이나 신규 콘텐츠 등장, 유저 간 경쟁 등 다양한 요소로 요구치가 상승한다. 앞으로의 성장과 업데이트를 고려해 꾸준히 상승 곡선을 그리는 게 이상적이다. 나중에 신규 콘텐츠가 열린 뒤 부랴부랴 챙기면 늦는다.
지금 필요한 명중 스탯을 알고 싶다면, 다른 유저의 도움을 받자. 사냥터나 퀘스트, 보스의 명중 컷을 요청하거나 간단한 실험을 하는 것이다. 실험 방법은 간단하다. 합의 하에 상대를 몇 대 때려보고, 공격이 빗나가는 빈도와 서로의 명중, 회피 관련 스탯을 비교한다. 아직 정확한 계산식은 알 수 없지만, '상대의 회피가 어느 정도일 때 대략 이 정도의 명중이 필요하다' 정도는 얼추 짐작할 수 있다. 뱀피르는 필드 PVP 페널티가 크니 과실치사를 주의하는 건 필수다.
뱀피르의 일부 장비는 축복이나 강화로 명중 스탯을 얻는데, 축복은 천천히 투자해도 괜찮다. 재료인 트리니티 공급이 수요을 못 따라가는 상황이다. 게다가 장비는 꾸준히 상위 등급으로 올려야 한다. 당장 급한 게 아니라면, 만족할만한 고스펙 장비에 투자하는 게 든든하다.
거래 가능한 희귀 장비는 예외다. 최근 밝혀진 바로는 축복한 희귀 장비는 분해 시 트리니티 획득량이 10배가 된다. 이에 거래소에서 관련 매물을 구매하거나 판매해 다이아를 버는 유저가 많다. 같은 방법으로 다이아를 벌어 컬렉션을 달성하거나, 제작 재료를 구매해 육성에 보태는 것도 염두에 두자.
T1 희귀 장비도 수집할 가치가 있다
뱀피르는 장비에 T1, T2, T3를 표기해 장비 구분을 돕는다. 뒤로 갈수록 더 좋은 장비다. 일반 유저들은 대개 희귀 장비를 착용하는데, 최근 관심사는 T1과 T2다. 티어 간 수집 난도와 스펙이 확실하게 차이 나기 때문이다. 이에 T1 희귀 장비는 수요와 가치가 점점 줄어들 것으로 분석하는 유저가 많다.
착용을 기준으로 생각하면 일리가 있지만, 아이템 컬렉션 달성을 위해선 T1 장비도 모아야 한다. 이건 40레벨대 사냥터에서도 드랍하니 파밍해서 채우면 된다. 자주 강조하는 거지만, 컬렉션과 마력 주입, 초상화 등 가능한 많은 콘텐츠로 내실을 다지는 게 육성의 기본이다. 게다가 컬렉션 보상은 같은 서버의 모든 캐릭터가 혜택을 누린다. 마침 유저들은 서브 캐릭터로 이득을 얻는 법을 연구 중이니 시너지 효과가 기대된다.
T1 희귀 장비를 직접 제작하는 것도 괜찮은 선택이다. 직접 파밍할 시간과 노력이 줄고, 대성공 시 거래소에 팔아 다이아를 벌 수 있다. 목표는 던전이 아닌 사냥터에서 줍기 힘들거나 거래소 매물이 매우 적은 아이템을 만들어 비싸게 파는 것이다. 이렇게 번 다이아로 컬렉션을 채우거나 티어가 높은 완제품 장비를 구매해 스펙을 높인다.
마침 뱀피르는 9월 3일 업데이트로 신규 컬렉션 항목을 추가했다. 장비 32종과 유물 12종, 수집품 16종이다. 앞으로도 뱀피르는 컬렉션 항목을 추가할 가능성이 생긴 셈이다. 앞서 설명한 명중과 비슷한 느낌으로 접근하자. 지금까지 나온 걸 미리 정리할수록 나중에 편해진다.
낮은 아이템 획득처도 꼼꼼하게 확인할 것!
희귀 장비 제작, 판매를 통한 다이아 획득은 일반, 고급 장비에도 적용 가능하다. 뱀피르의 장비 중에는 필드에서 파밍할 수 없는 것이 존재한다. 이건 아이템을 일일이 눌러서 획득처를 확인하지 않으면, 알 수 없는 정보다. 컬렉션을 위해서는 직접 조사한 뒤 제작해서 등록해야 한다.
정보는 거래소에서 아이템을 꾹 눌러 조사한다. 획득처 파트에 '필드 - 던전 - 고대의 공방 - 게헨나'가 없는지 확인한다. 필드가 없을 경우 일반 사냥터에서는 못 줍는다는 뜻이다. 던전과 고대의 공방도 비슷하다. 게헨나에서 드랍하는 건 그나마 사정이 낫지만, 게헨나는 PVP가 허용되는 콘텐츠라 부담이 된다.
파밍 불가 또는 게헨나에서만 드랍하는 장비는 직접 제작한다. 제작한 뒤에는 컬렉션에 등록해 내실을 다지거나 거래소에 판매해 다이아를 얻는 데 사용하면 된다. 판매할 때에는 거래소에서 매물이 적은 아이템을 비싸게 파는 걸 목표로 하자.





- [Today's steam] Animorphs officially released, recording 100,000 Concurrent Players
- An Ensemble Drama with Four Heroes, Fire Emblem Mazachanhong
- [Today's steam] PC version of The War of Genesis Raising achieves 30,000 Concurrent Players
- What is the recently popular indie game genre 'DB Thriller'?
- [TGS 26] A world breathing with the Nexon Games style, Pareidolia
- [Photo] How does Riftbound captured in cards look?
- [TGS 26] Tokyo Game Show decided to close one day early due to typhoon
- [TGS 26] Hyung-tae Kim "AI video was an experiment, I apologize"
- Duolingo's 'Duo' Appears as a Boss in Brawl Stars
- [TGS 26] Leaping into a global event, Tokyo Game Show 2026 opens





 GAMEMECA GLOBAL SITE