
[Game of Thrones: Kingsroad Tips] Greatsword Burst Damage Skill Build from a Top Knight Ranker
[왕좌의 게임 꿀팁] 기사 랭커의 대검 폭딜 스킬 세팅
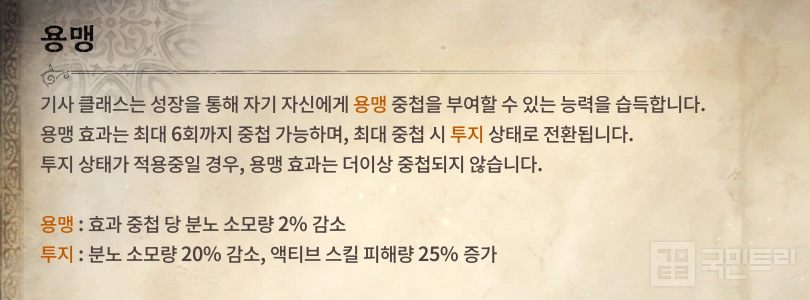
In Game of Thrones: Kingsroad, the Knight is all about that burst damage, weaving skills together to absolutely melt health bars. The key to this is the 'Fighting Spirit' effect, triggered by stacking 'Valor'. Once active, it slashes your skill stamina cost by 20% and boosts damage output by 25%. Naturally, the golden rule here is to dump your entire kit while that window is open.
So, which skills should you be packing for maximum carnage? To find out, we’ve crunched the data on the top 20 Knight players currently topping the Elite Hideout leaderboards, focusing specifically on their 'Two-handed Greatsword' setups. Keep in mind, these meta trends are as fluid as a Westerosi political alliance, so take these findings with a grain of salt.

90% pick rate: The bread and butter [Continuous Slash]
[Continuous Slash] is the heavy hitter of the Knight's arsenal, boasting a base damage of 440% at level 1. If you manage to buff it with the right Imprint, that number climbs to a staggering 622.5%, which explains why almost every Knight is running it.
Thanks to its 'Laceration' specialization, you aren't just hitting hard—you’re applying Bleed, which in turn buffs your damage against those poor, hemorrhaging souls. It’s a tidy bit of synergy that plays beautifully into the [Gathering Thrust] combo we’ll touch on later.
75% pick rate: The kickoff [Inspiring Shout]
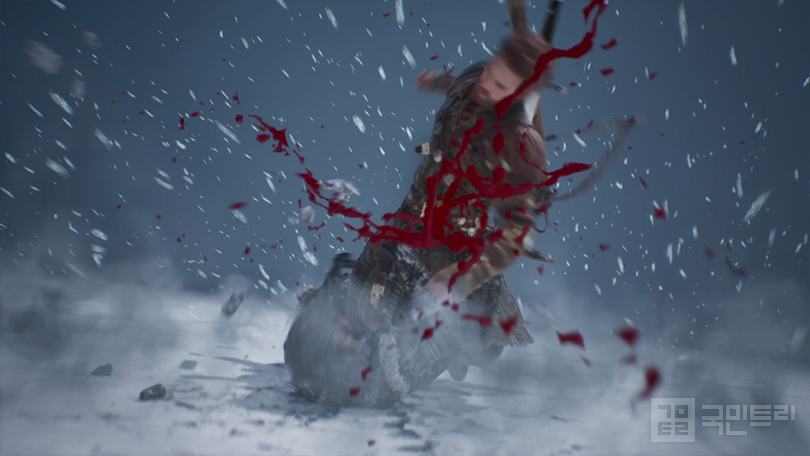
As we mentioned, the Knight’s lifeblood is dumping everything during that 'Fighting Spirit' window. [Inspiring Shout] is the starter pistol for that race. It grants a flat 20% skill damage boost, and with the 'Advance' Imprint, you’re handing out a 10% Crit Rate and 30% Crit Damage buff to your entire party. Toss in the 'Elevation' specialization for an extra 10% Crit Rate, and it’s a no-brainer in an era where crit stats are hard to come by on gear.
But the real magic of [Inspiring Shout] lies in its enhancement. Pop it, and you instantly trigger 'Fighting Spirit', letting you skip the tedious chore of stacking Valor manually. Oh, and it shreds nearby enemies' defense by 30%—it’s essentially giving your damage output a set of wings.
![[사기 진작]을 사용할 생각이려만 각인으로 반드시 강화하자 (사진: 국민트리 촬영)](https://cdn.gamemeca.com/trees/0001/776/095/gm602052_260605_01_03.jpg)
75% pick rate: The finisher [Gathering Thrust]
[Gathering Thrust] is the closing act for the Greatsword rotation. On its own, the base damage looks a bit underwhelming compared to [Continuous Slash]. However, once you pile on the 'Pain Amplification' Imprint and 'Burning Strike' specialization, it hits like a freight train.
The 'Pain Amplification' Imprint is the star here, boosting damage against Burning or Bleeding targets by 15%. The real kicker? It stacks. If you’ve managed to get both status effects on a target, that’s a 30% damage spike. Add the extra damage from 'Burning Strike' against burning enemies, and you’ve got yourself a proper, devastating blow.
30% pick rate: The Groggy specialist [Shoulder Check]
[Shoulder Check] isn't winning any awards for raw DPS. However, it’s accessible early and brings solid Groggy damage to the table—provided you commit to the 'Destruction' Imprint and 'Weakness Analysis' specialization. Fun fact: at level 3 specialization, [Shoulder Check] makes your subsequent [Gathering Thrust] hit even harder against Groggy foes.
30% pick rate: The utility launcher [Helmet Breaker]
[Helmet Breaker] is handy early on for stunning minor mobs, but since Elite and Boss-level enemies are largely immune to stuns, its usefulness falls off a cliff in the late game. Its only real purpose now is acting as a setup for [Continuous Slash].
You can use it to apply Bleed, use the 'Dizzy' Imprint to shred enemy attack and defense, and leverage the 'Condemnation' specialization to boost [Continuous Slash] damage. It's an option, sure, but it’s nowhere near as efficient as the [Inspiring Shout] - [Continuous Slash] - [Gathering Thrust] loop.
5% pick rate: The neglected [Pounding]
[Pounding] grabs a foe and leaves them defenseless while dishing out damage that rivals [Continuous Slash]. The problem? It’s useless against Elite or Boss-tier enemies, who aren't easily coerced into being 'defenseless'.
Sure, the 'Overpower' specialization gives your Greatsword a 15% damage boost after use, but wasting a precious skill slot for such a minor gain is, quite frankly, a bit daft. Still, the animation is flashy—use it if you're feeling fancy and have time to kill.
'왕좌의 게임: 킹스로드'에서 기사는 스킬을 연계해 순간적인 폭딜을 주는 클래스로, 고유 효과 ‘투지’가 이를 뒷받침한다. ‘용맹’을 중첩해 발동하는 투지 효과는 스킬의 분노 소모량을 20% 줄이고, 스킬 피해량은 25% 올린다. 따라서, 투지 효과가 유지되는 동안 스킬을 몰아쳐야 최고의 효율을 뽑아낼 수 있다.
그렇다면 어떤 스킬을 써야 폭딜이 가능할까? 이 질문에 답하기 위해 먼저 기사의 무기 중 ‘양손 대검’의 스킬 선호도를 조사했다. 조사 대상은 정예 은신처 랭킹에 오른 기사 클래스 20명이며, 추후 선호도가 변경될 수 있으니 참고하자.
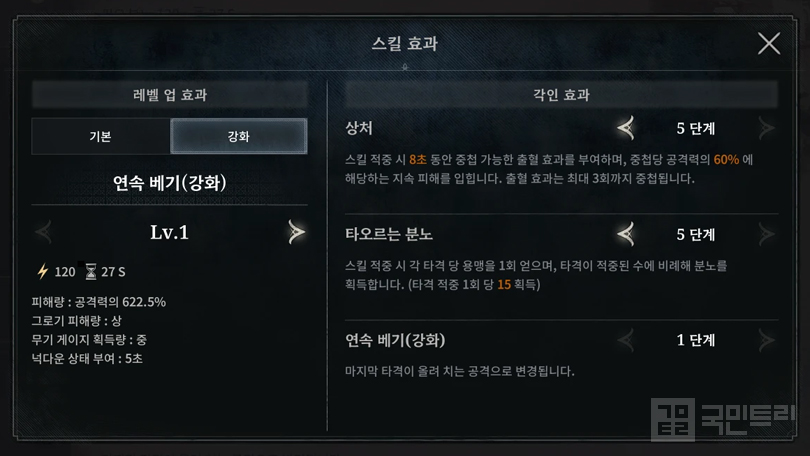
선호도 90%, 기본이 탄탄한 [연속 베기]
[연속 베기]는 1레벨 기준 피해량이 공격력의 440%로, 기사가 보유한 스킬 중 가장 높다. 각인 효과로 강화하면 최대 622.5%까지 증가한다. 이러한 이유로 대다수의 기사가 [연속 베기]를 선호한다.
‘열상’ 특화로 적에게 출혈을 부여할 뿐더러, 출혈 상태의 적에게 주는 피해량을 증가시킬 수 있어 특화 포인트의 효율이 좋다. 더불어 출혈을 부여하는 기능은 후술할 [모아 찌르기]와 궁합이 잘 맞는다.
선호도 75%, 스킬 연계의 시작 [사기 진작]
앞서 투지 상태에서 스킬을 몰아치는 게 기사의 전투 방식이라 설명했다. 그 포문을 여는 스킬이 [사기 진작]이다. 기본적으로 자신의 스킬 피해량을 20% 올리고, ‘진격’ 각인으로 자신과 파티원 전원에게 치명타 확률 10%, 치명타 피해량 30% 증가 버프를 제공한다. 여기에 ‘고양’ 특화로 자신의 치명타 확률을 10% 더 올릴 수 있다. 장비로 얻는 치명타 확률이 낮은 현시점에서 효율이 높을 수밖에 없다.
하지만, [사기 진작]의 진면모는 강화 효과에 있다. [사기 진작]을 사용하는 즉시, 투지 상태로 만들어 주기 때문에 바로 폭딜이 가능하다. 즉, 불필요하게 콤보로 용맹을 중첩할 필요가 없다. 더불어 주변 적의 방어력을 30% 감소시키는 효과는 호랑이에게 날개를 달아주는 셈이다.
선호도 75%, 스킬 연계의 마무리 [모아 찌르기]
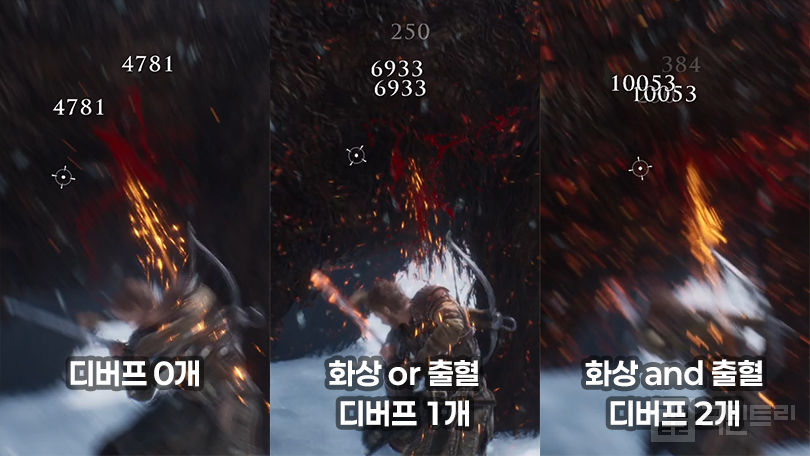
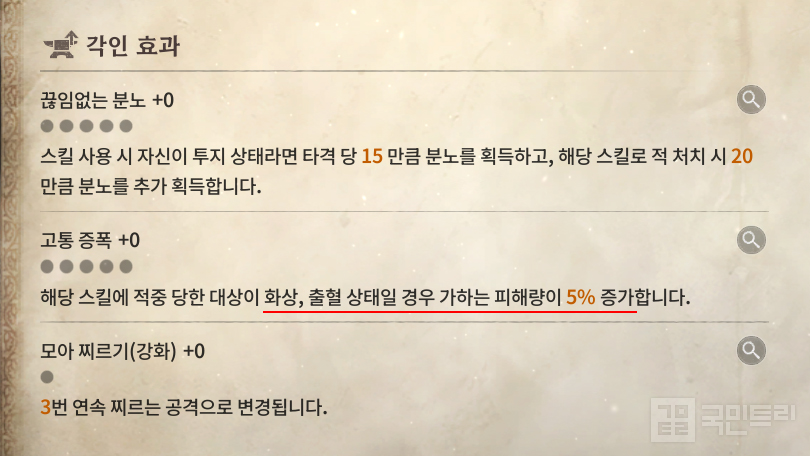
[모아 찌르기]는 양손 대검 스킬 연계의 피날레를 장식하는 스킬이다. 일단 기본 피해량은 앞서 설명한 [연속 베기]에 비해 낮다. 그러나 ‘고통 증폭’ 각인과 ‘불타는 일격’ 특화, 강화를 투자하면 [연속 베기]보다 높은 피해량을 가진 스킬로 변한다.
먼저 ‘고통 증폭’ 각인은 화상, 또는 출혈 상태의 적에게 주는 피해량이 15% 증가한다. 이 각인의 가장 큰 장점은 중첩이 된다는 사실이다. 대상에게 출혈과 화상이 모두 걸려있다면 주는 피해량이 30%로 뻥튀기된다. 여기에 ‘불타는 일격’ 특화의 화상 상태 적에게 추가 피해가 더해지면 명실상부 강력한 한 방이 완성된다.
선호도 30%, 그로기 피해 특화 [어깨 밀치기]
[어깨 밀치기]는 앞서 설명한 스킬에 비해 피해량 측면에서 강점이 없다. 대신, 처음부터 사용할 수 있어 익숙하고, 상대적으로 높은 그로기 피해를 줄 수 있단 장점을 가진다. 물론, 이를 위해서는 ‘파괴’ 각인과 ‘약점 파악’ 특화를 모두 투자해야만 한다. 참고로 약점 파악 특화 3레벨을 투자한 [어깨 밀치기]를 사용하면, 그로기 상태의 적에게 [모아 찌르기]를 더 강하게 쓸 수 있다.
선호도 30%, 발사대 역할의 [투구 깨기]
[투구 깨기]는 일반 등급의 적을 기절시킬 수 있어 초반에 유용하다. 하지만, 정예나 보스 등급의 적은 기절이 불가능해 후반부 전투에서는 효율이 급감한다. 그나마 [연속 베기]의 발사대가 되는 방향이 유일한 활용 방법이다.
먼저 스킬 강화 옵션으로 피격된 적을 출혈 상태로 만든다. ‘현기증’ 각인으로 대상의 공격력과 방어력을 낮추고, ‘단죄’ 특화로 출혈 상태의 적에게 [연속 베기]의 피해량을 높인다. 이러한 방향으로 [연속 베기]를 보다 강하게 사용할 수는 있으나, 앞서 설명한 [사기 진작] - [연소 베기] - [모아 찌르기] 연계에 비해 효율이 떨어지니 참고하자.
선호도 5%, 버림받은 스킬 [파운딩]
[파운딩]은 적을 붙잡아 무방비 상태로 만들고 큰 피해를 준다. [연속 베기] 다음으로 높은 피해량을 자랑한다. 단, 정예 및 보스 등급의 적에게 효율이 급감하는 게 문제다. 심지어 정예 및 보스 등급의 적은 무방비 상태로도 만들 수 없다.
비록 ‘압도’ 특화로 [파운딩]을 사용한 다음 양손 대검의 피해량을 15% 높일 수 있지만, 이 작은 효과를 위해 스킬 슬롯을 사용하는 건 낭비에 가깝다. 다만, 연출만큼은 일품이니 심심할 때 사용하도록 하자.

-
 A Complete Guide to the Red Moon Eve Event Celebrating the Launch of 'Vampir' Global 2
-
 [Ancient Citadel Ranking] Massive Guild Migration for Raven 2 Server Transfer
-
 Arthdal Chronicles: Unlocking Your Hidden Combat Power with Talent Points and Treasure Chests
-
 [Sol: Enchant Tips] Conquer the 'Trial of the Gods' to obtain the new God Armor
- Shoulder to shoulder with Ronaldo, Faker named Esports World Cup ambassador
- Dplus KIA Admits Salary Delays, Confirms Club Sale in Progress
- Catch! Teenieping Arrives in KartRider Rush+ Collaboration
- Learn card games at the station, 'Pokémon Mega Festa' kicks off in Busan
- GTA 6 Estimated to Have Earned $260 Million in Pre-orders Within 3 Weeks
- FromSoftware's new title 'The Duskbloods' to hold test in August
- Simultaneous Launch of Skins and Apparel, PUBG Mobile Collaborates with Musinsa
- SOOP and Gen.G to Host '2026 League of Legends Myeolmangjeon with Gen.G' on the 19th
- Steam Reveals First Half 2027 Sale Schedule Including Seasonal Discounts and Next Fest
- VCT Pacific Stage 2, Gen.G secures sole lead with two consecutive wins