

[Game of Thrones: Kingsroad Tips] Recommended House Sigil Board Placement
[왕좌의 게임 꿀팁] 가문 휘장 보드 추천 배치 방법

In Game of Thrones: Kingsroad, the 'House Sigils' are more than mere aesthetic choices; they are vital collection items that boost your stats. By slotting these into your 'Support Board', you can generate Momentum and unlock bonus attributes. However, wringing the maximum efficiency out of these requires a tactical mind for managing the diplomatic relations—both friendly and hostile—between the Houses. It is a real headache for many, so KookminTree has stepped in to streamline the process.
Just keep two basic formulas in mind
You only need to master two core formulas to optimise your Support Board. First, prioritise placing 'Great House' sigils into 'x2 slots'. Since Great House sigils possess higher base Momentum than 'Vassal House' sigils, this is the most effective way to multiply your gains.
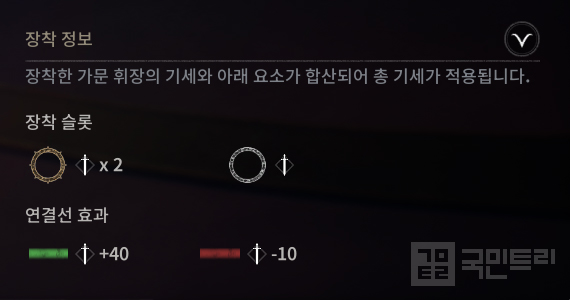
The second rule is to place friendly House sigils in connected slots. Linking allied Houses grants a sweet bonus of 40 Momentum. Conversely, connecting hostile Houses incurs a 10-point penalty. For slots with multiple connection lines, try to use sigils that have the most allies.
Note that hostility and friendship do not apply between Vassal Houses themselves. Focus your attention solely on the relationships between Great Houses, and between Great Houses and their respective vassals.
Prioritising your boards
Because a House sigil can only be used on one board at a time, you must pick your battles. The first criterion for priority is the maximum number of connected slots. For instance, the Crown Board features 6 connected slots, making it a top priority.
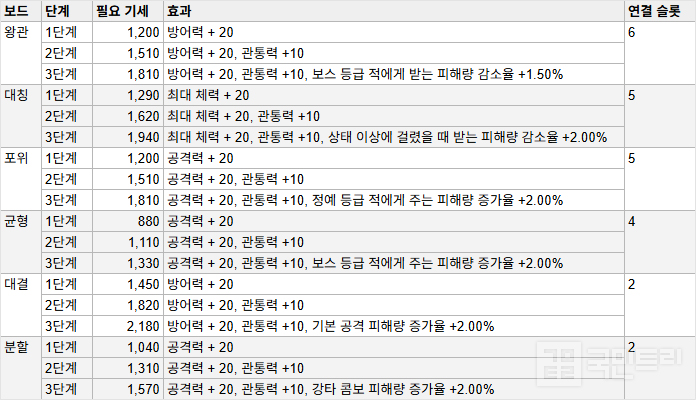
The second criterion is the bonus attributes the board provides. Choose boards that align with your build—be it Attack, Defence, or Max HP. The specific bonuses and required Momentum for each board are detailed in the table below.
Crown Board
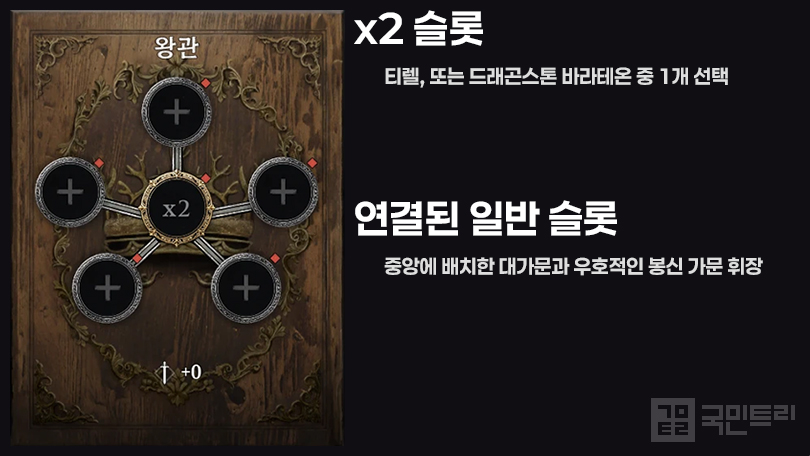
The central x2 slot on the Crown Board boasts 5 connection lines, the highest available. Following our basic formula, I recommend the 'Tyrell' or 'Dragonstone Baratheon' sigils here. While other Great Houses will fit, you will notice a slight drop in overall efficiency.
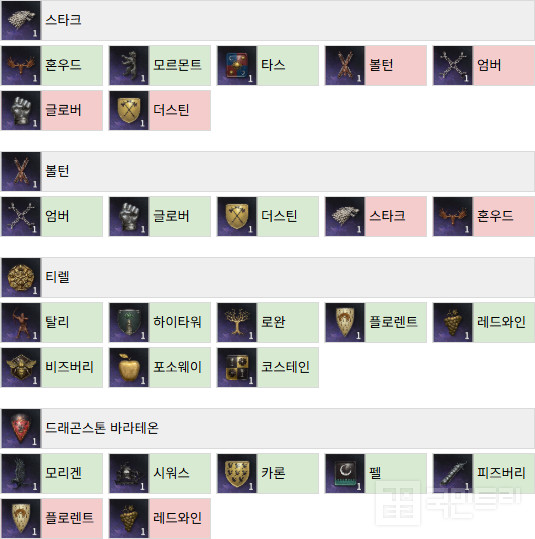
If you choose Tyrell, fill the remaining slots with five from the Tarly, Hightower, Rowan, Florent, Redwyne, Beesbury, Fossoway, or Costayne houses. If you go with Dragonstone Baratheon in the centre, follow up with Morigen, Chyttering, Caron, Peake, or Beesbury.
Symmetry Board
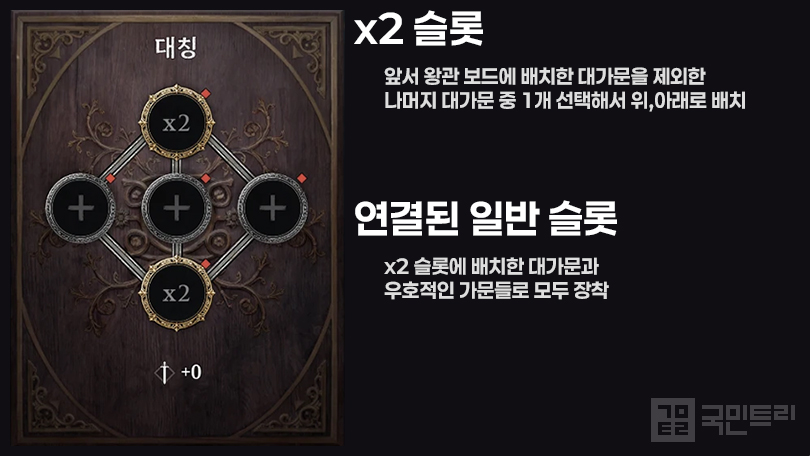
The Symmetry Board features two x2 slots at the top and bottom, connected by three standard slots. You must ensure that the same Great House sigil is placed in both x2 slots.Choose a Great House other than the ones used for the Crown Board. Then, fill the standard slots with compatible vassal sigils to squeeze out every bit of efficiency.
Siege Board
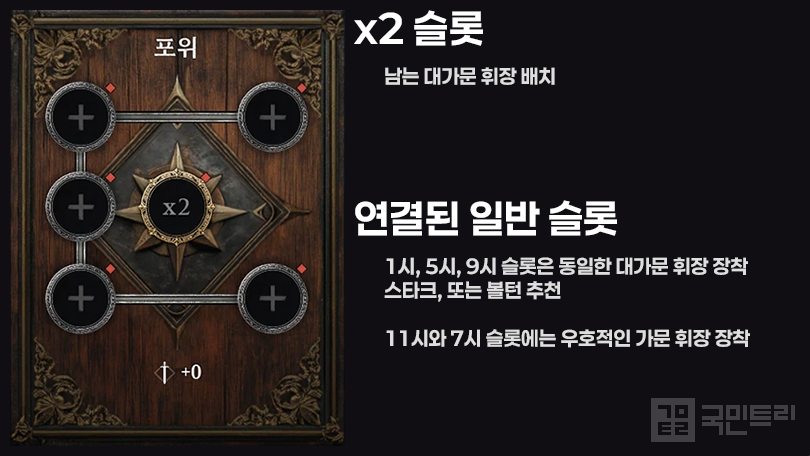
There are 12 Great House sigils in total, and the Siege Board has 8 x2 slots. This leaves 4 Great House sigils to spare, which are perfect for the Siege Board’s standard slots. Plus, the bonus attribute here is 'Increased Damage to Elite Enemies', making it a solid choice for investment.
Place the same Great House sigil at the 1, 5, and 9 o'clock positions. I recommend the 'Stark' or 'Bolton' houses, as they only have three friendly houses. Then, fill the empty standard slots with friendly vassal sigils. The central x2 slot has no connections, so just dump any leftover Great House sigil there.
Balance Board
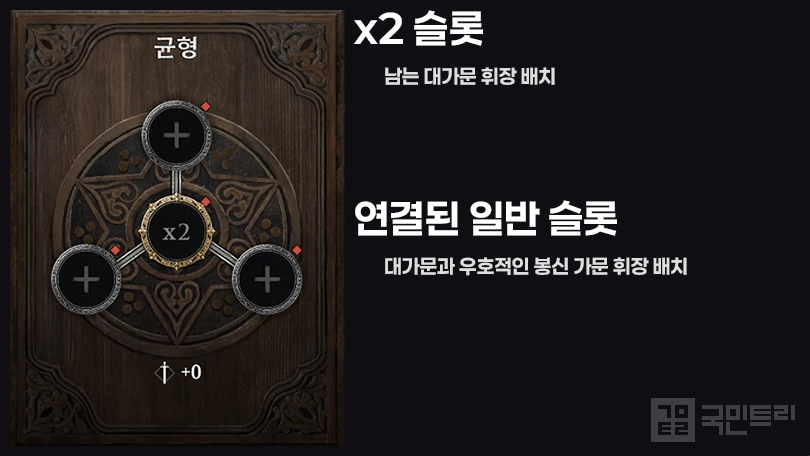
For the Balance Board's central x2 slot, any House will do. Just keep in mind that since a sigil can only be equipped on one board, you must exclude the ones already used in the Siege Board. Fill the remaining linked slots with friendly vassals.
Duel and Split Boards

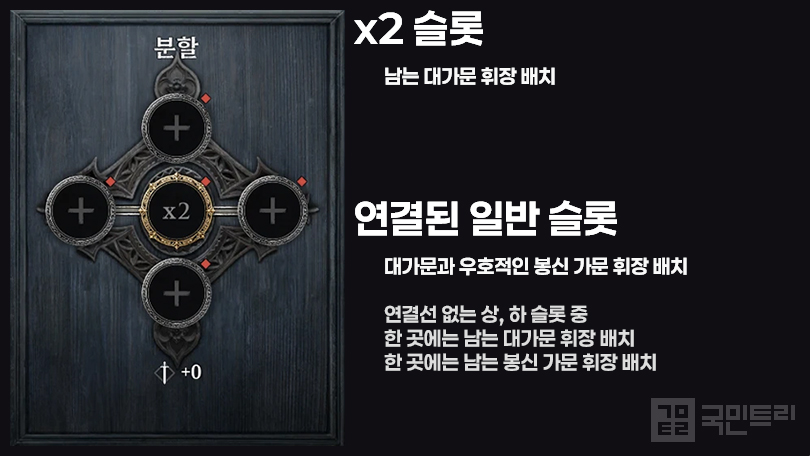
These final boards are configured with two standard slots connected to an x2 slot. Assign your remaining Great House sigils to these x2 slots and fill the standard slots with friendly vassals. If you have collected every sigil and followed the steps above, you should have one Great House sigil left over; slot that into any remaining position on the Split Board.
‘왕좌의 게임: 킹스로드’의 ‘가문 휘장’은 능력치를 올리는 수집 요소 중 하나다. 수집한 휘장을 ‘지원 보드’에 배치하면 기세와 추가 능력치까지 확보할 수 있다. 이 가문 휘장의 최고 효율을 끌어내기 위해서는 각 가문의 우호 및 적대 관계를 계산해야 한다. 많은 유저가 고민에 빠지는 부분이다. 이에 국민트리가 최적 방법을 정리했다.
기본 공식 2개만 기억하자
지원 보드는 두 가지 핵심 공식만 기억하면 누구나 막힘없이 최고 효율을 누릴 수 있다. 첫 번째는 ‘x2 슬롯’에 ‘대가문’ 휘장을 우선 배치하는 것이다. 대가문 휘장은 ‘봉신 가문’ 휘장보다 기본 기세 수치가 높아 x2 슬롯 효율을 극대화할 수 있다.
두 번째는 연결된 슬롯에는 우호적인 가문 휘장을 배치하는 것이다. 우호 가문끼리 연결하면 추가 기세를 40이나 얻는다. 반대로 적대 가문 연결 시에는 10의 페널티를 얻는다. 연결선이 여러 개 뻗은 슬롯에는 우호 가문이 많은 휘장을 활용하자.
참고로 봉신 가문끼리는 적대 및 우호가 성립하지 않는다. 대가문끼리의 관계, 그리고 대가문과 봉신 가문의 관계만 주의하자.
보드 우선 순위 판단
가문 휘장은 하나의 보드에만 쓸 수 있으므로 선택과 집중이 필요하다. 우선순위의 첫 번째 기준은 연결된 슬롯의 최대 개수다. 예를 들어 왕관 보드는 연결된 슬롯 개수가 총 6개이므로 우선순위가 가장 높다.
두 번째 기준은 보드가 제공하는 추가 능력치다. 자신의 능력치 구성에 따라 공격력이나 방어력, 최대 체력 등의 보드를 선택하자. 보드마다 제공하는 추가 능력치와 요구 기세는 아래 표와 같다.
왕관 보드
왕관 보드의 중앙 x2 슬롯은 연결선이 5개로 가장 많다. 앞서 설명한 기본 공식을 대입하면 이 슬롯에는 ‘티렐’과 ‘드래곤스톤 바라테온’ 가문의 휘장을 추천한다. 다른 대가문의 휘장을 넣어도 큰 문제는 없지만, 효율이 다소 떨어진다.
티렐을 선택했다면 나머지 슬롯에는 탈리, 하이타워, 로완, 플로렌트, 레드와인, 비즈버리, 포소웨이, 코스테인 중 5개를 배치하면 된다. 만약, 드래곤스톤 바라테온 가문을 중앙에 넣었다면 모리겐, 시워스, 카론, 펠, 피즈버리가 뒤따라야 한다.
대칭 보드
대칭 보드는 위, 아래에 x2 슬롯이 2개 있고, 이 사이에 일반 슬롯 3개가 연결되어 있다. x2 슬롯에는 반드시 동일한 대가문 휘장을 넣어야 한다. 앞서 왕관 보드에서 선택한 가문을 제외한 나머지 가문 중 하나를 선택해서 배치하자. 그리고 일반 슬롯에 우호적인 봉신 가문을 통일해서 장착하면 효율을 추구할 수 있다.
포위 보드
대가문 휘장은 총 12개고 보드의 x2 슬롯은 모두 8개다. 결국 4개의 대가문 휘장이 남게 되는데, 이를 포위 보드의 일반 슬롯에 사용하면 효과적이다. 마침, 포위 보드의 추가 능력치가 ‘정예 등급 적에게 주는 피해량 증가율’이어서 투자 가치도 높다.
우선 1시, 5시, 9시 방향에 동일한 대가문 휘장을 둔다. 우호적인 가문이 3개뿐인 ‘스타크’나 ‘볼턴’ 가문을 추천한다. 이후 빈 일반 슬롯에는 우호적인 봉신 가문 휘장을 두면 된다. 중앙의 x2 슬롯은 연결선이 없으므로 추후 남는 대가문 휘장을 할당하자.
균형 보드
균형 보드의 중앙 x2 슬롯은 어느 가문을 선택해도 무방하다. 다만, 가문 휘장은 하나의 보드에만 배치할 수 있으므로, 앞서 설명한 포위 보드의 일반 슬롯에 사용한 대가문 휘장은 제외하자. 이후 연결된 일반 슬롯에는 우호적인 봉신 가문으로 도배하면 된다.
대결, 분할 보드
마지막 보드는 모두 x2 슬롯에 2개의 일반 슬롯이 연결된 구성이다. 앞서 보드에 장착하고 남은 대가문 휘장을 x2 슬롯에 할당하고, 일반 슬롯에는 우호적인 봉신 가문을 두면 된다. 모든 가문 휘장을 수집하고 위 과정을 모두 따라왔다면 대가문 휘장이 하나 남을 텐데, 이건 분할 보드의 상단이나 하단 남는 슬롯에 넣으면 된다.






- Already the third time, Overwatch x LE SSERAFIM detailed look revealed
- Animo Prepares to Open Special No Brand Burger Store Ahead of Launch
- Popup events to be held in Dongdaemun and Yongsan to celebrate the release of Liftbound
- GTA 6 Online to support up to 32 players, confirmed through lawsuit documents
- Doomfist's Companion, Overwatch Vampire New Hero 'Doctrine'
- Restart of the Storm of the Void, Xal'atath comes to Heroes of the Storm
- Deepening Crisis in Snezhnaya, Genshin Impact Version 7.1 Starts on the 23rd
- [Today's steam] Normalized new FPS Wardogs surpasses 420,000 Concurrent Players
- A Magnificent Two-Consecutive-Championship Feat, The Protagonist of 2026 LCK is Gen.G
- Gathering Cheonhwi and Slowly Falling for the Charm of 'Animo'





