

[Meca Ranking] SKRB Arena Meta's Focal Point 'Yoon Geon and Dong Young'
[메카 랭킹] 세나 리버스 결투장 메타의 구심점 '윤건·동영'

Look, let's be honest, it is time for another SKRB Meca Ranking. The air in the Arena has completely shifted ever since Yungeon arrived, hasn't it? Offensive parties built around the developer's new favourite character have basically taken over as the new meta. In the very first week, the character found a lot more homes in offensive compositions rather than tuned-up magic setups. But now, with another week behind us, magic-type party pick rates have edged slightly ahead. Let us dive into the nitty-gritty of these shifts alongside the Arena team composition stats.
Magic-type hero pick rates rise together alongside Yungeon and Dongyoung
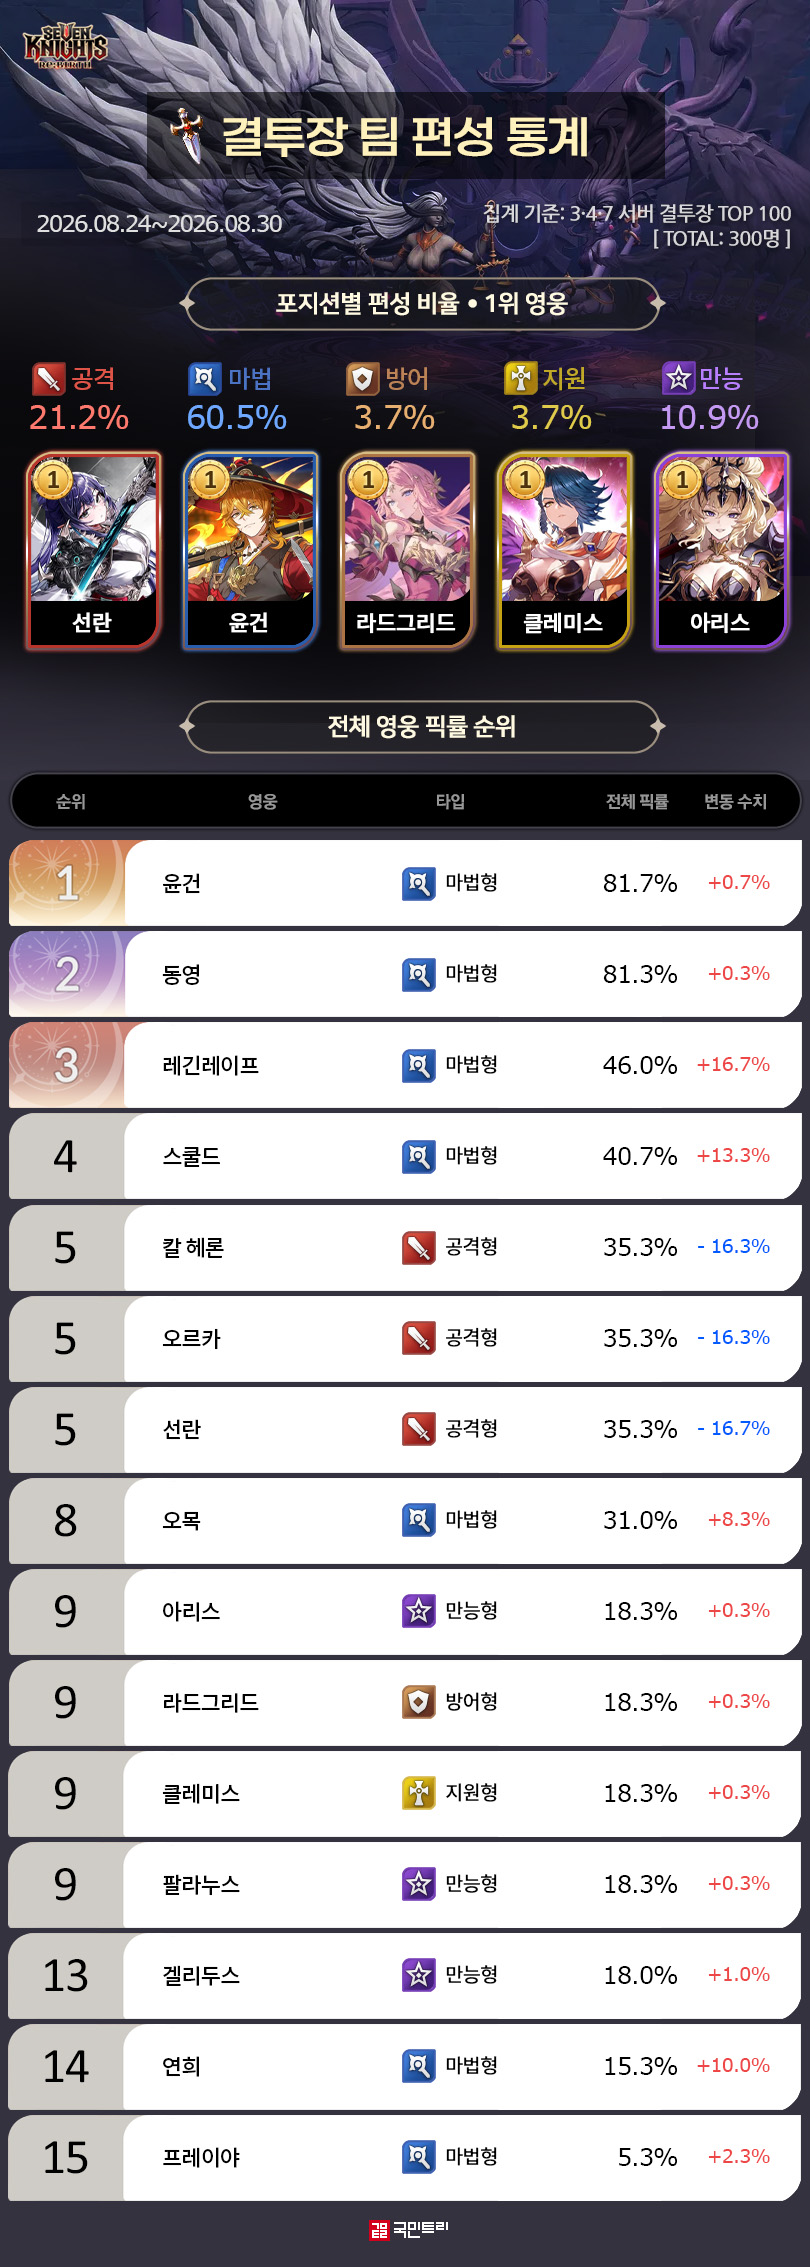
Yungeon completely shattered the Arena balance upon arrival, holding steady at the number one spot for overall pick rates. Since the debut pick rate was already through the roof, it only inched up by a modest 0.7 percentage points, but the character's sheer influence over the Arena feels heavier than ever. We are looking at a soaring run in the 80% bracket for two weeks straight, with the runner-up Dongyoung tagging along nicely at 81.3% to form a proper duo with Yungeon.
Positions 3 through 8 are claimed by the supporting cast who share the spotlight with the main stars. This gives us a neat little peek into the ratios between offensive and magic formations. With the magic-type Reginleif hitting 46% and the offensive-type Sunran sitting at 35.3%, it is pretty clear that magic setups hold a slightly higher share. The offensive formations that took an early lead during Yungeon's launch week have officially given up the throne to magic formations, trading roughly 16 percentage points in pick rates.
While magic and offensive formations are busy tearing each other apart in brutal skirmishes, defensive formations are standing tall with a respectable 18.3% pick rate. None of the shiny new South Korean heroes—Yungeon, Dongyoung, or Sunran—fit into their game plan, yet the defensive crew is holding the line admirably. Each individual hero boasts massive stat pools and top-tier team synergy, guaranteeing a decent win rate even when bumping into a Yungeon party.
A magic meta where mind games over pre-scheduled skills and speed tuning are everything
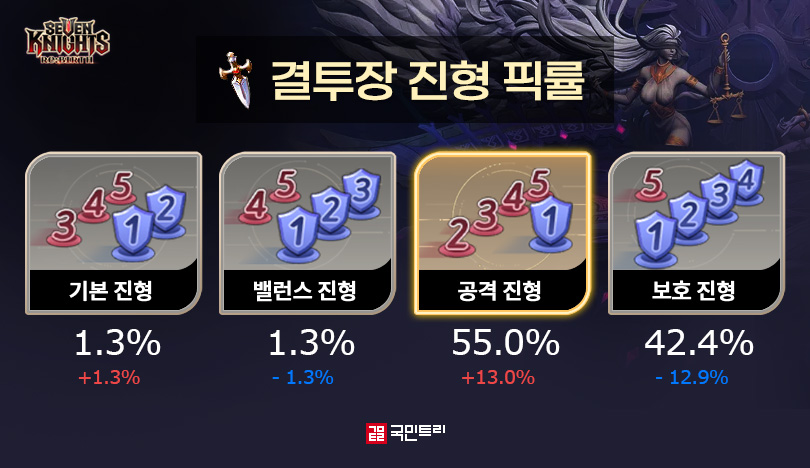
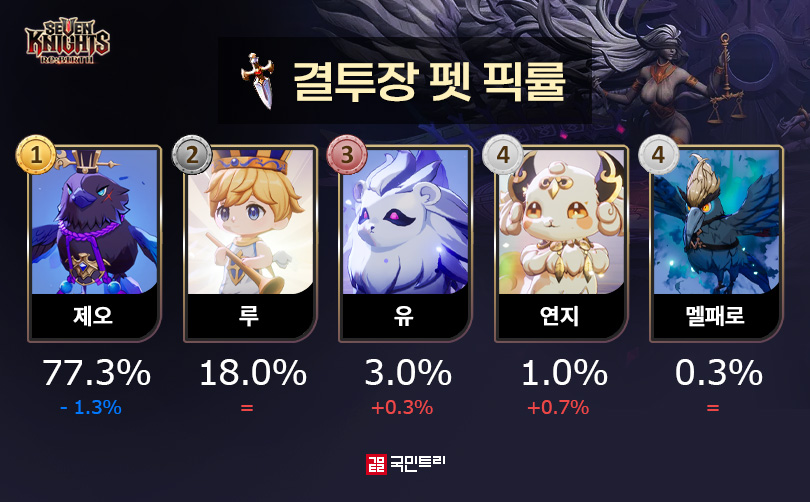

Arena formation choices have essentially narrowed down to just two: Offensive and Protective formations. Right now, the Offensive formation—which defensive teams also love to dabble in—is gathering a bit more weight. Because the strategic approaches of the two formations clash so drastically, pick rate fluctuations are bound to be quite wild. The best pick we want to zoom in on today is the magic team rocking the Offensive formation.
Right now, magic rankers are losing sleep over two main headaches: reserved skill sequences and Yungeon's exact positioning. The former splits players into two distinct camps: one opening with Yungeon's skill, and the other reserving Skuld's second skill to delay the enemy's cooldowns first. Since both strategies have distinct pros and cons depending on the opponent, matches often come down to a cheeky bit of luck.
As for Yungeon's placement, the prevailing trend is sticking the character right at the front of the Offensive formation. This crafty trick prevents Yungeon's survival passive from getting stripped away by Sunran's opening backline AoE blast when running into mirror matches. Here, Dongyoung's team-wide buff granting one turn of damage immunity becomes exceptionally crucial. Because the exact timing of when that effect wears off can make or break the match, it demands some seriously precise speed tuning. In short, today's magic meta is an absolute chess match governed by matchups and fine-tuned gear.
Advanced Arena Defense Team Pick Rate Analysis
※ Advanced Arena defense team pick rates were tallied as of September 2 at 10:00 AM.
※ The stats aggregate the defense team setups of the top 100 players in the Upper Ranking tab.
※ These figures may slightly differ from current defense team setups in-game.
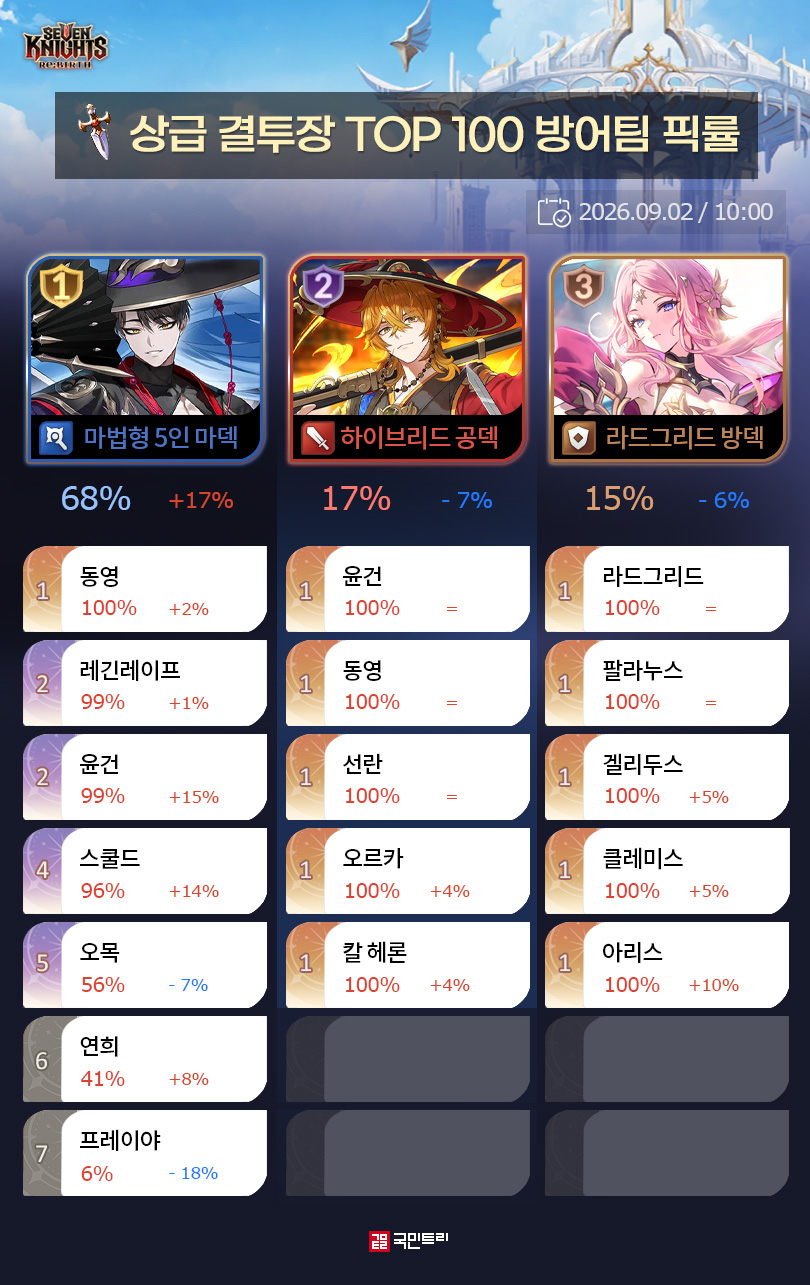
With the event season wrapped up, the Advanced Arena is practically identical to the standard Arena meta at this point. The pick rate graphs followed the exact same trajectory we broke down earlier. Aside from a slightly higher concentration of magic setups, there is nothing particularly groundbreaking about the compositions. A five-hero magic party leads the pack at 68%, followed by the hybrid party known as the Yungeon offensive team at 17%, and defensive teams rounding things out at 15%.
As you can tell from the top three party pick rates adding up to a neat 100%, there simply are no other rogue decks out there. Even right on the doorstep of the seasonal reset, players are wrapping things up without a single surprise twist. It is a stark contrast to the old days when instant-death decks used to act as chaotic wildcards, implying that instant-death strategies just cannot keep up with the current Yungeon-centric meta.
This Week's Clear Decks
Trial Tower Floor 7, 6-Medal Clear
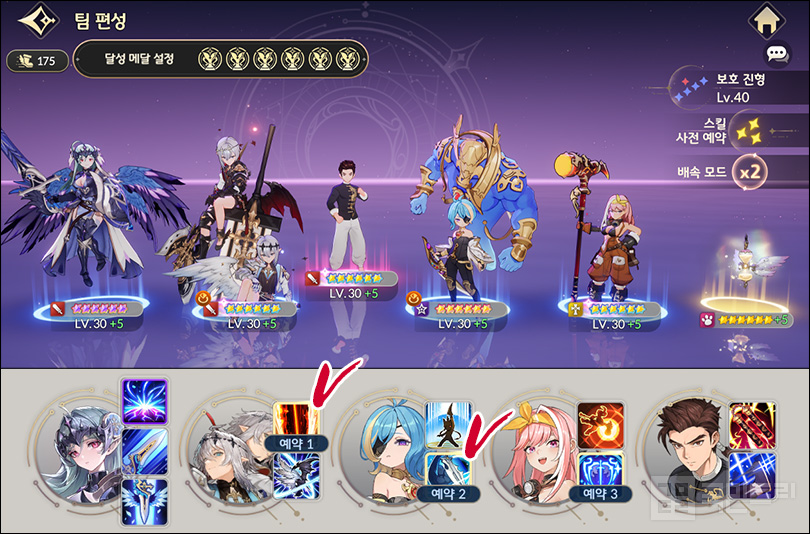
Following the previous update, the developers decided to seriously buff the clear rewards for the Trial Tower. Naturally, that meant the difficulty went up a notch as well. While the tower still caps out at 10 floors just like before, the allure of collecting those medals got a massive glow-up. Every single tier now hands out Tuning Stones, and reaching 50 medals bags you a Four-Star Legendary Accessory Box. Naturally, guides for this mode are currently trending hard.
Hands down, the absolute most annoying floor giving players grief is Floor 7. The objective is simple enough: take down the level 150 Chancellor in the backline and you win. The catch? Chancellor's passive skill, Intimidation. The core effect deals a punishing 3,000 fixed damage to your entire team every time a non-Chancellor enemy bites the dust. In other words, wiping out anyone other than Chancellor triggers a devastating wave of counter-damage. Surviving that onslaught is basically impossible, making laser-focused attacks on Chancellor the golden rule of this stage.
To set up this ideal hunting environment, the developers of the strategy recommend bringing Branz & Bransel alongside Asura. The first step involves using Branz & Bransel's second skill to whittle down Chancellor's health from the backline. This tricks the AI into triggering weak-point attacks that automatically lock onto the enemy with the lowest HP. From there, you just slap Concentrated Attack on Chancellor using Asura and funnel all single-target abilities right into the boss to finish the job.
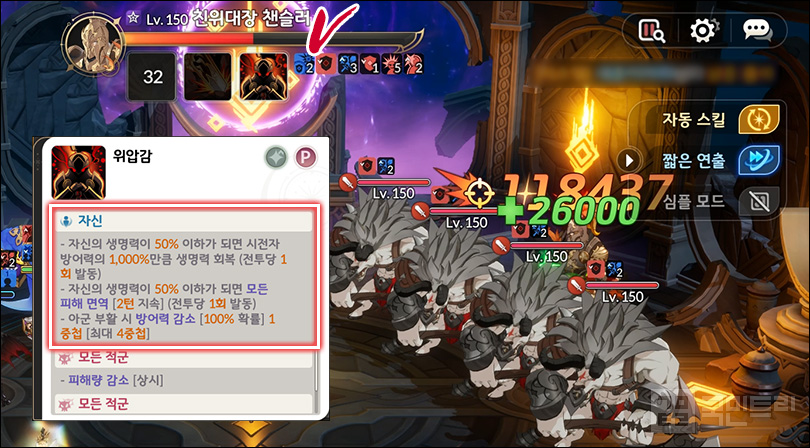
Of course, if it were that simple, we wouldn't be talking about it—there is a sneaky twist midway through. Once Chancellor's HP dips to 50% or lower, a self-buff granting two turns of complete damage immunity pops up. When this happens, you will need to rely on Hebienia's Fierce Attack or pull out Branz & Bransel's Salvation Attack once more to strip away those turn-based buffs. Just make sure your Concentrated Attack doesn't drop off during this crucial window, or your run is going south in a hurry. Best of luck out there, mate!
'세븐나이츠 리버스(이하 세나 리버스)' 메카 랭킹 시간입니다. '윤건' 출시 후 결투장의 공기가 바뀌었죠. 그를 중심으로 편성한 공격형 파티가 대세로 떠올랐습니다. 출시 첫 주에는 포지션을 맞춘 마법형 파티보다 공격형에서 더 많이 찾는 추세였죠. 일주일이 더 지난 지금은 마덱 편성 픽률이 소폭 더 앞서는 모양새입니다. 상세 변화를 결투장 팀 편성 통계와 함께 살펴보시죠.
'윤건·동영'과 함께 마법형 영웅 픽률 동반 상승
결투장 균형을 깨고 등장한 윤건이 전체 픽률 1위를 유지했습니다. 첫 픽률이 워낙 높았던 탓에 0.7% 포인트 소폭 상승에 그쳤지만, 결투장의 영향력은 더욱 커진 느낌이네요. 2주 연속 80%대 고공행진을 이어갔고, 2위 '동영'도 81.3%로 윤건과 함께 세트를 이뤘습니다.
3위부터 8위까지는 그와 함께 활약한 멤버들이 자리 잡았습니다. 이를 통해 공덱과 마덱 비율을 유추할 수 있죠. 마법형인 '레긴레이프'가 46%, 공격형인 '선란'이 35.3%를 달성했으니 마덱 비중이 약간 더 높았음을 알 수 있습니다. 윤건 출시 첫 주에 앞서 나갔던 공덱이 마덱에게 역전을 허용했군요. 약 16% 포인트 가량 픽률을 교환했습니다.
마덱과 공덱이 치열한 공방전을 치르는 와중, 방덱은 18.3% 픽률을 고고히 유지했습니다. 한국형 최신 영웅인 '윤건·동영·선란' 어느 것 하나 활용할 수 없지만, 선방했다고 할 수 있죠. 영웅 하나하나의 체급 자체가 높고, 조합 완성도가 뛰어난 편이라 윤건 파티를 만나도 어느 정도 승률을 보장합니다.
'예약 스킬·속공 조절' 수 싸움 중요한 마덱 메타
결투장 진형 픽률은 공격과 보호 진형 2개로 압축된 상태입니다. 여기서 방덱도 즐겨 쓰는 '공격 진형'에 조금 더 무게가 실리는 양상이네요. 두 진형의 전략이 극명하게 나뉘는 편이라 픽률 변동이 다소 큽니다. 여기서 좀 더 깊이 분석할 베스트 픽은 공격 진형을 채택한 마덱이죠.
현재 마덱 랭커들의 고민은 예약 스킬 순서와 윤건의 위치입니다. 전자는 윤건 스킬로 오프닝을 여는 것과 '스쿨드'의 2스킬 예약, 즉, 상대 스킬 쿨타임 증가를 먼저 거는 스타일로 나뉘죠. 두 전략이 만나는 덱에 따라 장단점이 나뉘므로 어느 정도 운에 맡기는 경향도 있습니다.
윤건의 위치는 공격 진형 앞에 배치하는 것이 대세입니다. 윤건 공덱을 만나면 전투 초반 선란의 후열 광역 공격에 윤건의 생존기가 빠지는 것을 피하기 위함이죠. 이때는 동영의 아군 버프인 피해 면역 1턴이 중요합니다. 해당 효과가 사라지는 타이밍이 중요하므로, 정교한 속공 세팅을 요구하죠. 이런 식으로 현재 마덱은 매칭과 세팅에 따른 수 싸움이 치열하게 오가고 있습니다.
상급 결투장 방어팀 픽률 분석
※ 상급 결투장 방어팀 픽률은 9월 2일 오전 10시 집계 결과입니다.
※ '상위 랭킹' 탭 100명의 방어팀 편성을 집계합니다.
※ 현재 방어팀 정보와 일부 차이가 있을 수 있습니다.
이벤트 시즌이 끝난 상급 결투장은 사실상 결투장 메타와 다를 바가 없죠. 앞서 분석한 결투장과 같은 흐름으로 픽률 그래프가 움직였습니다. 마덱 비중이 조금 더 높은 것 외에는 편성에서도 특별히 다른 점이 없죠. 마법형 5인 마덱이 68%로 선두에 섰고, 이른바 '윤건 공덱'인 하이브리드 파티가 17%, 방덱이 15% 픽률을 기록했습니다.
3파티 픽률 합계가 100%로 딱 떨어지는 것에서 알 수 있듯, 해당 파티 외에는 다른 덱이 없었습니다. 시즌 결산 직전인데도 별다른 특이점 없이 마무리를 짓는 중이죠. 과거 '즉사덱'이 변수로 작용하던 것과는 사뭇 다른 모습입니다. 즉사덱은 현재 윤건 중심의 메타에 뛰어들만한 적수가 아니라는 의미로 풀이됩니다.
금주의 클리어 덱
시련의 탑 7층, 6메달 클리어
지난 업데이트에 시련의 탑 클리어 보상을 대폭 상향했죠. 이에 콘텐츠 클리어난도도 약간 올랐습니다. 꼭대기가 10층인 것은 기존과 같으나 달성 메달 보상의 메리트를 강화했죠. 모든 단계 '조율석'을 제공하고, 메달 50개 달성 시, '4성 전설 장신구 상자'도 챙길 수 있습니다. 이에 관련 공략이 큰 인기죠.
여기서 가장 까다로운 층으로 손꼽히는 곳이 바로 7층입니다. 후열의 150레벨 '챈슬러'를 쓰러트리면 끝인 곳인데요, 문제는 그의 패시브 스킬 '위압감'입니다. 핵심 효과는 아군 사망 시, 3,000의 고정 피해를 적 전체에 가하는 것이죠. 즉, 챈슬러 외에 다른 적을 쓰러트릴 때마다 대량의 대미지가 들어오는 겁니다. 사실상 버티는 건 불가능에 가까우므로 오직 챈슬러만 공격하는 것이 공략의 핵심이죠.
이런 환경을 만들기 위해 필요한 영웅이 '브란즈&브란셀', 그리고 '아수라'입니다. 브란즈&브란셀의 2스킬 후열 공격으로 챈슬러의 체력을 깎아두는 것이 첫 단추죠. 체력이 가장 낮은 적을 타깃으로 삼는 약점 공격을 유도하기 위함입니다. 이후에는 아수라로 '집중 공격'을 걸고, 1인 타깃 공격만 집중해 챈슬러를 꺾으면 됩니다.
여기서 끝이라면 좋을 텐데, 중간에 변수가 하나 있습니다. 챈슬러의 체력이 50% 이하가 될 때, 자신에게 '모든 피해 면역' 2턴을 걸거든요. 이때는 '헤브니아'의 '맹렬한 공격'이나 앞서 사용한 브란즈&브란셀의 '구원의 공격'을 한 번 더 사용해 턴제 버프 감소를 걸면 됩니다. 이 타이밍에 집중 공격이 풀리면 공략이 어려워지니 주의하세요.


- [gamescom 26] Project Zeta, the Core is "High-Density and Sustained Combat"
- Will Miami Airport and Downtown Become 'Vice City' to Match the Release of GTA 6?
- [gamescom 26] Krafton Captures Visitors' Attention with 5 New Games
- Hanwha Life Esports, All LCK Team 2026 Selection of All Starting Players
- [gamescom 26] The World's Largest Gaming Exhibition, Gamescom in Germany Opens
- [gamescom 26] NC B2B booth features Guild Wars 3
- [Today's steam] Crimson Desert resurges with its first discount and enhanced edition
- Literally Star Wars XCOM, Zero Company Metacritic Score 86
- [gamescom 26] CDPR and SEGA Win Three Awards at Gamescom Awards
- On September 18, a Game and eSports Event to be Held at Dongdaemun DDP





