

[Game of Thrones: Kingsroad Tips] Recommended Assassin Combo for Rapid Blood Drain Stacking
[왕좌의 게임 꿀팁] 빠른 파혈 중첩을 위한 암살자 추천 콤보

The Assassin in 'Game of Thrones: Kingsroad' relies on a unique status effect known as 'Blood Drain'. While the effect itself does nothing on its own, triggering it with specific skills or combos deals damage proportional to the number of stacks currently applied. In short, the Assassin is a class built around the repetitive loop of building stacks and popping them for burst damage.
Blood Drain: Stacking methods, skills, combos, and Artifacts
Blood Drain caps at 8 stacks, with bonus damage scaling based on your count at the moment of activation. Don't fall for the trap of thinking this scales exponentially; it increases linearly by 45% per stack. There is no desperate need to hit the maximum 8 stacks every time. In fact, if you overshoot the cap, you are essentially wasting potential, so do not hesitate to trigger it even if you have fewer than 8 stacks.
Building stacks is generally done through combos, then topping off the remainder with skills to reach your target. For instance, if you use 'Ambush (Enhanced)' and 'Dagger Throw', you only need to land a combo for 4 stacks. Consult the table below for the maximum stacking potential of each skill.As a pro-tip, upgrading the high-tier legendary Artifact 'Rhaegar's Ruby' grants a chance to double your Blood Drain stacks upon application. Given that its other options are also highly effective against enemies afflicted with Blood Drain, it is a top recommendation for any Assassin player.
Recommendation 1: Dagger Combo 1 (2 stacks of Blood Drain)
Much like other classes, Dagger Combo 1 is favored for its brief animation and versatility. If you equip the 'Blood Drain' mastery, every hit from the combo's heavy strike applies a stack and deals bonus damage to afflicted targets. Since Dagger Combo 1 hits twice with heavy strikes, it nets you 2 stacks in total.
The second mastery choice depends on your playstyle or gear set. Picking 'Wrath' helps solve any lingering issues with rage recovery. On the other hand, 'Heavy Attack' leans into a more aggressive profile; not only does it boost damage, but it also prevents enemies from countering your heavy strikes. Investing here ensures enemies cannot dodge or parry, allowing for stable stack building.
As for the final mastery, neither option is particularly useful in boss encounters. If you must choose, 'Wrath' is recommended for mob fights to help spam skills. 'Amplification' boosts active skill damage, but the window is too short to be practical for killing enemies and transitioning to new targets.
Recommendation 2: Dagger Combos 2 and 3 (4 stacks of Blood Drain)
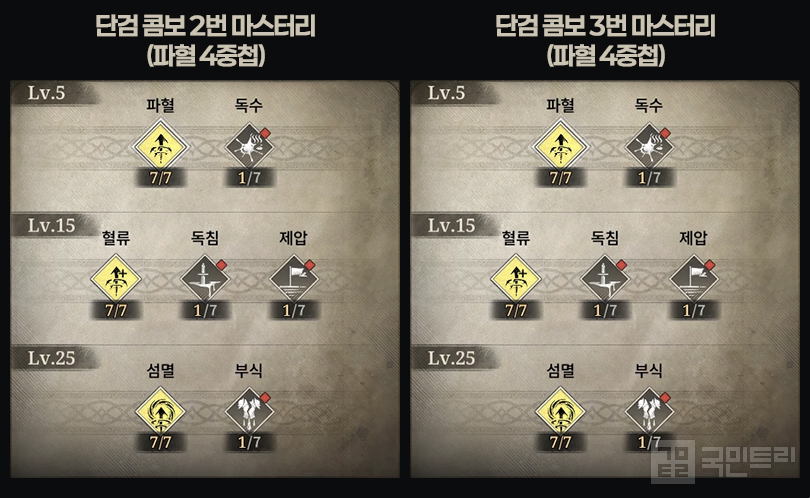
Dagger Combo 2 features more actual hits than the heavy strike input suggests, making it a perfect match for the 'Blood Drain' mastery. By investing in both 'Blood Drain' and 'Annihilation', you can apply up to 4 stacks in a single combo sequence.
Dagger Combo 3 applies stacks strictly according to the heavy strike inputs. Like the second combo, it caps at 4 stacks, but it generally outperforms in terms of damage, rage recovery, and weapon gauge acquisition. However, the animation is longer and more prone to being interrupted, so choose based on your personal preference.
Recommendation 3: Dagger Combos 2 and 3 (3 stacks of Blood Drain, Stagger damage)
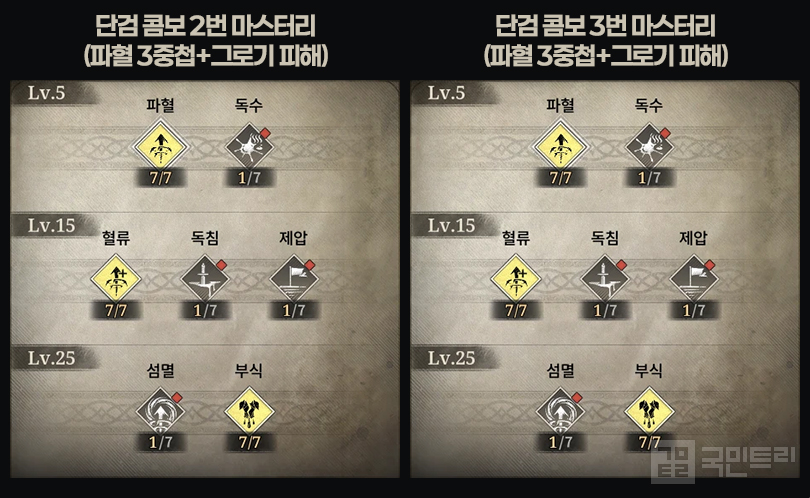

This setup involves taking the aforementioned Dagger Combos 2 and 3 but swapping the final mastery for 'Corrosion'. While this reduces your Blood Drain stacks to 3, it significantly boosts Stagger damage. Once an enemy is staggered, they are left defenseless, allowing for a steady follow-up assault. Beware, however, that this is less efficient in areas like the Altar of the Abyss or Altar of Memories, where enemies have overwhelmingly high Stagger gauges.
Bonus: Rapier Combo 1 (1 stack of Blood Drain)
The Assassin's Rapier combos feel sluggish compared to Daggers due to long animations. Combos 2 and 4 suffer from delays during the back-and-forth movement, and Combo 1 is similarly hampered by the post-hit animation, limiting its practical efficiency.
However, you can elevate the efficiency of Combo 1 by utilizing a 'Guard Cancel'. The method is simple: immediately after the final hit of Combo 1 lands, tap and release the block button. This cancels the unnecessary post-delay, allowing you to enter a guard stance momentarily before transitioning smoothly into your next attack. Check the link below for the efficiency of a Guard-Cancelled Combo 1.
※ [Game of Thrones Tips] Attack and defend at once with 'Guard Cancel' (Link)
‘왕좌의 게임: 킹스로드’의 암살자는 고유 효과 ‘파혈’을 사용한다. 파혈 그 자체는 별도의 효과가 없지만, 파혈을 터트리는 스킬이나 콤보를 사용하면 중첩에 비례한 피해를 즉시 줄 수 있다. 즉, 암살자는 파혈을 빨리 중첩하고 터트리는 걸 반복해서 피해를 주는 클래스다.
파혈 중첩 방법, 스킬, 콤보, 그리고 유물
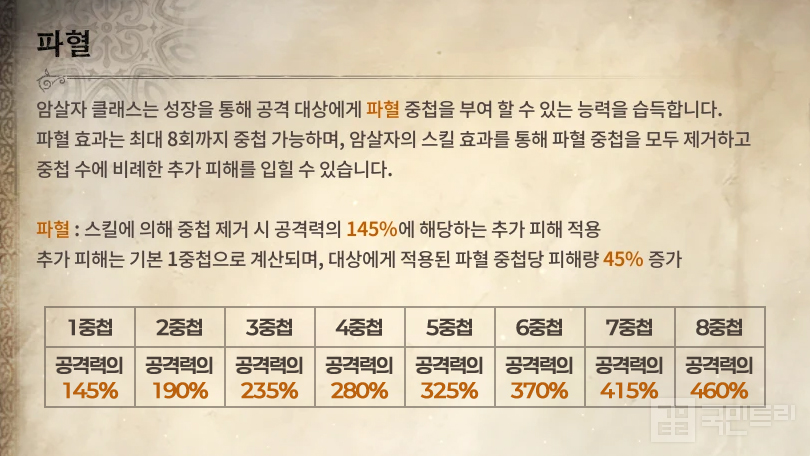
파혈은 최대 8중첩까지 가능하며, 터트릴 시점의 중첩에 따라 추가 피해가 증가한다. 추가 피해는 중첩에 따라 지수 곡선을 그리지 않고, 45%씩 규칙적으로 증가한다. 따라서, 꼭 8중첩을 만들 필요는 없다. 오히려 8중첩을 초과하면 파혈을 낭비하는 셈이니, 상황에 따라 8중첩 이하여도 망설이지말고 터트리자.
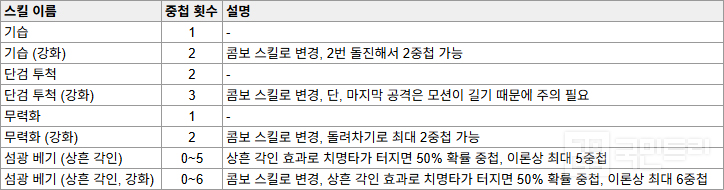
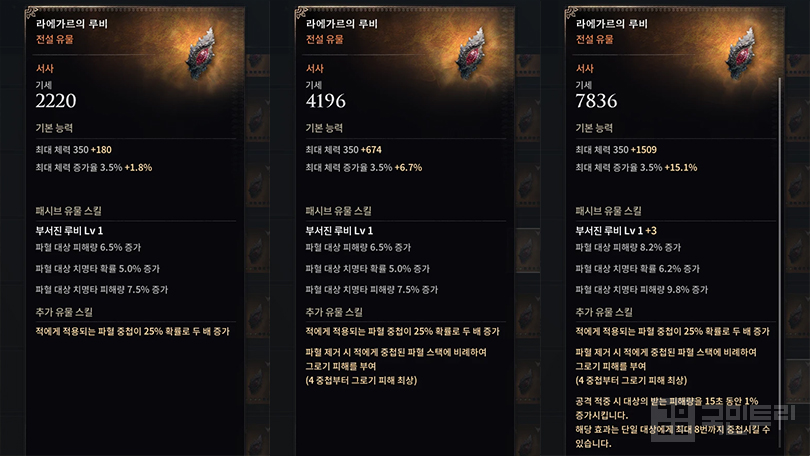
파혈 중첩은 일반적으로 콤보로 부여하고, 스킬을 사용해 8중첩까지 부족한 부분을 채운다. 예를 들어 '기습(강화)'와 '단검 투척' 스킬을 사용한다면, 콤보로 4중첩만 부여하면 된다. 각 스킬이 중첩할 수 있는 최대 중첩은 아래 표를 참고하자. 참고로 상급 전설 유물 ‘라에가르의 루비’를 승급하면 파혈을 부여할 때 확률적으로 2배로 중첩할 수 있다. 그 외 옵션도 파혈에 걸린 적에게 효과적이므로 암살자에게 추천하는 유물이다.
추천 1, 단검 콤보 1번 (파혈 2중첩)
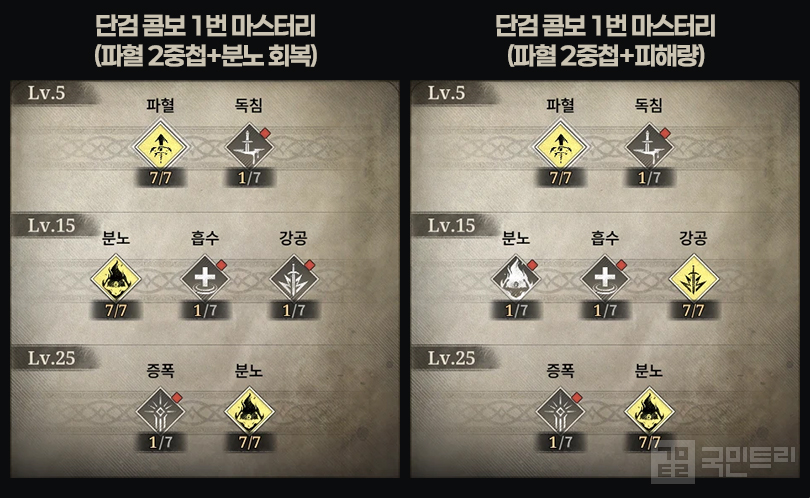
타 클래스와 마찬가지로 모션이 짧은 단검 콤보 1번이 범용적이다. 마스터리 [파혈]을 찍으면 콤보의 강타가 명중할 때마다 대상에게 파혈을 중첩하고, 파혈에 걸린 대상에게 추가 피해를 준다. 단검 콤보 1번의 강타는 2번 명중하기에 총 2중첩이 가능하다.
2번째 마스터리는 플레이 성향, 또는 다른 장비 세팅에 따라 나뉜다. 마스터리 [분노]를 찍으면 부족한 분노 회복량을 채울 수 있다. 반면, [강공]은 공격 성향이 강하다. 피해량이 높아질 뿐만 아니라, 적이 강타 콤보에 대응할 수 없게 만든다. 해당 마스터리에 투자할 경우 적이 회피나 패링을 할 수 없어 안정적인 파혈 중첩이 가능하다.
마지막 마스터리는 둘 다 보스와의 전투에서는 쓸모가 없다. 굳이 고르자면 다수와의 전투에서 스킬을 난사할 수 있게 도와주는 [분노]를 추천한다. [증폭]은 액티브 스킬 피해량을 높이지만, 적을 처치하고 다른 대상에게 파혈을 중첩하기에는 너무 짧은 시간만 유지되어 실전성이 낮다.
추천 2. 단검 콤보 2번과 3번 (파혈 4중첩)
단검 콤보 2번은 강타 입력보다 실제 타수가 많아, 적중한 대상에게 파혈을 중첩하는 마스터리 [파혈]과 궁합이 좋다. [파혈]과 [섬멸]을 모두 투자하면 콤보 한 번으로 파혈을 최대 4중첩까지 부여한다.
단검 콤보 3번은 정직하게 강타 입력만큼 파혈을 중첩한다. 콤보 2번과 마찬가지로 최대 4중첩이며, 피해량을 비롯해서 분노 회복량, 무기 게이지 획득량 등이 앞선다. 단, 콤보 2번에 비해 모션이 길어 중간에 끊일 위험이 있으니, 플레이 취향에 맞게 선택하자.
추천 3. 단검 콤보 2번과 3번 (파혈 3중첩, 그로기 피해)
앞서 설명한 단검 콤보 2번과 3번에서 마지막 마스터리만 [부식]으로 바꾼 경우다. 두 콤보 모두 파혈 중첩이 3으로 줄어들지만, 높은 그로기 피해를 줄 수 있다. 적이 그로기 상태에 빠지면 일정 시간 무방비 상태가 되어 안정적인 공격을 이어갈 수 있다. 다만, 그로기 게이지가 앞도적으로 높은 심연의 제단, 기억의 제단 등에서는 효율이 떨어지니 주의하자.
번외, 파혈 1중첩 가능한 레이피어 콤보 1번
암살자의 레이피어 콤보는 단검에 비해 전체적인 모션이 길어 조작감이 답답한 편이다. 콤보 2번과 4번은 중간에 뒤로 빠졌다가 진입하는 동작때문에 딜레이가 발생하고, 콤보 1번 역시 마지막 타격 직후 모션으로 실전 효율이 낮아진다.
하지만, ‘가드 캔슬’을 활용하면 콤보 1번의 효율을 끌어올릴 수 있다. 방법은 간단하다. 콤보 1번의 마지막 타격이 들어간 직후, 방어 키를 짧게 눌렀다 뗀다. 이러면 불필요한 후딜레이를 캔슬하고, 즉시 방어 동작을 취했다가 원래대로 돌아와 다음 공격을 매끄럽게 이어갈 수 있다. 가드 캔슬을 적용한 콤보 1번의 효율은 아래 링크를 참고하자.
※ [왕좌의 게임 꿀팁] '가드 캔슬'로 공격과 방어를 한 번에 (링크)

-
 [Weekly Forum Highlight] SKRB bustling with large-scale update
-
 [Global Talk] Game of Thrones Season 2: Fiercer Competition
-
 [Meca Ranking] Raven 2 Class Rankings and Share Change Rapidly After Battle World
-
 [Weekly Forum Highlight] Arthdal Chronicles: Three Factions accepting advance questions for its 3rd live broadcast!

- Will Miami Airport and Downtown Become 'Vice City' to Match the Release of GTA 6?
- On September 18, a Game and eSports Event to be Held at Dongdaemun DDP
- [gamescom 26] CDPR and SEGA Win Three Awards at Gamescom Awards
- [gamescom 26] A Quick Look at the 25-Year History of Xbox
- Which Teams Will Advance to the Finals? 2026 LCK CL Playoffs Begin on the 31st
- [Today's steam] Sword by day, vampire by night 'Dawn Walker' at the top of sales
- From Wolverine to Onimusha and Donwalker, Highly Anticipated September Releases Approaching Like a Tsunami
- [G-Star 26] HoYoverse to Meet Users via HoYoLAND and G-Star
- Up to 75% Off, Epic Games Store Late Summer Sale Begins
- [gamescom 26] Hands-On with the Hot Soulslike 'Waves of Oblivion'





