
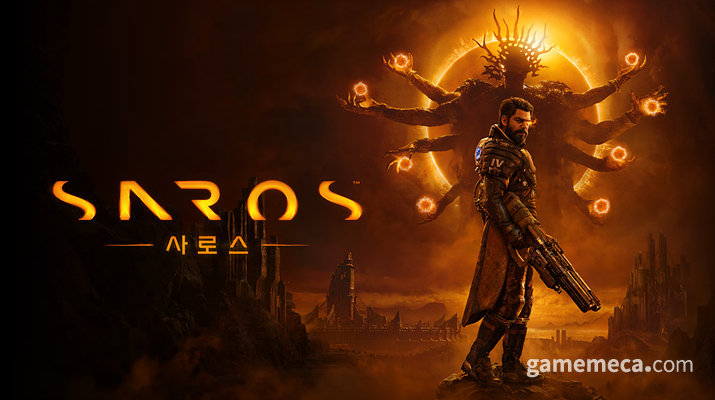
‘Saros’: Great action, satisfying combat, and controls, but the story falls short
‘사로스’ 액션·손맛·조작감 다 좋았지만 스토리가 아쉽다
2026.04.24 16:00 UTC+9
AI Summary
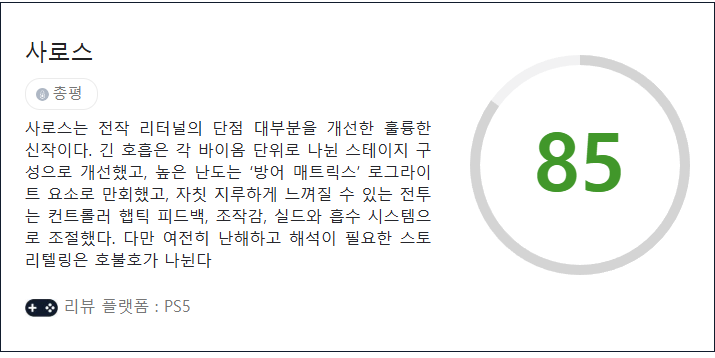
Saros refines the punishing Returnal formula into a more accessible, biome-based roguelite experience. While the haptic feedback and combat systems feel fantastic, the overly vague, confusing narrative remains a divisive hurdle. It is a technically polished successor that successfully balances high difficulty with clever player-progression mechanics.
I still remember the pain of my first time playing the PC version of 'Returnal'. It took me over five hours just to acquire a melee weapon, I died in the second room more times than I care to admit, and I never managed to clear a single boss without the 'spacesuit' item. Community guides kept insisting that 'getting an overpowered weapon makes it easy,' but frankly, being ejected from the ship felt much easier. By the end, seeing the name of the developer, Housemarque, was enough to make me grind my teeth in frustration.
When I first got my hands on 'Saros', the latest from that same studio, I must admit I was more worried than excited. However, playing it proved that Saros is significantly more user-friendly than its predecessor. The systems have been refined into something more rational, and while the bosses still pack a hell of a punch, the story—well, let’s just say it remains as bewildering as ever.
A Roguelike Shooter with an Alluring Structure
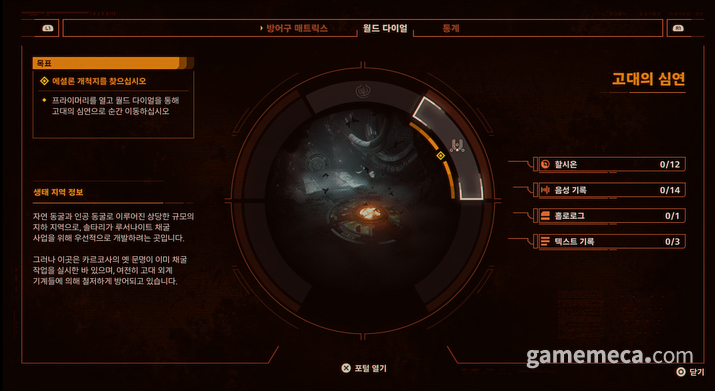
Saros acts as a true successor to the Returnal developers, inheriting and refining various elements of their previous work. One of the main gripes with Returnal was how it artificially inflated playtime through punishing difficulty and overly long, exhausting runs. Saros adopts a similar flow, but with a twist: destinations and farming areas are clearly marked, and once you take down a boss, there is no need to repeat the chore. Portals placed right in front of your base make things far more convenient. Crucially, by dividing the game into biome-based segments, the length of each run feels much tighter than in Returnal.
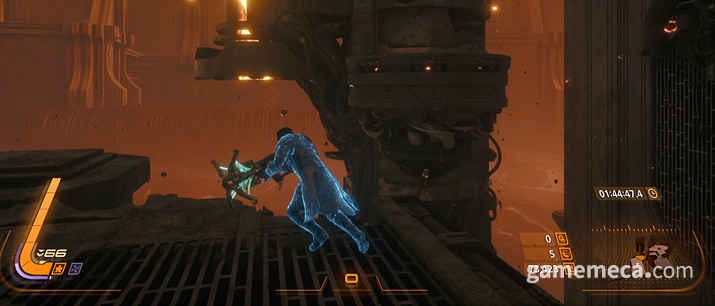
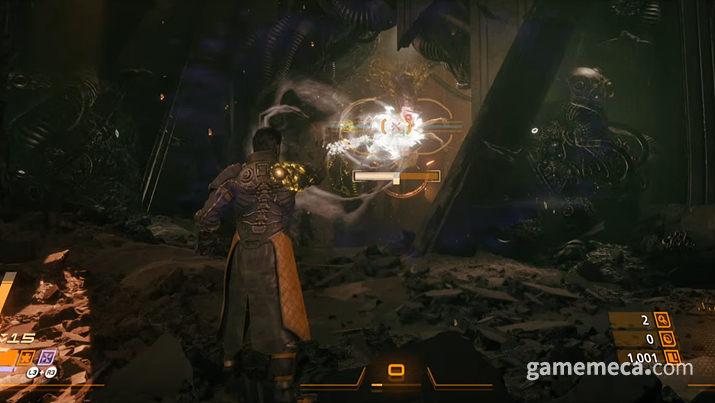
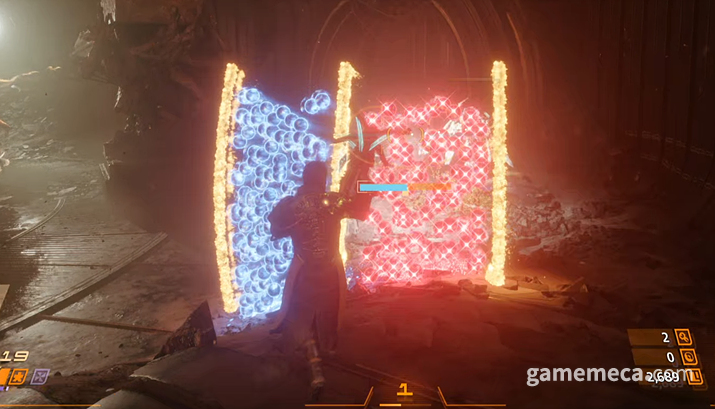
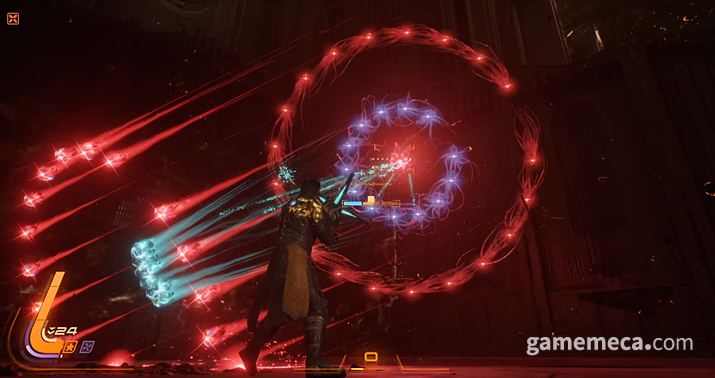
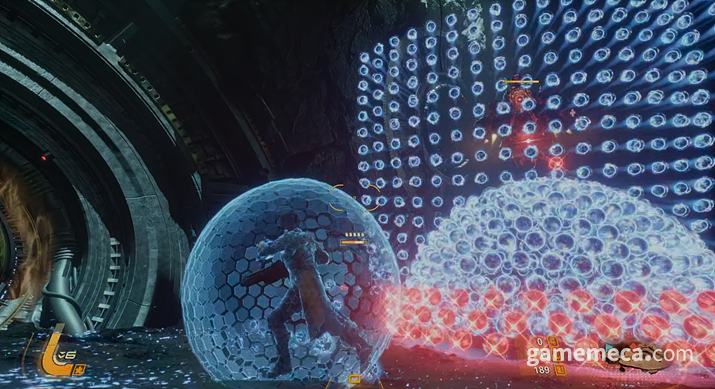
Combat has evolved, adding layers of complexity to the foundations laid by its predecessor. The protagonist, Arjun, faces off against enemies using a variety of firearms forged from the technology of the alien planet Carkosa. Notably, the 'secondary fire' from the previous game has expanded into 'power weapons,' while secondary fire now serves a more tactical, auxiliary role. On top of this, a 'shield' has been introduced, allowing you to absorb blue bullet hell patterns to replenish your power weapon resources.
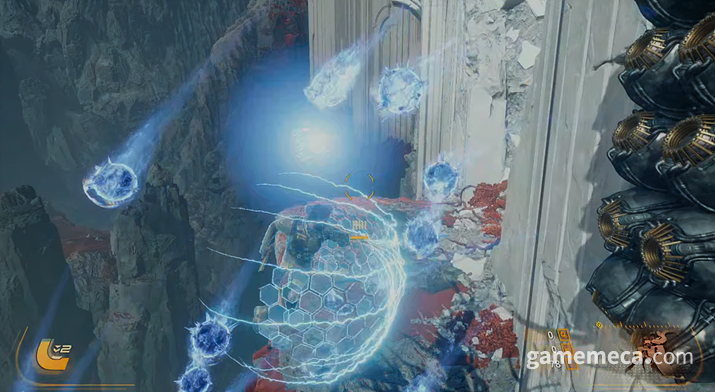
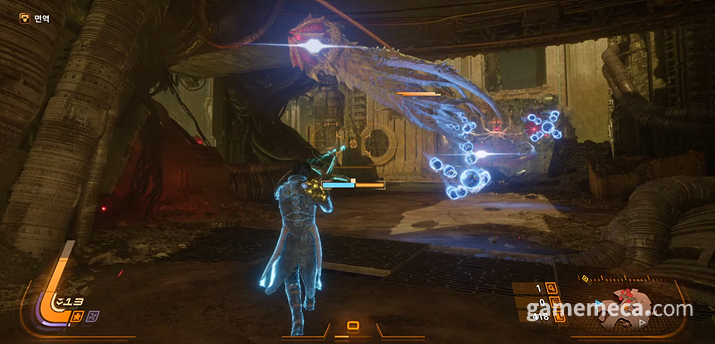
As you progress, you'll encounter red (Nova) and yellow (Corrupted) bullet patterns. Yellow projectiles can be absorbed, but doing so converts your maximum health into 'Corruption.' Red projectiles, however, cannot be dashed through or absorbed by the shield. By granting the player a shield, the developers have balanced it out by introducing these new hazards, keeping the combat intense and varied.
The implementation of haptic feedback is nothing short of exceptional. It’s easily on par with 'AstroBot'—you can feel the grass swaying and the mechanical clicks of shifting platforms. The dual-stage triggers are put to good use, requiring a light press of the L2 button for auxiliary weapons and a firm press for power weapons, which never felt cumbersome. This haptic feedback plays a massive role in cranking up the overall immersion.

Unique Firearms and Power Weapons of Saros
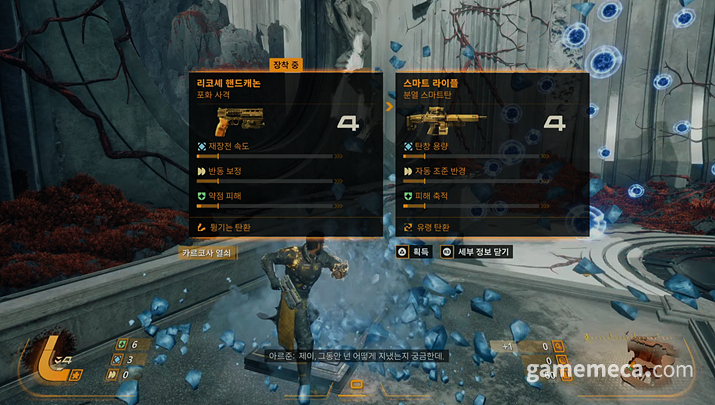
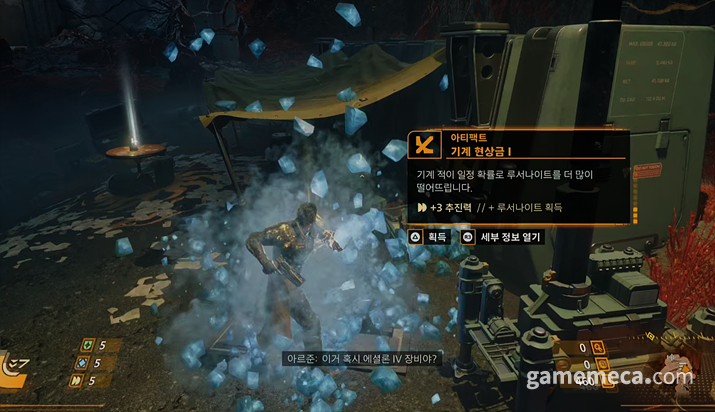
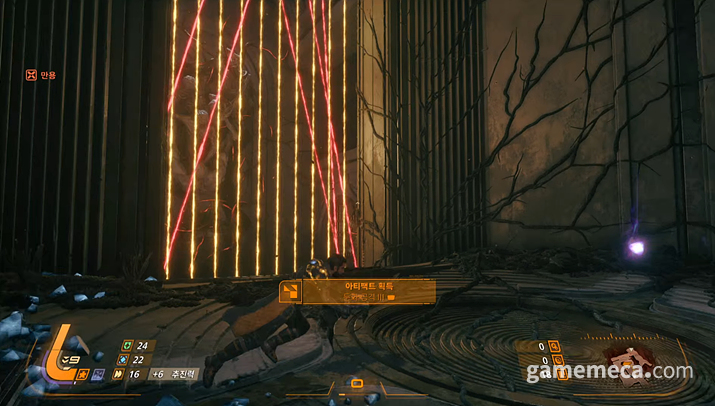
Another hallmark of Saros is its distinct collection of firearms that fit the alien landscape of Carkosa. While early gear might look like something you’d find in reality, the mid-game introduces bizarre weaponry that defies conventional design. Much like Returnal, you start with a handgun (hand cannon), but its performance is so underwhelming that you’ll be ditching it for rifles or shotguns as soon as possible. Once you unlock the basic prototype of a gun, randomized variants begin to appear. Throughout the map, you’ll find white, yellow, and red crates, which are your primary sources for weapons and artifacts.
Weapons can be broadly categorized into handguns, automatic rifles, shotguns, crossbows, and saw-blade chakrams. The crossbow arrives in the mid-game, and the saw-blade chakram appears in the very late stages. The Stalwart Shotgun and the Saw-blade Chakram were particularly standout. The Stalwart Shotgun allows you to scatter ammo into the air with secondary fire, which then homes in on enemies when you land a normal shot. The chakram can be fired, and after hitting an enemy, a light tap of L2 deals additional damage over time.
The 'weapon proficiency' system from Returnal also returns. It’s a leveling mechanic that scales based on how much 'Lucernite' you collect from defeated foes, dictating the quality of gear you find. Higher-level guns come with up to five 'traits,' and their performance ceiling is much higher. Arjun has three stats—Vitality, Command, and Momentum—and each weapon scales according to these values. Low-level weapons have a lower stat cap, whereas high-level ones reach such high limits that they can't even be fully maximized by player stats alone.
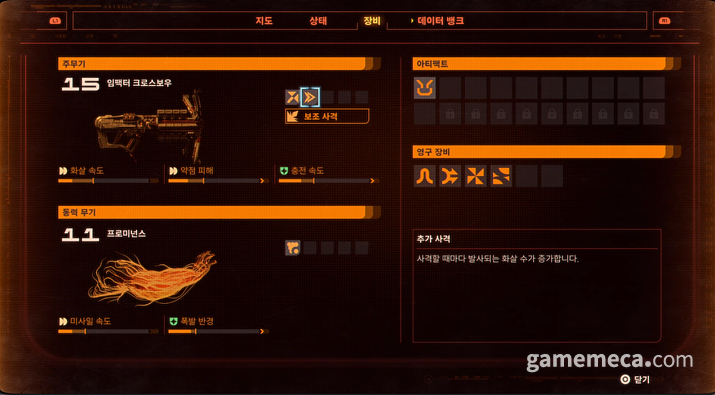
The power weapons used for special attacks are equally charming. The early-game 'Prominence' fires a powerful single shot, while the 'Nova Lance' charges up to unleash a narrow, high-energy beam. 'Illumine,' found in the late game, emits a sustained, devastating laser that locks you in place but delivers immense power. Not all are winners, though—the 'Dispiriter,' which plants a parasite that eats away at enemy health, is awkward to use and frankly lacks both style and impact.
However, the artifacts you find along the way feel a bit bland and disappointing. They function as gear that resets once your run ends, but most offer mundane effects like healing when dealing damage at low health, increased item pick-up range, or simple stat boosts. I never encountered an artifact that fundamentally changed the way the game was played. Then there are the 'Corrupted Artifacts' that trigger during an 'Eclipse'; they boost stats but come with brutal drawbacks, such as increased dash cooldowns or taking damage upon landing, making them almost universally avoided by players.
Bosses That Match the Intense Atmosphere
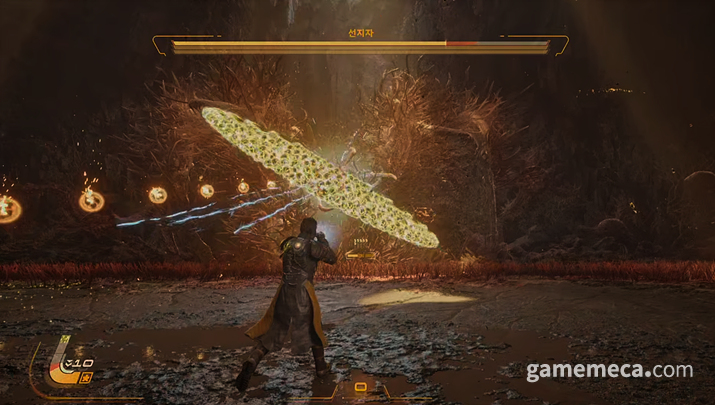
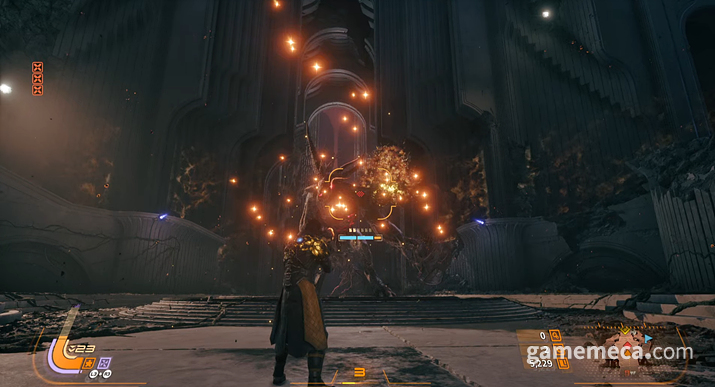
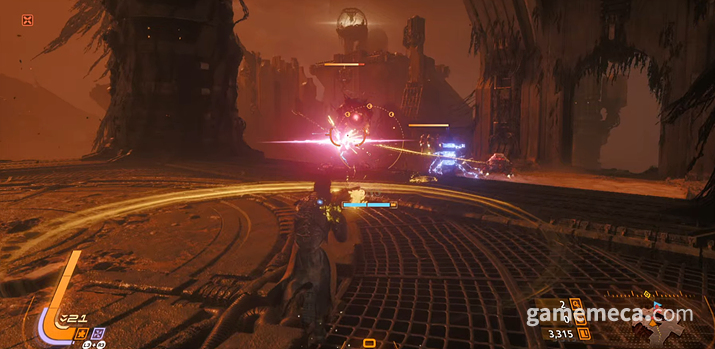
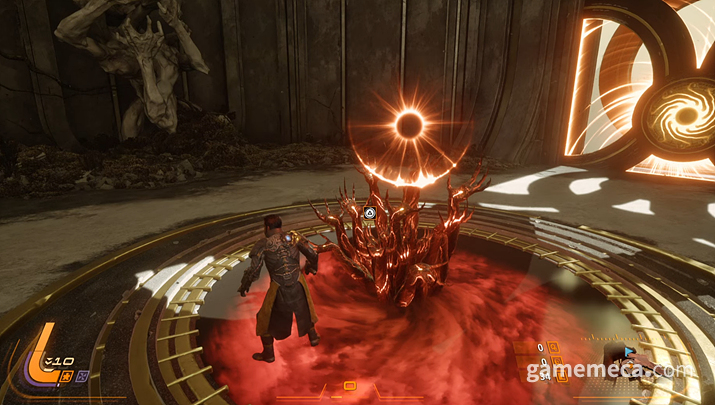
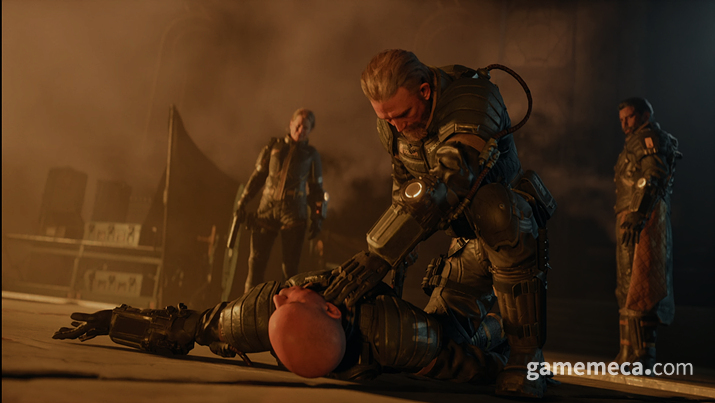
The bizarre atmosphere of the planet Carkosa and the enemies that inhabit it are genuinely impressive. Each puts pressure on Arjun in distinct ways, and the overall difficulty is quite high. In the first area, 'Shattered Ascent,' you face basic foes like the floating tentacle-machine 'Custodian' and the turret-like 'Guardian,' which remain standard threats throughout the game, occasionally reappearing as evolved 'Prime' variants.
Every enemy has its own unique projectile attack. The common Custodian fires straight-line projectiles that linger in the air. The 'Excubitor,' a tougher mid-tier enemy appearing from the second biome, resembles a machine that emits radial shockwaves and blue projectiles. The most memorable, however, was the 'Penitent'—a shrimp-like creature with inverted limbs and multiple arms that skitters around, leaving blue projectiles on the floor or spraying wall-like projectiles in your direction. These foes fit perfectly within their respective biomes.
Some areas feature special interactions tied to the 'Eclipse.' This world-altering event is usually required to progress through the latter half of a biome. While the Eclipse makes enemies stronger and the environment more hostile, it offers greater rewards. For instance, the 'Desolate Swamps' are filled with harmless puddles, but once an Eclipse begins, they turn into toxic bogs that drain your health if you linger too long.
While the biomes and enemies are colorful and relentless, the combat eventually starts to feel repetitive. Because the gameplay is so heavily reliant on your firearms, the core loop of dodging projectiles and landing your shots never truly shifts. The enemy patterns, despite their visual variety, boil down to scattering one of three types of bullet patterns. After playing long enough to reach the end, you can't shake the feeling that you're just doing the same thing over and over again.
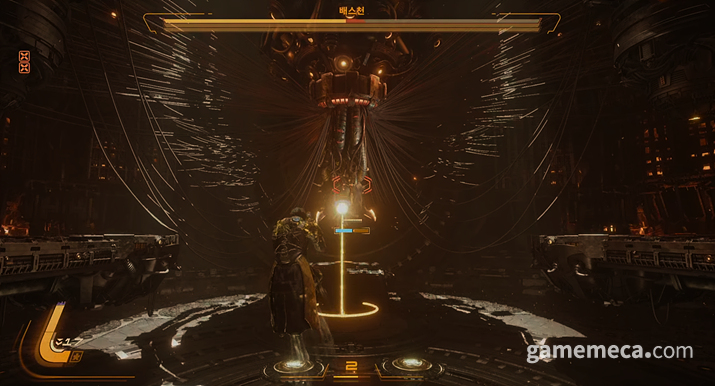
This is why the bosses, despite their unique patterns and appearances, also left a similar impression. With the exception of one mini-boss, they all have three health bars and rely on bullet-hell mechanics. The first boss and the final boss in the 'Cathedral' area have unique gimmicks, and the boss of the 'Sanctuary' is visually overwhelming. However, the final boss felt underwhelming in terms of pattern and difficulty compared to those that came before it. It’s as if the background, lore, and story were doing the heavy lifting to mask these shortcomings.
High Difficulty and the Elements That Mitigate It
Saros is undeniably a difficult game. While it might not be as punishing as my first experience with 'Returnal,' even seasoned players will find it tough to reach the first boss on their first run. Progressing through the early sections with just a handgun is a real slog, and the addition of the shield-absorption mechanic seems to have prompted the developers to increase the number of projectiles on screen. Furthermore, unlike in Returnal where picking up health packs at full HP increased your max health, here they only provide 'Lucernite.' Health recovery is limited, and death by multi-projectile collision is a common fate.
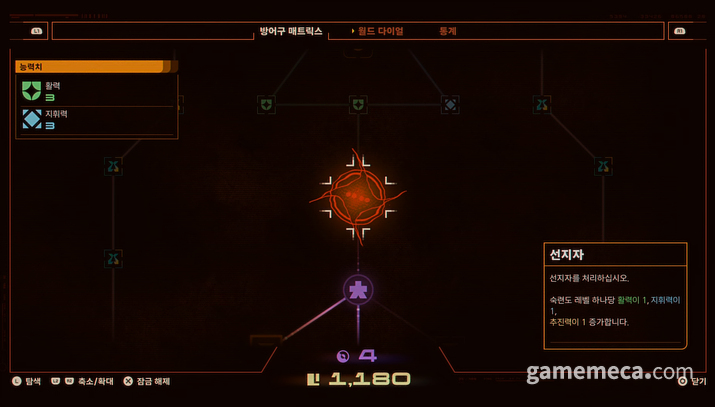
Despite this high bar for entry, if you forced me to recommend one for a newcomer, it would be Saros, hands down. This is thanks to the more explicit roguelite elements. After a failed run, you return to the 'Passage' headquarters, where the 'Armor Matrix' allows you to upgrade your base stats. The resurrection function is also made available very cheaply even before your first boss attempt, and you can boost your weapon proficiency alongside your other stats.
Unusually, Saros doesn't strip you of all your weapons upon death; it simply reverts them to their base level. If you were rocking a level 50 shotgun and had raised its base proficiency to level 3, you’ll respawn with a level 3 shotgun. Since being comfortable with your weapon is as crucial as proficiency, the ability to control your starting gear significantly lowers the early-game frustration.
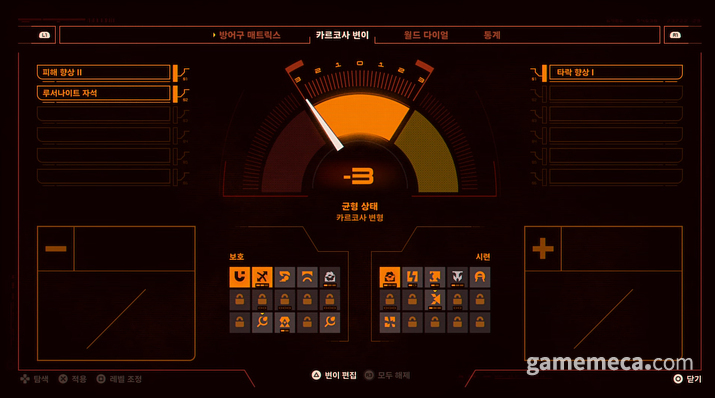
Additionally, the developers introduced 'Carkosa Mutations,' a challenge system that lets you apply positive and negative effects. There’s a limit, of course—for instance, increasing enemy damage might grant you extra points, but you can only trade up to -3 points. This allows for interesting builds where you can push your attack or defense to the limit, though you might end up with zero rewards or become extremely vulnerable to corruption damage. It’s a thoughtful way to help beginners push through.
A Narrative as Inscrutable as Returnal
The combat, action, boss design, and biomes of Saros are polished enough to warrant praise. But if there’s one point of contention—and a personal dislike—it’s the vague and unfriendly story. It’s a mirror image of Returnal: it seduces you with mystery at the start, only to descend into a chaotic mess where reality and fantasy blur. I couldn't even spoil it if I tried, because it’s just that poorly organized.
Sharp-eyed players will immediately recognize the inspiration for the setting upon hearing the name 'Carkosa.' The fact that every enemy has at least one tentacle is, frankly, a dead giveaway. The protagonist, Arjun, is an employee of 'Soltari,' a mega-corporation that sent expeditions to Carkosa with misplaced confidence. Soltari sent four teams to colonize the place; Arjun is a combat operative from Echelon 4, sent to scout and ensure safety after contact with previous ships was lost.

The early atmosphere deviates from the 'loneliness' that defined Returnal. In Returnal, isolation fueled the anxiety; in Saros, the people around you amplify it. From the jump, a squad member goes mad and attacks his allies, and the rest slowly spiral into instability. Arjun has a strange ability to resurrect upon death, which initially feels like a boon for helping his crew. However, it soon comes to light that Arjun has his own agenda—searching for a mysterious woman named Natiya—and his own hypocritical and fragile actions begin to surface.
I reached the ending of Saros, but even after ruminating on it, it doesn't make much sense. Every hypothesis I formed was contradicted by something else. I also speed-ran a section in the middle, and I’m fairly certain I missed a major story sequence as a result. A story-replay feature is badly needed for players like me. It’s quite harsh that you can't go back and re-watch these scenes. The developers previously pulled the 'story told by the player' card to hide a confusing narrative, and having it happen twice now is, frankly, a bit of a headache.
Saros is a fantastic new entry that improves on almost all the flaws of its predecessor, Returnal. It breaks down the exhausting long runs into digestible biome-based stages and softens the high difficulty with the 'Armor Matrix' roguelite elements. The combat, which could have been monotonous, is balanced by excellent controller haptics, tight controls, and the shield-absorption system. That said, the story remains a divisive mess. While finding the narrative threads has its charm, many gamers would certainly prefer a more coherent, player-friendly approach.

‘리터널(Returnal)’ PC판을 처음 했을 때 그 아픔을 아직도 기억한다. 근접무기를 얻는 데까지 5시간을 넘게 플레이했고, 두 번째 방에서 사망한 적도 있으며, 그 어떤 보스도 ‘우주복’ 아이템 없이 클리어 한 적이 없었다. 커뮤니티 공략에서는 ‘사기 무기를 얻으면 쉽다’라고 했는데, 주인공이 우주선으로 사출되는 것이 훨씬 쉬웠다. 이에 ‘하우스마크’라는 개발사 이름만 봐도 이를 뿌득 갈 지경이 됐다.
그런 하우스마크의 신작 ‘사로스(Saros)’를 처음 체험했을 때, 사실 기대보다는 걱정이 앞섰다. 하지만 실제로 플레이해본 사로스는 리터널보다 훨씬 더 유저 친화적인 게임이었다. 시스템 역시 더 합리적으로 다듬어졌고, 보스들은 여전이 강력한 인상을 남겼다. 물론 스토리는 여전히 난해했지만.
매력적인 구조의 슈팅 로그라이크
사로스는 리터널 개발진의 후속작답게 전작의 여러 요소를 계승하고 발전시켰다. 리터널의 단점 중 하나는 고난도 로그라이크 요소를 통해 분량대비 플레이타임을 늘린 점과 과하게 긴 한 판의 호흡이었다. 사로스는 리터널과 유사한 플레이 방식을 채택했다. 목적지와 파밍 부가지역이 분명하게 표시되고, 앞으로 나아가 지역의 보스를 처리하는 것이다. 리터널과 유사하게 보스를 처리하고 나면 다시 처리할 필요가 없고, 근거지 바로 앞에 포탈을 배치해 편의성을 높였다. 특히 각 구역을 바이옴 단위로 나눠 플레이어 선택에 따라 한 판의 길이가 리터널보다 줄었다.
전반적인 전투는 전작에 복잡성을 더하며 발전했다. 주인공 아르준은 배경이되는 외계 행성 카르코사의 기술로 만들어진 다양한 총기를 활용해 적과 맞선다. 특히 전작의 '보조 사격'이 '동력 무기'로 확장됐고, 보조 사격은 진정한 의미의 무기 보조의 역할로 남았다. 여기에 더해 '실드'가 더해졌다. 실드로는 푸른 탄막을 흡수할 수 있고, 이를 통해 동력 무기 자원을 충전할 수 있다.
게임을 진행하다 보면 붉은 탄막(노바)과 노란 탄막(타락)도 나오는데, 노란 탄막은 흡수가 가능한 대신 최대 체력을 '타락'으로 변질시킨다. 붉은 탄막은 대시 회피와 실드 흡수 모두 먹히지 않는다. 실드라는 보호구를 준 대신, 그만큼 다른 위험 요소를 더함으로서 다양성을 높이고 전투의 긴장감을 살렸다.
여기에 더해 햅틱 피드백이 탁월하게 구현됐다. '아스트로봇(AstroBot)'에 비견될 정도인데, 풀숲이 흔들리는 진동, 기계 장치 플랫폼의 철컥거리는 움직임이 모두 구현됐다. 여기에 보조 무기는 L2 버튼을 살짝 누르고, 동력 무기는 L2 버튼을 강하게 눌러야 하는데, 적응형 트리거가 적용되어 조작에 불편함이 없었다. 햅틱 피드백이 전반적인 몰입감을 크게 높이는 데 큰 역할을 했다.
개성 있는 사로스만의 총기와 동력무기
사로스의 또 다른 특징은 '카르코사' 라는 이계 행성에 걸맞은 독특한 총기들이다. 초반에는 현실에서도 볼 법한 총기에 외계 술이 살짝 접목된 정도였다면, 중반부부터는 현실에서는 구현하기 어려운 기묘한 무기들이 등장하기 시작한다. 게임을 처음 시작하면 리터널처럼 권총(핸드캐논)를 사용하지만, 전반적으로 성능이 저열해 이후 발견하는 라이플, 샷건 등을 주로 사용하게 된다. 총기의 기본 프로토타입을 해금하고 나면, 이후에는 무작위로 변형이 총기들이 등장한다. 맵 곳곳에는 흰색, 노란색, 붉은색 상자가 있는데, 흰색 상자와 붉은색 상자에서 주로 무기나 아티팩트를 무작위로 발견할 수 있다.
총기는 크게 분류하면 권총, 연발총, 샷건, 크로스보우, 톱날 차크람이 있다. 크로스보우는 중반부, 톱날 차크람은 최후반부에 얻을 수 있다. 독특한 무기로는 스탈워트 샷건과 톱날 차크람이 있었다. 스탈워트 샷건은 보조 사격을 하면 허공에 탄약을 흩뿌리고, 이후 일반 사격으로 적을 맞추면, 허공에 떠오른 총알이 모두 해당 적으로 날아간다. 톱날 차크람은 톱날을 날리는데, 적에게 맞춘 뒤 L2 버튼을 살짝 눌러 지속 피해를 더할 수 있다.
또한 리터널에서도 있었던 '무기 숙련도'가 계승됐다. 적을 처치하고 ‘루서나이트’를 모으면 상승하는 레벨 개념으로, 파망 장비 아이템이 숙련도에 맞춰 등장한다. 레벨이 높은 총기는 ‘특성’이 붙으며, 최대 5개까지 적용될 수 있다. 또 숙련도가 높은 총기는 전반적인 '고점'이 높아진다. 아르준은 활력, 지휘력, 추진력의 세 스태이터스를 지니는데, 각 무기는 이 수치에 따라서 강화된다. 낮은 레벨의 무기는 전반적인 최대 능력치가 낮은 반면, 고레벨의 무기는 캐릭터 스테이터스가 아무리 높아져도 최고 수치에 도달하지 못할 정도로 높은 상한을 지녔다.
특수 공격인 동력 무기 역시 매력적이었다. 초반에 얻는 '프로미넌스'는 단발로 강력한 에너지를 발사하며, '노바 랜스'는 잠시 충전해 강력하고 좁은 범위의 에너지 빔을 날린다. 가장 후반부에 얻는 '일루미네'는 지속적으로 강력한 레이저를 발사하며, 이동은 제한되지만 그만큼 강한 성능을 보였다. 물론 밸런스는 잘 맞지 않았다. 특히 적에게 맞추면 체력을 갉아먹는 기생충을 심는 '디스피리터'는 사용이 어려웠다. 외형도, 성능도 매력적이지는 않았다.
다만 게임을 진행하며 얻는 아티팩트는 평범하고 아쉬웠다. 아티팩트는 일종의 장비로, 모험이 끝나면 초기화된다. 체력이 낮을 때 적에게 피해를 주면 회복, 아이템 습득 범위 증가, 능력치 증가 등 다소 흔한 것이었고, 얻었을 때 게임을 바꿀 정도로 강력하거나 독특한 아티팩트는 만나지 못했다. '일식'이 일어나면 능력치가 강화되는 대신 디메리트가 생기는 '타락한 아티팩트'만 등장하는데, 대시 쿨타임이 늘어나거나 낙하 대미지가 생기는 등 단점이 지나치게 큰 경우도 많아 모두 기피하는 결과로 이어졌다.
강렬한 분위기와 어울리는 보스들
기괴한 카르코사 행성 분위기에 걸맞은 다양한 지역과 이곳에서 등장하는 적들 역시 인상적이었다. 서로 다른 방식으로 아르준을 압박했으며, 전반적인 난도 역시 상당히 높았다. 처음에 등장하는 지역인 '산산조각 난 오르막'에서는 가장 기초적인 유형의 적을이 등장한다. 부유하는 촉수 기계장치 '커스터디언'과 마치 포탑처럼 바닥에서 튀어나오는 '가디언'은 엔딩까지 찾아볼 수 있는 평범한 적들이며, 이후에는 '프라임 커스터디언'의 한 단계 진화한 형태로 등장한다.
각 적들은 모두 서로 다른 방식의 투사체 공격을 한다. 가장 흔한 '커스터디언'은 일직선으로 허공에 남는 전진형 투사체를 발사한다. 비교적 강한 상위 몬스터인 '익스큐비터'는 두 번째 바이옴부터 등장하는데, 기계 장치처럼 생겼으며 주변에 원형 파동과 푸른 투사체를 발사한다. 특히 인상적이었던 적은 '참회자'로, 몸이 역방향으로 꺾였고 팔이 여럿 달린 새우처럼 생겼으며, 바닥에 푸른 투사체를 남기며 빠르게 움직이거나, 벽 형태의 투사체를 뿌리듯 방사했다. 이러한 적들은 각 바이옴에 걸맞게 등장해 플레이어를 공격한다.
일부 지역은 '일식'과도 맞물려 특수 상호작용이 일어나기도 한다. 일식은 일종의 세계 변화로, 한 바이옴의 후반부는 일반적으로 일식을 활성화해야만 진입할 수 있다. 일식이 시작되면 지역의 적이 더 강해지고 환경이 더 위협적으로 변하지만, 그만큼 더 큰 보상을 지급한다. 예를 들어 '황폐한 늪지' 곳곳에는 무해한 늪이 다수 등장한다. 일식이 시작되면, 이는 유독성 늪으로 변해 오래 밟으면 체력 피해를 입히는 함정이 된다.
비록 바이옴과 적들은 다채로웠고 상당한 난도로 숨 쉴틈 없었지만, 궁극적으로는 전투가 반복적인 느낌도 들었다. 전투 자체가 총기 의존도가 크기 때문에 적의 투사체를 회피하고 내 공격을 맞춘다는 전투 근본 원리는 크게 변하지 않는다. 적들의 패턴 역시 그 형태는 매우 다양하지만, 근본적으로는 세 색의 탄막을 흩뿌리는 방식이다. 때문에 엔딩에 도달할 정도로 오랜 시간 플레이하면, 결국 비슷한 일을 반복한다는 인상을 주기 쉽다.
이러한 이유로 보스들 역시 서로 다른 패턴과 외형을 지녔음에도 비슷하다는 인상을 받았다. 중간 보스 역할을 하는 한 보스를 제외하면 모두 3줄의 체력을 지녔고, 탄막을 흩뿌리는 타입이기 때문이다. 물론 첫 보스와 최후반부에 만나는 '성당' 지역의 보스는 독특한 기믹을 보유했고, '안식처'의 보스는 그 외형만으로도 압도적이었다. 다만 최종 보스는 지역의 특수성 때문에 외형은 인상적이었지만, 패턴이나 난도는 오히려 이전 보스들보다 못하다는 인상을 받았다. 배경, 설정, 스토리가 이런 단점을 가려준 느낌이었다.
높은 난도와 이를 중화하는 여러 요소들
사로스의 전반적인 난도는 상당히 높다. 물론 처음 마주했던 ‘리터널’만큼은 아니지만, 적응한 유저라도 단번에 첫 보스에 도달하기는 어려울 정도다. 특히 연발총을 얻는 짧은 구간까지 권총으로 진행하는 것은 상당히 힘들고, 탄막을 실드로 흡수하는 기능이 더해지며 전반적인 투사체 수도 크게 늘었다. 여기에 더해 리터널에서는 체력이 모두 차 있을 때 회복제를 흡수하면 총 체력이 늘어났으나, 사로스에서는 ‘루서나이트’만 지급한다. 체력 회복 수단은 여전히 제한적이었고, 투사체 여럿에 동시에 맞아 사망하는 경우도 잦았다.
이런 고난도에도 불구하고 두 게임 중 초심자에게 추천할 수 있는 게임을 고르라면 단연 사로스다. 가시적이고 명시적으로 쌓이는 로그라이트 요소가 더해진 덕이다. 첫 트라이를 실패하고 ‘패시지’라는 본부에 돌아오면, ‘방어구 매트릭스’ 기능이 열려 캐릭터 기본 스테이테스를 강화할 수 있다. 특히 사망 후 부활 기능이 첫 보스 트라이 전부터 매우 저렴하게 개방되며, 능력치 외에도 ‘총기 숙련도’를 높일 수 있다.
사로스는 특이하게도 사망시 총기를 완전히 잃어버리는 것이 아니라 들고 있던 총기의 레벨을 기초 레벨로 낮추는 것에 그친다. 이전에 탐험을 진행하던 무기가 50레벨 샷건이었고 기초 숙련도를 3레벨까지 올렸다면, 사망해도 3레벨 샷건으로 다시 시작한다. 무기 숙련도만큼이나 플레이어 손에 익숙한 총을 드는 것이 중요한만큼, 초기 무기를 원하는 것으로 조절할 수 있다는 점은 초기 난도를 상당히 낮춰준다.
이외에도 ‘카르코사 변이’라는 일종의 챌린지 요소를 도입했다. 플레이어에게 긍정적인 효과와 부정적인 효과를 지정할 수 있되, 한계가 있다. 예를 들어 적에게 주는 피해는 레벨당 -2점이며, 플레이어가 받는 피해를 높이는 변이는 레벨 당 +2점이다. 최대 -3점까지 변이를 지정할 수 있기 때문에, 적절하게 조합하면 플레이어 방어력과 공격력을 극한으로 끌어올리는 대신 보상을 하나도 얻지 못하거나, 타락 피해에 극히 취약해지는 등의 빌드를 짤 수 있다. 이를 통해 초심자라도 게임을 돌파할 수는 있게끔 배려했다.
리터널만큼이나 난해하고 불가해한 이야기
리터널의 전반적인 전투, 액션, 보스전, 바이옴 등 완정도는 호평을 받기에 부족하지 않다. 게임에서 호불호 포인트, 그리고 개인적으로 불호인 요소를 꼽자면 모호하면서도 친절하지 않은 스토리다. 리터널과 판박이인데, 처음에는 신비함으로 플레이어를 유혹하지만 나중에는 현실과 비현실이 기이하게 뒤섞이며 혼란을 가중한다. 스포일러를 하고 싶어도 하기 어려울 정도로 정리가 잘 되지 않았다.
우선 눈치가 빠른 사람이라면 ‘카르코사’라는 배경을 들었을 때 게임의 기반이 되는 세계관이 어떤 것인지 곧장 알 것이다. 특히 모든 적들이 최소 하나의 촉수를 달고 다니기에, 사실상 대놓고 말해주는 셈이다. 주인공 아르준은 카르코사에 알 수 없는 자신감으로 탐험대를 파견한 대기업 ‘솔타리’의 직원이다. 솔타리는 카르코사에 총 네 차례의 탐사대원을 보내 이곳을 식민지화하려고 했다. 주인공은 에셜론 4의 전투 요원으로, 이전 함선들과 연락이 두절되자 정찰과 안전을 위해 파견됐다.
때문에 초반부 분위기는 ‘고독’이 핵심이 됐던 리터널과 다른 양상으로 흘러간다. 리터널에서 고독이 불안을 줬다면, 사로스에서는 오히려 함께하는 이들이 불안감을 가속한다. 시작부터 다른 전투 요원이 미쳐버려 동료를 공격하는가 하면, 다른 동료들도 조금씩 이상해진다. 아르준은 기이하게도 사망해도 다시 살아나는 능력을 지녔는데, 처음에는 이를 활용해 동료들을 돕는 느낌이었다. 하지만 이후 아르준 역시 나티야라는 미지의 여성을 찾는다는 개인적인 목표를 추구한다는 점이 알려지고, 어딘가 위태롭고 위선적인 행보 역시 조금씩 베일을 벗는다.
그렇게 결국 사로스가 전하는 엔딩에 도달했다. 하지만 곱씹어봐도 이해는 가지 않았다. 어떤 이야기라고 가설을 세우면 다른 곳에서 모순이 생겼다. 또 중간에 스테이지를 빠르게 돌파한 구간이 있었는데, 때문에 주요 스토리 시퀀스를 놓친 것 같다. 이런 사람들을 위해서라도 스토리를 다시 보는 기능을 넣어주면 좋겠다. 되돌릴 수도 없고, 다시 감상할 방법도 없어서 가혹했다. 또 제작진은 전작에서도 ‘플레이어가 만들어가는 이야기’라는 명목으로 다소 혼란스러운 내러티브를 소개한 바 있다. 두 번이나 당했고, 여전히 남은 찜찜함이 심신을 괴롭혔다.
사로스는 전작 리터널의 단점 대부분을 개선한 훌륭한 신작이다. 긴 호흡은 각 바이옴 단위로 나뉜 스테이지 구성으로 개선했고, 높은 난도는 ‘방어 매트릭스’ 로그라이트 요소로 만회했다. 자칫 지루하게 느껴질 수 있는 전투는 컨트롤러 햅틱 피드백, 조작감, 실드와 흡수 시스템으로 적절하게 조절해 밸런스를 잡았다. 다만 여전히 스토리는 호불호가 나뉘었다. 이야기를 찾아가는 맛은 있지만, 더 친절한 방식을 선호하는 게이머들도 많을 것이다.
This news was translated by AI.

I will always love games. skyanze@gamemeca.com
READ MORE
-
 The Uncomfortable Interview After Rejection: 'Thank You For Your Application'
-
 A Classic Revived with Its Gritty Atmosphere, Gothic 1 Remake
-
 Subculture with a Full Dose of Fantasy Sentiment, Limit Zero Breakers
-
 Ace Combat 8 Returns with a Captivating Narrative: An Experience Report
-
 Party Extraction with a Spoonful of Lethal: 'Tomb Busters'
-
 A Bitter Aftertaste of Mannerism in Deep Narrative Two Shots: 'Coffee Talk Tokyo'
-
 Sol: enchant Aims for Stress-Free MMORPG Experience
-
 Azur Promilia Adds Tag Action to Subculture Palworld

MOST POPULAR NEWS
- "Requested game blocking to credit card companies": Even threats have emerged
- The original work wasn't happy, was it? A Chainsaw Man game is coming
- [Today's steam] Largest discount in history, Cyberpunk 2077 reaches top sales
- [Monster Hunter] Wilds, Dynasty Warriors: Origins, and more, Steam Summer Festival begins on the 26th
- Revamped Lobby, Nexon Shares Direction for KartRider Revival Project
- [LOL Meme] The Biggest Rival Threatening Korea's MSI Victory, China's BLG
- [Photo] Crowded with fans, visiting the first Warhammer store in Korea
- 90s Magical Girl Nostalgia: Astraea Oratio Character Reveal
- US Automotive Company Decides on Temporary Shutdown for GTA 6 Launch
- Valve reveals Steam Machine pricing, starting at 1.61 million KRW
MEDIA PARTNERSHIPS


GAMEMECA SNS